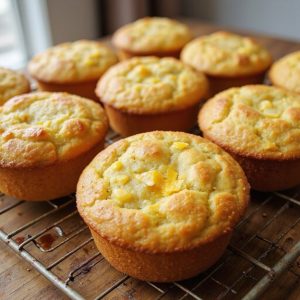
Imagine the golden hue of freshly baked mini cornbread muffins, their tops slightly cracked and inviting.
As you break one open, a soft crumb releases an aroma of sweet corn mingled with a hint of cheddar, creating a sensory experience that wraps you in warmth.
These muffins are more than just a delightful treat; they’re a comforting staple in our home, perfect for busy weeknights when time is short, or alongside hearty Sunday suppers shared with loved ones.
I remember a time when an unexpected guest arrived just before dinner. These mini cornbread muffins came to the rescue, effortlessly rounding out the meal and turning an ordinary evening into a special gathering.
Easy to prepare and always a crowd-pleaser, they’ve become a trusted standby in my kitchen. Ready? Let’s cook these little bites of joy and bring a touch of comfort to your table!
Why You’ll Love It
- Delivers bold flavor with a mix of cornmeal and cheddar cheese.
- Freezes beautifully for convenient make-ahead snacks or appetizers.
- Uses pantry staples like flour, sugar, and baking powder.
- Prepares quickly with a total of just 25 minutes of active time.
- Offers versatility with optional ingredients like corn kernels and honey drizzle.
Ingredients
- 1 cup all-purpose flour — choose a reputable brand for best texture
- 1 cup cornmeal — opt for stone-ground for a rustic feel
- 1/4 cup granulated sugar — adjust for sweetness preference
- 1 tablespoon baking powder — guarantee freshness for proper rise
- 1/2 teaspoon salt — use sea salt for more flavor depth
- 1 cup buttermilk — homemade or store-bought works equally well
- 1/3 cup vegetable oil — canola oil is a good alternative
- 2 large eggs — room temperature for better mixing
- 1/2 cup corn kernels (optional, canned or fresh) — sauté fresh for extra taste
- 1/4 cup cheddar cheese, shredded (optional) — sharp cheddar adds a nice tang
- 1 tablespoon honey (optional, for drizzling) — local honey enhances flavor
Step-by-Step Method
Preheat the Oven
Set your oven to 400°F (200°C) to allow it to reach the correct temperature for baking. This guarantees that your muffins cook evenly and develop a golden-brown crust.
Grease the Muffin Tin
Apply non-stick spray or butter to the muffin tin. This helps prevent the muffins from sticking, making them easy to remove once baked.
Combine Dry Ingredients
In a large mixing bowl, mix the all-purpose flour, cornmeal, sugar, baking powder, and salt.
Stir well to guarantee even distribution of the baking powder, which is essential for the muffins’ rise.
Whisk Wet Ingredients
In a medium mixing bowl, whisk together the buttermilk, vegetable oil, and eggs.
Whisk until the mixture is smooth and fully combined, guaranteeing a consistent texture in your muffins.
Mix Wet and Dry Ingredients
Pour the wet ingredients into the bowl with the dry ingredients.
Stir gently until just combined. Avoid overmixing to keep the muffins light and fluffy.
Fold in Optional Ingredients
Gently fold in corn kernels and shredded cheddar cheese, if using.
This step adds texture and flavor, giving your muffins a delicious twist.
Fill the Muffin Cups
Spoon the batter into the prepared muffin tin, filling each cup about 3/4 full.
This allows space for the muffins to rise without overflowing.
Bake the Muffins
Place the muffin tin in the preheated oven and bake for 12-15 minutes.
Check for doneness by inserting a toothpick into the center; it should come out clean.
Let the Muffins Rest
Remove the muffins from the oven and let them rest in the tin for 5 minutes.
This resting period allows the muffins to set and cool slightly for easy handling.
Transfer and Serve
Move the muffins to a wire rack to cool completely.
Drizzle with honey if desired for an extra touch of sweetness before serving.
Enjoy your flavorful mini cornbread muffins!
Ingredient Swaps
- For a gluten-free version, substitute the all-purpose flour with a gluten-free flour blend.
- Replace buttermilk with a mixture of 1 cup of almond milk and 1 tablespoon of lemon juice for a dairy-free option.
- Use maple syrup or agave nectar instead of honey for a vegan-friendly drizzle.
You Must Know
1. Preheat the Oven: Verify your oven is preheated to 400°F (200°C) for ideal baking conditions and to achieve perfectly golden brown muffins.
2. Do Not Overmix: Stir the wet and dry ingredients until just combined to prevent overmixing, which can result in dense muffins instead of light and fluffy ones.
3. Use Fresh Ingredients: For the best flavor, consider using fresh corn kernels and freshly shredded cheddar cheese.
Sauté the corn lightly in a pan to enhance its sweetness and flavor before adding to the batter.
4. Measure Accurately: Use measuring cups and spoons to confirm precise measurements of ingredients like flour, cornmeal, and sugar, which are essential for the texture and taste of the muffins.
5. Store Properly: Keep the muffins in an airtight container at room temperature for up to 3 days, or freeze them for longer storage.
Reheat frozen muffins in the oven for a few minutes before serving to enjoy them warm.
Serving Tips
- Serve warm with a drizzle of honey or a pat of butter.
- Pair with chili or a hearty soup for a comforting meal.
- Add a dollop of sour cream and a sprinkle of chives for a savory touch.
- Serve alongside a BBQ spread for a classic American side dish.
- Arrange on a platter with assorted spreads like jalapeño jam or herb butter.
Storage & Make-Ahead
Mini cornbread muffins can be stored in an airtight container in the fridge for up to 3 days.
They also freeze well. Place them in a freezer-safe bag or container for up to 2 months.
Thaw at room temperature or gently reheat in the oven before serving.
Reheating
To gently reheat mini cornbread muffins, use a microwave for 10-15 seconds.
An oven set at 350°F can be used for 5-7 minutes.
Alternatively, warm them on a stovetop in a covered pan.
Cultural Significance of Cornbread
While enjoying the warmth and comfort of reheated mini cornbread muffins, let’s explore the rich cultural tapestry that cornbread weaves through American history.
Cornbread is more than a simple side dish; it’s a culinary emblem of resilience and resourcefulness. Rooted in Native American traditions, this humble bread was embraced by settlers who adapted it with their own ingredients.
Across the South, cornbread became a staple, its golden hue a beacon of sustenance and community. I find it fascinating how cornbread connects diverse cultures, each adding its unique twist.
Whether sweetened or savory, plain or with a hint of cheese, each bite tells a story. Today, these mini muffins carry forward that legacy, inviting us to savor a piece of history.
Final Thoughts
Give these Mini Cornbread Muffins a try for your next gathering—they’re delicious as they’re or can be customized with your favorite mix-ins.
Feel free to experiment with adding ingredients like jalapeños or chopped herbs to make them uniquely yours!
Frequently Asked Questions
Can I Use a Different Type of Oil Instead of Vegetable Oil?
Absolutely, you can swap vegetable oil for olive or canola oil. I’ve tried both, and they work wonderfully, adding a subtle flavor twist. It’s an easy way to personalize the recipe to your taste. Enjoy experimenting!
How Can I Make These Muffins Gluten-Free?
To make these muffins gluten-free, I’ll swap the all-purpose flour with a gluten-free flour blend. I’ll guarantee it’s labeled for baking to maintain the right texture. It’s an easy tweak that keeps the muffins delicious!
What Can I Substitute for Buttermilk in the Recipe?
For a buttermilk substitute, I usually mix 1 cup of milk with 1 tablespoon of lemon juice or white vinegar, letting it sit for 5 minutes. This tangy swap works beautifully, adding a delightful richness.
Are These Muffins Suitable for Freezing?
Yes, you can freeze them! I recommend storing the muffins in an airtight container or freezer bag. When you’re ready to enjoy them again, just thaw at room temperature or pop them in the oven briefly.
How Can I Make the Muffins Spicier?
To spice up the muffins, I’d suggest adding chopped jalapeños or a pinch of cayenne pepper. You’ll get a delightful kick with each bite. Adjust the amount to your taste for the perfect spicy treat!
Mini Cornbread Muffins
Equipment
- 1 muffin tin (24-cup)
- 1 large mixing bowl
- 1 medium mixing bowl
- 1 Whisk
- 1 Spatula
- 1 measuring cup
- 1 set of measuring spoons
Ingredients
- 1 cup all-purpose flour
- 1 cup cornmeal
- 1/4 cup granulated sugar
- 1 tablespoon baking powder
- 1/2 teaspoon salt
- 1 cup buttermilk
- 1/3 cup vegetable oil
- 2 large eggs
- 1/2 cup corn kernels optional, canned or fresh
- 1/4 cup cheddar cheese shredded, optional
- 1 tablespoon honey optional, for drizzling
Instructions
- Preheat the oven to 400°F (200°C).
- Grease the muffin tin with a non-stick spray or butter.
- In a large mixing bowl, combine the flour, cornmeal, sugar, baking powder, and salt.
- In a medium mixing bowl, whisk together the buttermilk, vegetable oil, and eggs until well combined.
- Pour the wet ingredients into the dry ingredients and stir until just combined.
- Fold in the corn kernels and cheddar cheese, if using.
- Fill each muffin cup about 3/4 full with the batter.
- Bake in the preheated oven for 12-15 minutes or until golden brown and a toothpick inserted into the center comes out clean.
- Remove from the oven and let the muffins rest in the tin for 5 minutes before transferring them to a wire rack.
- Drizzle with honey, if desired, before serving.
Notes

Cynthia Weatherford is a seasoned chef and culinary enthusiast who serves as the Recipe creator of Somonday. With decades of experience in the kitchen and a passion for exploring diverse cuisines, Cynthia brings a blend of creativity and technique to every dish. Known for transforming simple ingredients into show-stopping meals, Cynthia believes that cooking is an art form anyone can master. Dedicated to inspiring home cooks, Cynthia shares approachable recipes, pro tips, and culinary wisdom to make every meal memorable.