
When crafting Mini Lemon Drop Cakes, you’ll find the process straightforward yet rewarding.
You’ll achieve a harmonious blend of tangy lemon zest and juice with a moist, sweet cake texture.
This recipe requires precision in measuring and mixing to guarantee consistent results.
With the right kitchen tools and ingredients, you can prepare these delightful treats with ease.
Curious about serving suggestions or storage tips? There’s more to explore that will enhance your baking experience.
Kitchen Tools Required
- 1 Mixing bowl
- 1 Electric mixer
- 1 Mini muffin pan
- 1 Zester
- 1 Juicer
- 1 Whisk
- 1 Measuring cups set
- 1 Measuring spoons set
- 1 Oven
Ingredients
- 1 cup All-purpose flour
- 1/2 teaspoon Baking powder
- 1/4 teaspoon Salt
- 1/2 cup Granulated sugar
- 1/4 cup Unsalted butter, softened
- 1 large Egg
- 1 tablespoon Lemon zest
- 2 tablespoons Lemon juice
- 1/4 cup Milk
- 1/2 cup Powdered sugar
- 1 tablespoon Lemon juice
Cook & Prep Time
To efficiently manage your time while preparing and cooking Mini Lemon Drop Cakes, follow this timeline:
- Prep Work (15 minutes)
- 0:00-0:02 minutes: Gather all ingredients and equipment.
- 0:02-0:05 minutes: Preheat the oven to 350°F (175°C).
- 0:05-0:07 minutes: Measure out all dry ingredients (flour, baking powder, salt) and whisk together in a mixing bowl.
- 0:07-0:10 minutes: Cream together granulated sugar and softened butter in a separate bowl until light and fluffy.
- 0:10-0:12 minutes: Beat in the egg, lemon zest, and lemon juice into the sugar and butter mixture.
- 0:12-0:14 minutes: Alternate adding dry ingredients and milk to the wet mixture, mixing until just combined.
- 0:14-0:15 minutes: Grease the mini muffin pan and spoon the batter into the cups, filling each 3/4 full.
- Cooking (20 minutes)
- 0:15-0:35 minutes: Bake in the preheated oven for 18-20 minutes, or until a toothpick inserted comes out clean.
- Resting and Glazing (10 minutes)
- 0:35-0:40 minutes: Allow the cakes to cool in the pan for 5 minutes.
- 0:40-0:42 minutes: Transfer the cakes to a wire rack to cool completely.
- 0:42-0:45 minutes: Whisk together powdered sugar and lemon juice to make the glaze.
- 0:45-0:47 minutes: Drizzle the glaze over the cooled mini cakes.
- 0:47-0:50 minutes: Allow the glaze to set for an additional 5 minutes before serving.
Total Time: 50 minutes
Recipe
Mini Lemon Drop Cakes are a delightful dessert option that combines the tangy flavor of lemon with the sweetness of a moist cake.
These bite-sized treats are perfect for any occasion, offering a revitalizing twist to traditional cake recipes.
The combination of lemon zest and lemon juice not only infuses the cakes with a vibrant citrus flavor but also enhances their overall freshness.
With a light glaze drizzled on top, these mini cakes are sure to impress your family and friends.
Preparing these Mini Lemon Drop Cakes is a breeze, requiring only a few simple ingredients and about an hour of your time.
Whether you’re an experienced baker or just starting, this recipe is straightforward and easy to follow.
The key to achieving the perfect texture lies in confirming the ingredients are at room temperature and mixing them until just combined.
Serve these cakes as a dessert after dinner or enjoy them as a snack with a cup of tea.
To make these Mini Lemon Drop Cakes, start by preheating your oven to 350°F (175°C).
In a mixing bowl, whisk together the flour, baking powder, and salt. In a separate bowl, cream the granulated sugar and butter until light and fluffy.
Beat in the egg, lemon zest, and lemon juice. Gradually add the dry ingredients to the wet ingredients, alternating with the milk, mixing until just combined.
Spoon the batter into a greased mini muffin pan, filling each cup 3/4 full.
Bake for 18-20 minutes or until a toothpick inserted comes out clean.
Cool the cakes in the pan for 5 minutes, then transfer to a wire rack.
For the glaze, whisk powdered sugar and lemon juice until smooth and drizzle over cooled cakes. Allow the glaze to set before serving.
For the best results, confirm your ingredients are at room temperature before you begin.
When zesting the lemon, avoid the bitter white pith by focusing only on the yellow part of the peel.
If your glaze turns out too thick, add a little more lemon juice to achieve your desired consistency.
These mini cakes are versatile and can be stored in an airtight container at room temperature for a few days, making them a convenient and delicious treat to have on hand.
Enjoy the burst of citrus flavor and the delightful texture of these Mini Lemon Drop Cakes!
Cooking Steps
You’re ready to create your mini lemon drop cakes, so start by preheating your oven to 350°F.
In a mixing bowl, thoroughly combine your dry ingredients to guarantee an even distribution of the baking powder and salt.
Next, cream the sugar and butter together until fluffy, then incorporate the lemon zest and juice completely before alternating between adding the dry mixture and milk to achieve a smooth batter.
Step 1. Heat Oven to 350°F
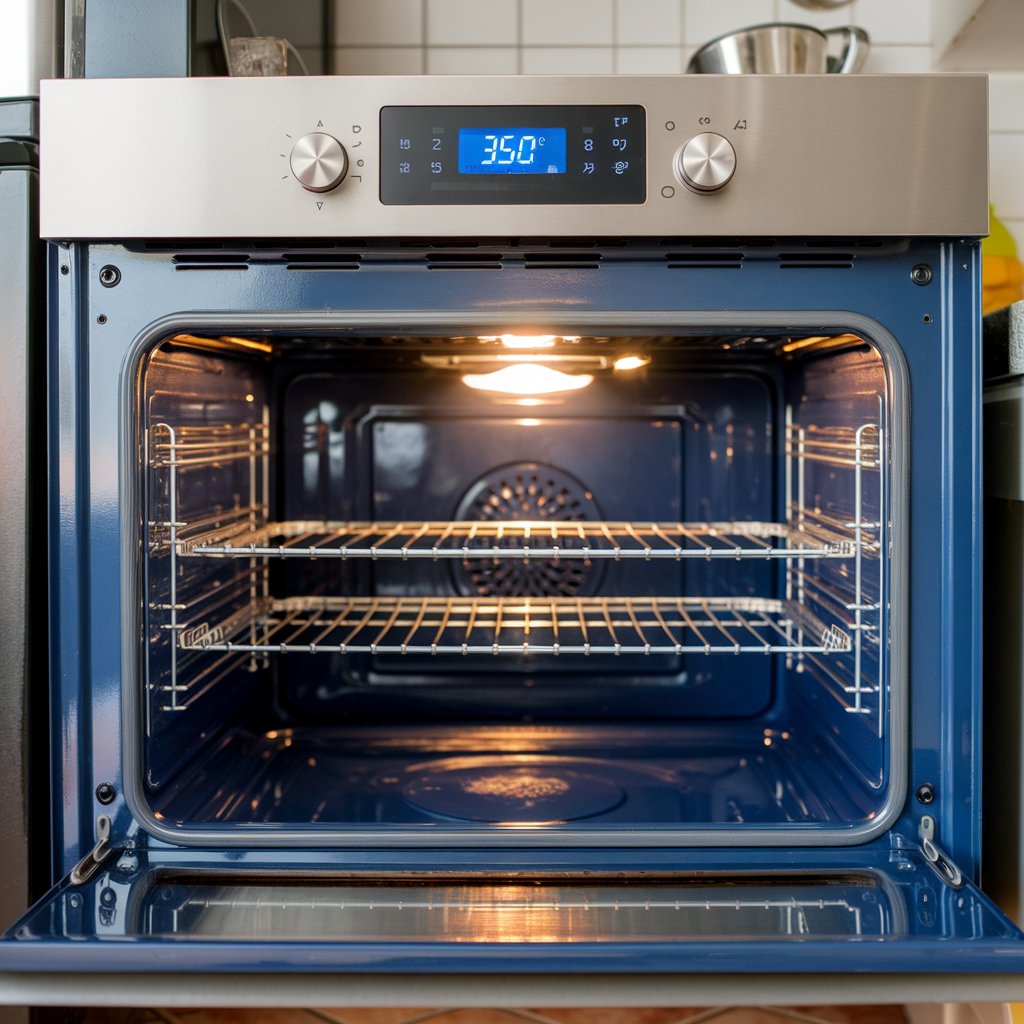
Begin by setting your oven to a precise 350°F (175°C) to secure ideal baking conditions for the mini lemon drop cakes.
Confirm proper preheating by allowing your oven to reach the designated temperature before inserting the batter.
This step is vital for uniform baking and achieving the desired texture.
Verify your oven’s accuracy with an oven thermometer, if available, as variations can affect the outcome.
Adjust the rack to the center position, promoting even heat distribution.
This placement guarantees that the cakes are neither too close to the heating element nor too far, preventing over-browning or undercooking.
While the oven preheats, refrain from opening the door unnecessarily.
This helps maintain temperature consistency, a key factor in baking success.
Once preheated, you’re ready to proceed with the next steps.
Step 2. Combine Dry Ingredients Thoroughly
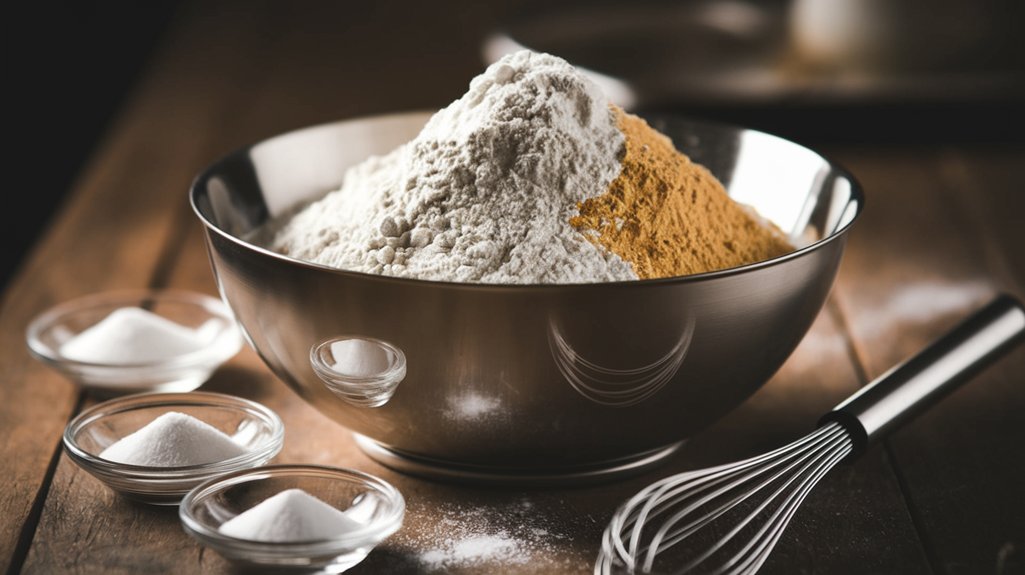
Once the oven is preheating, focus on assembling your dry ingredients to guarantee a seamless baking process.
Begin by measuring 1 cup of all-purpose flour, 1/2 teaspoon of baking powder, and 1/4 teaspoon of salt.
Use a whisk to combine them in a mixing bowl.
This step is essential, ensuring each ingredient is evenly distributed, which promotes consistent texture and rise in your cakes.
Whisking integrates air, contributing to a lighter cake crumb.
Be meticulous with measurements; too much or too little can impact the cake’s quality.
Keep the bowl nearby, allowing for easy access when you incorporate these dry ingredients into the wet ones later.
Properly combined dry components set the foundation for your mini lemon drop cakes.
Step 3. Cream Sugar and Butter Together
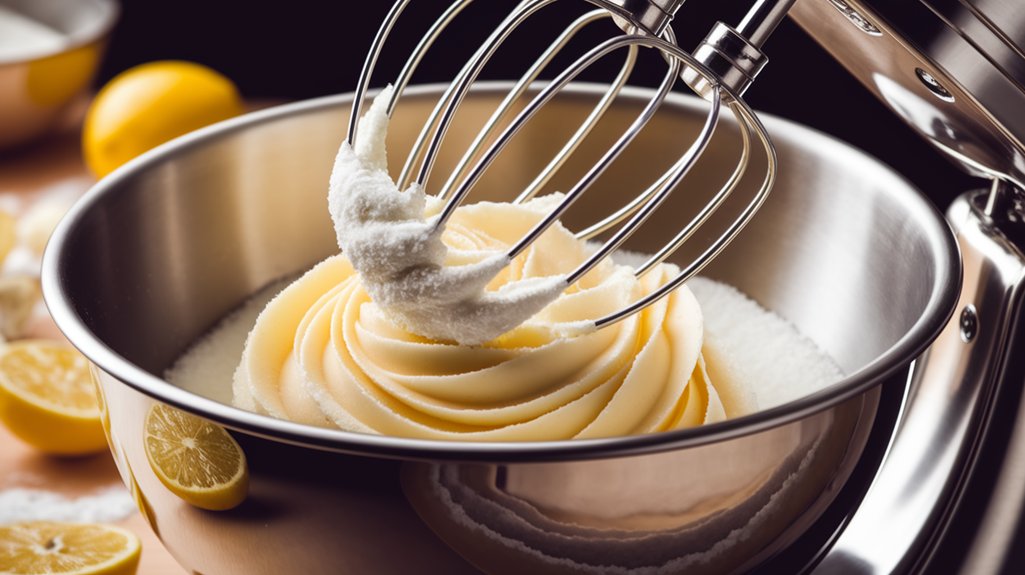
To achieve the perfect texture for your mini lemon drop cakes, cream the granulated sugar and softened butter together until the mixture is light and fluffy.
Use an electric mixer on medium speed for ideal results.
This process guarantees that air is incorporated, which is essential for the cake’s delicate crumb.
Pay attention to:
- Consistency: The mixture should appear pale and hold soft peaks.
- Time: Mix for about 3-5 minutes; the butter should be fully integrated with the sugar.
- Temperature: Verify butter is softened, not melted, for even creaming.
Precision in this step lays the foundation for the cake’s structure and flavor.
Avoid rushing; a hastily creamed mixture can lead to dense cakes. Consistency is key for successful baking.
Step 4. Incorporate Lemon Elements Completely

After achieving a light and fluffy texture with the creamed sugar and butter, it’s time to focus on integrating the lemon elements which are essential for the cake’s signature flavor.
Start by finely zesting the lemon using a zester, guaranteeing you only remove the vibrant yellow outer layer, avoiding the bitter white pith.
Next, extract two tablespoons of fresh lemon juice using a juicer, making sure no seeds are included.
Add the lemon zest and juice directly into the creamed mixture, followed by the egg.
Beat these ingredients together at medium speed with an electric mixer until thoroughly combined.
This step guarantees that the lemon flavor is evenly distributed, infusing every bite with a bright, citrusy essence that defines these delightful mini cakes.
Step 5. Alternate Dry, Wet Ingredients
As you continue with the preparation, gradually integrate the dry and wet ingredients into the creamed mixture.
Begin by adding a portion of the flour, baking powder, and salt combination. Mix until just incorporated.
Then, pour in a small amount of milk, blending gently to maintain the mixture’s consistency.
Repeat this process, guaranteeing each addition is fully integrated before proceeding to the next.
- Dry Ingredients: Add in three increments.
- Milk: Alternate with dry ingredients.
- Mixing: Use a gentle folding motion to avoid overmixing.
This alternating method guarantees a well-balanced batter, essential for achieving the desired texture of your mini lemon drop cakes.
Pay attention to the consistency, aiming for a smooth, cohesive blend without overworking the mixture.
Serving Tips
- Fresh Berries: Complement the citrusy flavors with a side of fresh strawberries or blueberries for a burst of color and sweetness.
- Whipped Cream: Add a dollop of freshly whipped cream to each mini cake for a creamy contrast to the tangy lemon glaze.
- Mint Leaves: Garnish with a sprig of mint for a revitalizing touch and an extra layer of aroma.
- Vanilla Ice Cream: Serve alongside a scoop of vanilla ice cream for a classic pairing that balances the zesty flavor with creamy smoothness.
- Lemon Curd: Offer a small spoonful of lemon curd on the side for those who crave an extra punch of lemony goodness.
Reheating
Reheating: To reheat, thaw the cakes at room temperature for about an hour.
Warm them in a preheated oven at 300°F (150°C) for 5 minutes to refresh their texture.
Final Thoughts
When you take your first bite of these mini lemon drop cakes, you’ll appreciate the vibrant flavor and the perfect balance of sweet and tangy notes.
The lemon zest and juice integrate seamlessly, providing a revitalizing contrast to the buttery, soft crumb of the cake.
Each element, from the precise mixing of ingredients to the meticulous baking time, contributes to the cake’s exceptional texture and taste.
The glaze, applied at the right consistency, enhances the citrus profile without overwhelming.
Ensuring your ingredients are at room temperature and employing the correct techniques—like careful zesting—are critical for the desired outcome.
With attention to detail, these cakes become a refined dessert, offering a sophisticated yet simple treat suitable for any occasion.
Frequently Asked Questions
Can I Substitute Lemon Juice With Another Citrus Fruit?
You can substitute lemon juice with lime, orange, or grapefruit juice. Each offers a distinct flavor profile. Adjust sweetness accordingly, as these fruits vary in tartness. Make certain citrus zest aligns with chosen juice for ideal consistency and taste.
How Can I Make These Cakes Gluten-Free?
To make gluten-free cakes, replace all-purpose flour with a gluten-free flour blend. Guarantee the blend includes xanthan gum for structure. Adjust liquid amounts if necessary, as gluten-free flours may absorb differently than traditional flour.
What Is the Nutritional Information per Serving?
You need to calculate nutritional information per serving by considering each ingredient’s values. Break down calories, carbohydrates, fats, and proteins for one mini cake. Use a nutritional calculator or app for precise results.
Can I Use a Regular Muffin Pan Instead of a Mini One?
You can use a regular muffin pan, but adjust baking time. Fill each cup 3/4 full and bake for 22-25 minutes. Check doneness with a toothpick; it should come out clean. Cool and glaze as directed.
Are There Any Variations for People With Dairy Allergies?
You can substitute unsalted butter with dairy-free margarine and use almond milk instead of regular milk. Confirm the margarine is softened similarly to butter for consistent texture. This adaptation maintains flavor while accommodating dairy allergies.

Mini Lemon Drop Cakes
Equipment
- 1 Mixing bowl
- 1 Electric mixer
- 1 Mini muffin pan
- 1 zester
- 1 Juicer
- 1 Whisk
- 1 Measuring cups set
- 1 Measuring spoons set
- 1 Oven
Ingredients
- 1 cup All-purpose flour
- 1/2 teaspoon Baking powder
- 1/4 teaspoon Salt
- 1/2 cup Granulated sugar
- 1/4 cup Unsalted butter softened
- 1 large Egg
- 1 tablespoon Lemon zest
- 2 tablespoons Lemon juice
- 1/4 cup Milk
- 1/2 cup Powdered sugar
- 1 tablespoon Lemon juice
Instructions
- Preheat the oven to 350°F (175°C).
- In a mixing bowl, whisk together flour, baking powder, and salt.
- In a separate bowl, cream together granulated sugar and butter until light and fluffy.
- Beat in the egg, lemon zest, and lemon juice into the sugar mixture.
- Gradually add the dry ingredients to the wet ingredients, alternating with milk, and mix until just combined.
- Spoon the batter into a greased mini muffin pan, filling each cup 3/4 full.
- Bake in the preheated oven for 18-20 minutes or until a toothpick inserted comes out clean.
- Allow the cakes to cool in the pan for 5 minutes, then transfer to a wire rack to cool completely.
- For the glaze, whisk together powdered sugar and lemon juice until smooth.
- Drizzle the glaze over the cooled mini cakes and allow it to set for an additional 5 minutes before serving.
Notes

Cynthia Weatherford is a seasoned chef and culinary enthusiast who serves as the Recipe creator of Somonday. With decades of experience in the kitchen and a passion for exploring diverse cuisines, Cynthia brings a blend of creativity and technique to every dish. Known for transforming simple ingredients into show-stopping meals, Cynthia believes that cooking is an art form anyone can master. Dedicated to inspiring home cooks, Cynthia shares approachable recipes, pro tips, and culinary wisdom to make every meal memorable.


