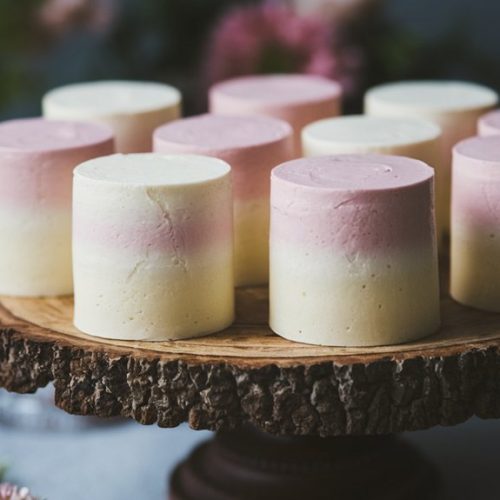
Creating mini ombre cakes is an artful journey that blends culinary precision with a touch of creativity.
You’ll find the process both rewarding and engaging as you layer vibrant hues of batter, achieving a seamless shift of colors.
These charming cakes are not only visually enchanting but also offer a delightful taste experience.
As you begin this baking adventure, you’ll discover the secrets to perfecting the ombre effect and crafting a dessert that’s sure to impress.
Kitchen Tools Required
- 3 6-inch round cake pans
- 1 mixing bowl
- 1 electric mixer
- 1 spatula
- 3 piping bags
- 1 cooling rack
- 1 cake turntable
- 1 offset spatula
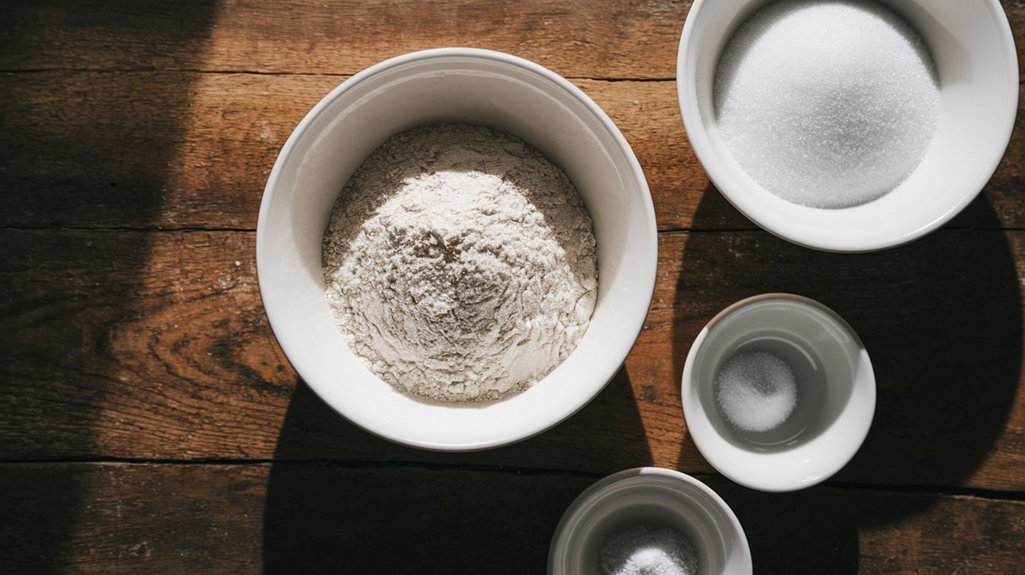
Ingredients
- 1 1/2 cups all-purpose flour
- 1 cup granulated sugar
- 1/2 cup unsalted butter, softened
- 2 teaspoons baking powder
- 1/2 teaspoon salt
- 3/4 cup whole milk
- 2 large eggs
- 1 teaspoon vanilla extract
- 1/2 cup heavy cream
- Food coloring (pink, purple, blue)
Cook & Prep Time
To efficiently manage your time while preparing and cooking Mini Ombre Cakes, you can follow this timeline:
Preparation and Cooking Timeline
1. Preparation (Total Time: 45 minutes)
- 0:00 – 5:00 minutes: Preheat the oven to 350°F (175°C) and grease the cake pans.
- 5:00 – 15:00 minutes: In a mixing bowl, cream together the butter and sugar until light and fluffy.
- 15:00 – 20:00 minutes: Add the eggs one at a time, beating well after each addition, then mix in the vanilla extract.
- 20:00 – 25:00 minutes: In a separate bowl, whisk together the flour, baking powder, and salt.
- 25:00 – 30:00 minutes: Gradually add the dry ingredients to the wet mixture, alternating with milk, beginning and ending with the flour mixture.
- 30:00 – 35:00 minutes: Divide the batter equally into three bowls and add food coloring to each.
- 35:00 – 40:00 minutes: Pour each colored batter into separate cake pans.
- 40:00 – 45:00 minutes: Place the pans in the oven.
2. Baking (Total Time: 20 minutes)
– 45:00 – 65:00 minutes: Bake the cakes for 18-20 minutes, or until a toothpick inserted into the center comes out clean.
3. Cooling & Resting (Total Time: 30 minutes)
- 65:00 – 75:00 minutes: Let the cakes cool in the pans for 10 minutes.
- 75:00 – 95:00 minutes: Turn the cakes out onto a cooling rack to cool completely (approximately 20 minutes).
4. Decorating (Total Time: 30 minutes)
- 95:00 – 105:00 minutes: Whip the heavy cream until stiff peaks form, then divide and tint it with food coloring.
- 105:00 – 115:00 minutes: Assemble and fill the cake layers with respective whipped creams.
- 115:00 – 125:00 minutes: Apply the crumb coat and chill the cake for 20 minutes.
- 125:00 – 135:00 minutes: Apply the final layer of ombre whipped cream and blend the colors for a gradient effect.
Total Time: Approximately 2 hours and 15 minutes
Recipe
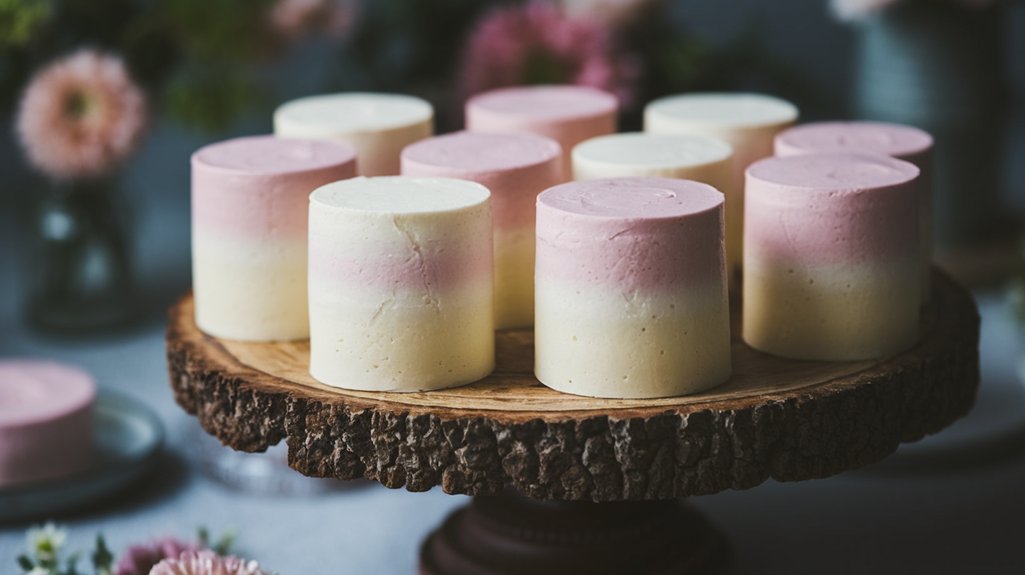
For a delightful dessert that’s both visually appealing and delicious, try making Mini Ombre Cakes.
These charming cakes are perfect for a special occasion or just to satisfy your sweet tooth.
The ombre effect, achieved with colorful layers and whipped cream, adds a whimsical touch to your dessert table.
With a combination of pink, purple, and blue hues, these cakes are sure to impress both the eyes and the palate.
The process of creating these Mini Ombre Cakes involves preparing a simple cake batter, dividing it into portions, and adding your chosen food colorings.
Once baked and cooled, the cakes are stacked with alternating layers of tinted whipped cream, resulting in a stunning gradient effect.
The cakes are finished with a smooth layer of ombre whipped cream, which not only seals in the flavors but also enhances the overall presentation.
To make the mini ombre cakes, start by preheating your oven to 350°F (175°C) and greasing three 6-inch round cake pans.
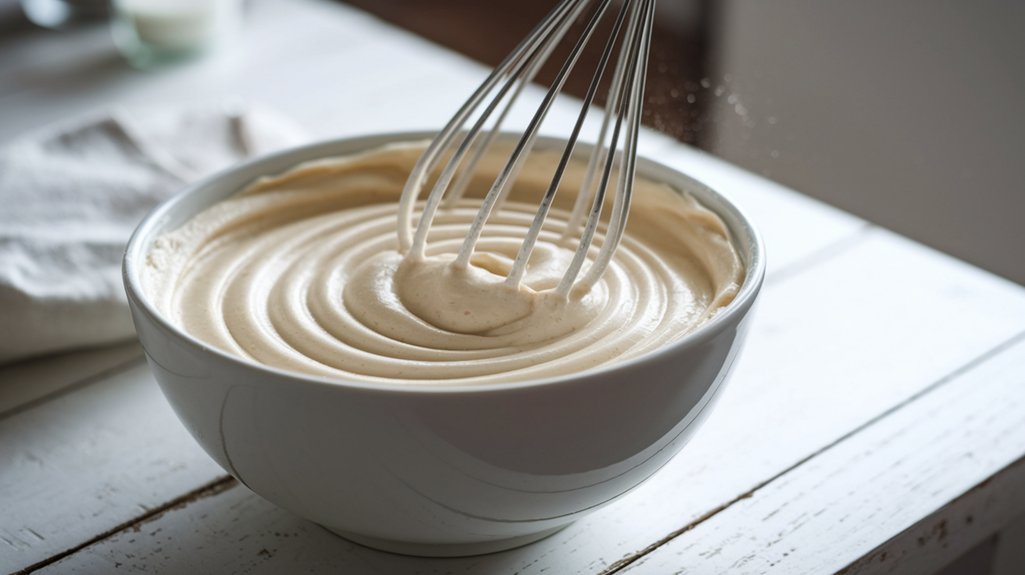
Cream the butter and sugar in a mixing bowl until light and fluffy.
Add the eggs one at a time, mixing well after each addition, and incorporate the vanilla extract.
In a separate bowl, combine the flour, baking powder, and salt.
Gradually add this dry mixture to the wet ingredients, alternating with milk and starting and ending with the flour mixture.
Divide the batter equally into three bowls and tint each with the desired food coloring.
Pour the colored batters into the prepared pans and bake for 18-20 minutes.
Allow the cakes to cool in the pans for 10 minutes before transferring them to a cooling rack.
Once cooled, whip the heavy cream to stiff peaks, divide into three portions, and tint accordingly.
Layer the cakes with the corresponding whipped cream colors, create a crumb coat with blue whipped cream, chill, and finish with a final layer of blended ombre whipped cream.
For best results, verify all ingredients are at room temperature before beginning the baking process.
This helps the batter mix evenly and results in a better texture for the cakes.
When blending the ombre effect, use a gentle touch to create a smooth shift between colors.
If the whipped cream becomes too soft while decorating, place it in the refrigerator for a few minutes to firm up before continuing.
This will help maintain the structure of your ombre layers and guarantee a polished finish.
Cooking Steps
Start by preheating your oven to 350°F, ensuring an even bake for your cakes.
Next, cream the butter and sugar thoroughly until they achieve a light, fluffy texture, then beat in the eggs one by one, followed by the fragrant addition of vanilla extract.
In a separate bowl, meticulously combine your dry ingredients, and incorporate them into the wet mixture by alternating with milk, beginning and ending with flour, to create a perfectly balanced batter.
Step 1. Preheat Oven to 350°F
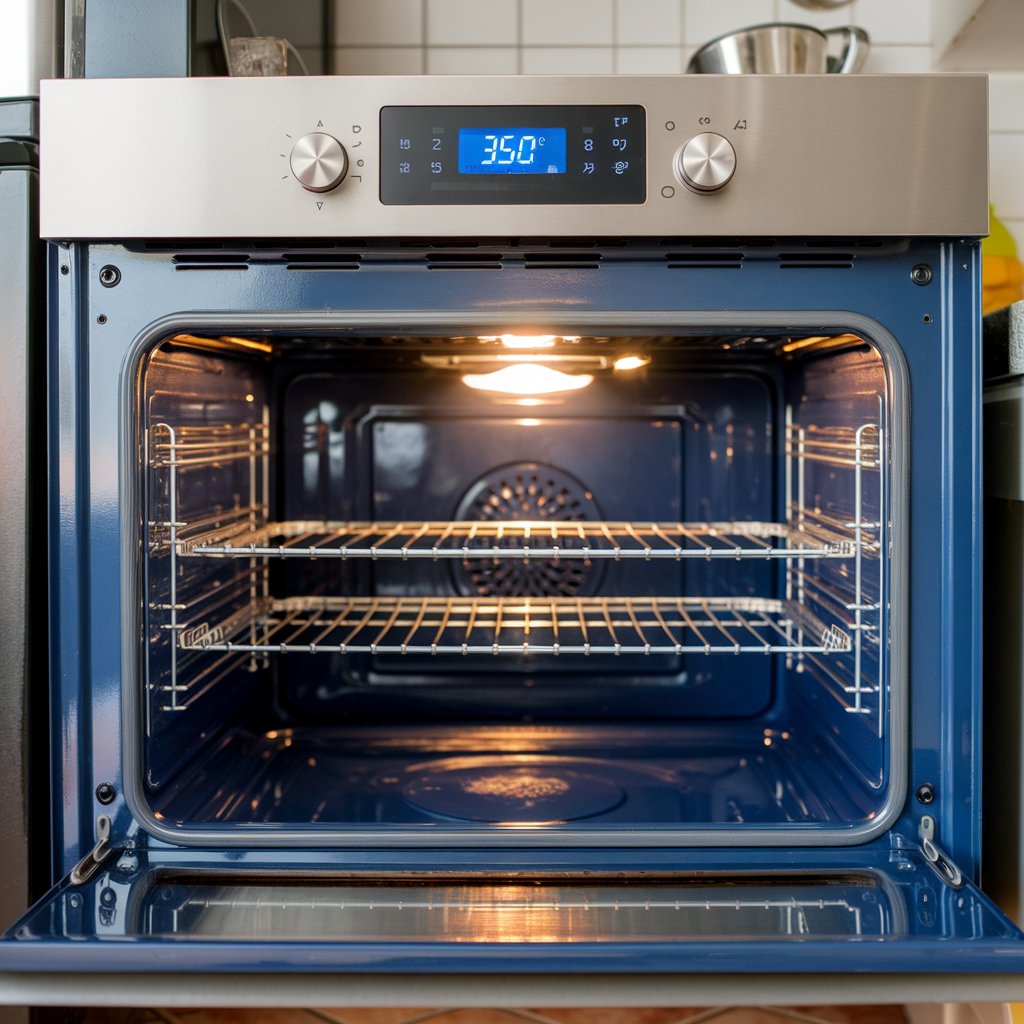
While the anticipation of baking begins to build, set your oven to 350°F (175°C), making sure it’s preheated and ready for the layers of ombre delight you’re about to create.
Locate the oven’s control panel, selecting the appropriate temperature.
Confirm the oven’s light or indicator signals it’s heating up.
As the oven warms, gather your cake pans.
Lightly grease each pan, making certain of even coverage to prevent sticking and promote flawless release.
This step is vital for achieving evenly baked layers, so don’t skip it.
Position the oven rack in the center; this guarantees uniform heat distribution.
While the oven reaches the desired temperature, maintain focus on the task, knowing this step is foundational for your mini ombre cakes’ success.
Step 2. Cream Butter, Sugar Thoroughly
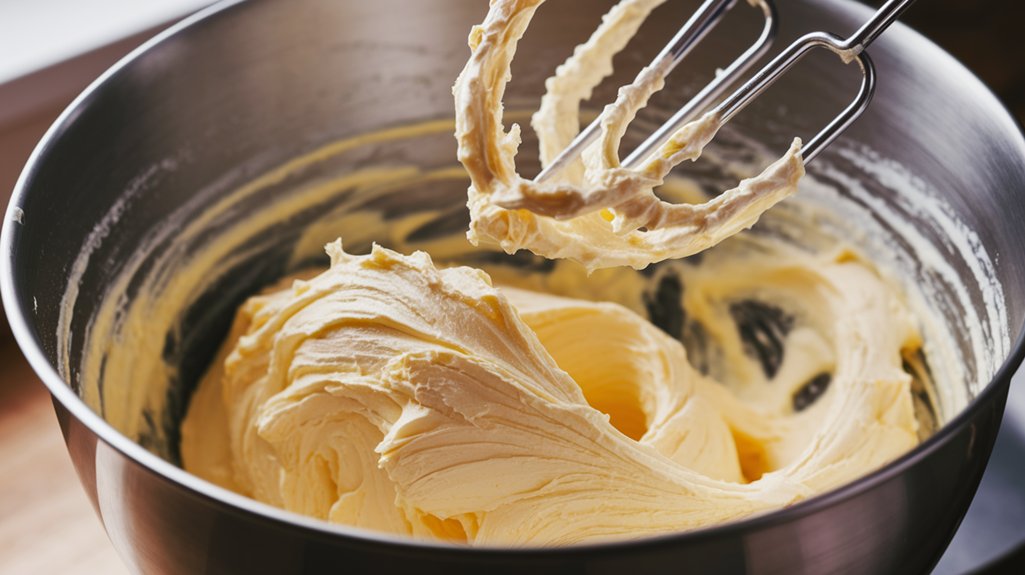
Begin by creaming the butter and sugar until they transform into a light, fluffy mixture, a process that sets the foundation for your cake’s texture.
Use an electric mixer on medium speed to blend the softened butter and granulated sugar in your mixing bowl.
Make sure the butter is at room temperature for ideal blending.
As you mix, watch for the moment the mixture turns pale and airy, a sign that the sugar crystals have integrated perfectly with the butter.
This step is vital for creating a tender crumb in your mini ombre cakes.
Scrape down the bowl’s sides occasionally with your spatula to assure even mixing.
Be patient; this step, though simple, is essential for achieving that delicate cake structure.
Step 3. Beat Eggs, Add Vanilla Extract
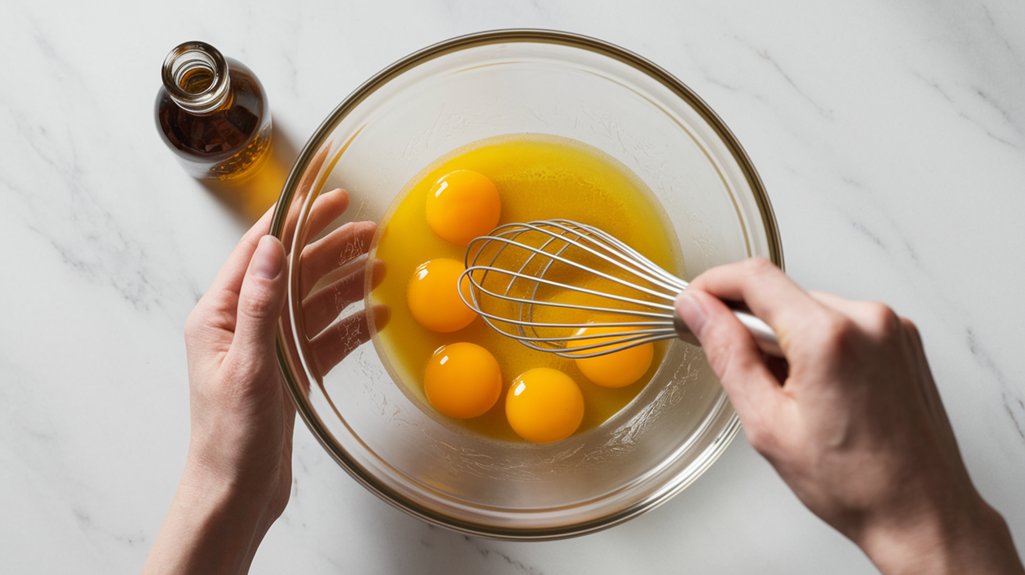
Having achieved a light and airy mixture of butter and sugar, it’s time to incorporate the eggs and vanilla extract, enhancing the cake’s richness and aroma.
Begin by cracking the eggs into a separate bowl to prevent no shells make their way into your mixture.
- Add eggs one at a time: Pour the first egg into your creamed butter and sugar. Beat it thoroughly until well integrated before adding the second egg. This careful addition guarantees a smooth, uniform batter.
- Mix until fully combined: Once both eggs are in, continue to beat the mixture until it appears glossy and smooth. Avoid overmixing to maintain a tender cake texture.
- Add vanilla extract: Gently pour in the vanilla extract, allowing its aromatic essence to infuse the batter completely.
Step 4. Combine Dry Ingredients Separately
In a separate bowl, whisk together your dry ingredients with care.
Begin by sifting 1 1/2 cups of all-purpose flour to eliminate any lumps, ensuring a fine texture.
Add 2 teaspoons of baking powder and 1/2 teaspoon of salt, vital for leavening and flavor balance.
Use a whisk, not a spoon, to incorporate air, creating a light, evenly mixed powder.
Hold the whisk vertically and move it in a circular motion, watching as the ingredients transform into a harmonious blend.
This step is essential for consistent cake structure and texture.
Feel the rhythm as you whisk, letting the flour’s soft cascade guide your movements.
When complete, your dry mixture should feel airy and look uniform, ready to integrate with the wet ingredients.
Step 5. Alternate Flour and Milk Additions
As you commence on the next stage of crafting your Mini Ombre Cakes, guarantee a seamless blend by alternating the addition of dry ingredients with milk into the wet mixture.
Begin by dividing your dry ingredients into three equal parts.
- Add the first portion of dry ingredients: Gently fold it into the wet mixture until just combined. Avoid over-mixing to maintain a tender crumb.
- Incorporate half of the milk: Pour it in a steady stream while mixing on low speed. This guarantees the batter remains smooth and uniform.
- Repeat: Alternate the second portion of dry ingredients, followed by the remaining milk, and finally the last portion of dry ingredients.
This method harmonizes the components, creating a batter that’s perfectly balanced and ready for coloring.
Serving Tips
- Fresh Berries: Serve with a side of fresh berries like strawberries or blueberries for a burst of natural sweetness and color.
- Whipped Cream Dollop: Add an extra dollop of whipped cream on the side for those who love a bit more creamy texture.
- Mint Garnish: Garnish with a fresh mint leaf for a pop of color and a revitalizing aroma.
- Chocolate Shavings: Sprinkle some chocolate shavings over the top for a touch of elegance and a hint of chocolate flavor.
- Fruit Coulis Drizzle: Drizzle a fruit coulis, such as raspberry or strawberry, to complement the flavors and add a tangy contrast.
Storage/Freezing/Reheating
Storage: Store mini ombre cakes in an airtight container in the refrigerator for up to 3 days to maintain freshness and prevent the whipped cream from becoming too soft or melting.
Freezing: To freeze, wrap each mini ombre cake tightly in plastic wrap, then place in a freezer-safe container.
Freeze for up to 2 months. Thaw in the refrigerator overnight before serving.
Reheating: Reheating isn’t recommended as it can alter the texture and appearance of the whipped cream.
Instead, allow cakes to come to room temperature before serving for ideal taste.
Final Thoughts
Even though these mini ombre cakes may seem complex, you’ll find the process surprisingly straightforward and rewarding.
With careful attention to detail, each step transforms simple ingredients into an artistic masterpiece.
Precision is key: measure your ingredients accurately and monitor the baking time closely for perfect layers.
When decorating, let your artistic flair shine by blending whipped cream colors gently, creating a seamless gradient.
Use an offset spatula for smooth finishes and clean lines.
Remember, patience is essential—allow cakes to cool completely before assembling to avoid melting the whipped cream.
As you step back to admire your creation, appreciate the intricate layers and harmonious colors.
These cakes are more than just a dessert; they’re a reflection of your culinary artistry and dedication.
Frequently Asked Questions
Can I Use Natural Food Coloring Instead of Artificial?
You can definitely use natural food coloring. Choose options like beet juice, turmeric, or blueberry powder. Make certain you adjust quantities for desired intensity. Remember, natural colors might slightly alter the flavor, so taste and adjust accordingly.
Are There Any Gluten-Free Substitutions for the Flour?
You can substitute all-purpose flour with a gluten-free blend for similar results. Verify it’s a mix that contains xanthan gum or add it separately for structure. Experiment with ratios to maintain the cake’s texture and flavor.
How Can I Adapt This Recipe for a Vegan Diet?
You can adapt this recipe for a vegan diet by replacing butter with vegan margarine, eggs with flax eggs, and whole milk with almond milk. Use coconut cream for the whipped cream, ensuring all ingredients are at room temperature.
What Other Color Combinations Work Well for Ombre Cakes?
Consider using a green-to-yellow ombre for a fresh, spring look or a red-to-orange gradient for a vibrant fall theme. Use gel food coloring for precise hues, and blend them gently to achieve a seamless shift.
How Do I Prevent the Cakes From Sticking to the Pans?
Grease your pans thoroughly with butter, then line them with parchment paper. Make certain the paper fits snugly. After baking, run a knife around the edges before inverting. This precise prep guarantees your cakes release smoothly.
Mini Ombre Cakes
Equipment
- 3 6-inch round cake pans
- 1 Mixing bowl
- 1 Electric mixer
- 1 Spatula
- 3 piping bags
- 1 Cooling rack
- 1 cake turntable
- 1 offset spatula
Ingredients
- 1 1/2 cups all-purpose flour
- 1 cup granulated sugar
- 1/2 cup unsalted butter softened
- 2 teaspoons baking powder
- 1/2 teaspoon salt
- 3/4 cup whole milk
- 2 large eggs
- 1 teaspoon vanilla extract
- 1/2 cup heavy cream
- Food coloring pink, purple, blue
Instructions
- Preheat your oven to 350°F (175°C) and grease the cake pans.
- In a mixing bowl, cream together the butter and sugar until light and fluffy.
- Add the eggs one at a time, beating well after each addition, then mix in the vanilla extract.
- In a separate bowl, whisk together the flour, baking powder, and salt.
- Gradually add the dry ingredients to the wet mixture, alternating with milk, beginning and ending with the flour mixture.
- Divide the batter equally into three bowls.
- Add a few drops of pink food coloring to one bowl, purple to the second, and blue to the third, mixing until the colors are evenly distributed.
- Pour each colored batter into separate cake pans and bake for 18-20 minutes, or until a toothpick inserted into the center comes out clean.
- Let the cakes cool in the pans for 10 minutes, then turn them out onto a cooling rack to cool completely.
- Whip the heavy cream until stiff peaks form, then divide it into three bowls and tint each with a drop of the respective food colorings.
- Place the pink cake layer on a cake turntable and spread a layer of pink whipped cream on top.
- Add the purple cake layer, spread purple whipped cream, and then top with the blue cake layer.
- Cover the whole cake with a thin layer of blue whipped cream to create a crumb coat, then chill for 20 minutes.
- Once chilled, apply a final layer of ombre whipped cream, blending the colors slightly for a gradient effect.
Notes

Cynthia Weatherford is a seasoned chef and culinary enthusiast who serves as the Recipe creator of Somonday. With decades of experience in the kitchen and a passion for exploring diverse cuisines, Cynthia brings a blend of creativity and technique to every dish. Known for transforming simple ingredients into show-stopping meals, Cynthia believes that cooking is an art form anyone can master. Dedicated to inspiring home cooks, Cynthia shares approachable recipes, pro tips, and culinary wisdom to make every meal memorable.


