There’s something about a plate of mini red velvet cupcakes that instantly brightens the room.
Picture tiny, ruby-red cakes with a tender crumb, crowned with swirls of plush cream cheese frosting, catching the light like little celebrations.
This is a cozy, crowd-pleasing dessert that comes together surprisingly fast—perfect when you need something sweet in under an hour.
It’s ideal for busy hosts, beginners who want bakery-style results without stress, and anyone with a serious sweet tooth.
I still remember the evening a friend called to say she’d had a rough week and was stopping by. I pulled together a batch of these minis, and by the time she arrived, the kitchen smelled of cocoa and vanilla.
We stood at the counter, sharing cupcakes and stories, and everything felt lighter.
These shine at birthday parties, office treats, last-minute celebrations, or simple Sunday afternoons. Ready to bring this dessert to life?
Why You’ll Love It
- Delivers classic red velvet flavor in perfectly portioned mini bites
- Bakes fast, so you can satisfy dessert cravings quickly
- Uses simple, familiar ingredients you likely already have on hand
- Pairs tangy cream cheese frosting with soft, tender chocolatey crumb
- Ideal for parties, potlucks, and gifting—no slicing or plates needed
Ingredients
- 1 1/4 cups all-purpose flour — measure with spoon-and-level for accuracy
- 1 tablespoon unsweetened cocoa powder — natural cocoa, not Dutch-processed
- 1/2 teaspoon baking soda — make certain it’s fresh for proper rise
- 1/4 teaspoon fine salt — fine-grain helps it disperse evenly
- 1/2 cup granulated sugar — standard white sugar works best
- 1/4 cup unsalted butter, softened — butter should dent easily when pressed
- 1 large egg, room temperature — take out of the fridge 30 minutes ahead
- 1/2 cup buttermilk, room temperature — shake well before measuring
- 1 teaspoon vanilla extract — use pure vanilla for best flavor
- 1 teaspoon white vinegar — reacts with baking soda for lift
- 1 tablespoon red liquid food coloring — adjust for deeper or lighter color
- 4 ounces cream cheese, softened — use full-fat block cream cheese
- 1/4 cup unsalted butter, softened (for frosting) — brings richness to the icing
- 1 1/2 cups powdered sugar, sifted — sifting prevents lumpy frosting
- 1/2 teaspoon vanilla extract (for frosting) — rounds out the tang of cream cheese
- 1 pinch fine salt (for frosting) — balances sweetness and enhances flavor
Step-by-Step Method
Preheat & Prepare Pan
Preheat your oven to 350°F (175°C). Line a 24-cup mini muffin pan with mini cupcake liners so the cakes release easily.
Set out your butter, egg, buttermilk, and cream cheese to come to room temperature. This helps the batter mix smoothly and the cupcakes bake evenly with a soft, tender crumb.
Whisk Dry Ingredients
Measure the flour, cocoa powder, baking soda, and fine salt into a medium mixing bowl. Whisk thoroughly to break up any cocoa clumps and evenly distribute the leavening and salt.
Keep whisking until the mixture looks uniform in color. Set this bowl aside; you’ll be alternating it with the liquid mixture later for a smooth batter.
Cream Butter & Sugar
Beat the softened butter and granulated sugar together in another medium bowl using an electric mixer. Start on low, then increase to medium-high until the mixture is light, pale, and fluffy.
Scrape down the bowl with a rubber spatula as needed. Proper creaming incorporates air, helping your mini cupcakes rise beautifully in the oven.
Add Egg & Combine
Crack the room-temperature egg into the butter-sugar mixture. Beat on medium speed until fully incorporated and creamy, with no streaks of egg remaining.
Scrape down the sides and bottom of the bowl again. Make sure the mixture is smooth, as any curdling now can affect the final texture of your cupcakes later.
Tint the Buttermilk Mixture
In a small bowl, stir together the buttermilk, vanilla extract, white vinegar, and red liquid food coloring. Mix until the color is completely even, with no darker swirls of dye.
Adjust the shade with a little more food coloring if needed. This mixture adds tang, moisture, and that classic red velvet color and flavor.
Alternate Dry & Wet Additions
Add one-third of the dry ingredients to the butter mixture. Mix on low just until combined.
Pour in half of the tinted buttermilk mixture and mix again. Repeat with another third of the dry ingredients, the remaining buttermilk, then the last of the dry.
Mix gently each time, stopping as soon as the batter looks smooth and uniform.
Fill the Mini Liners
Use a small cookie scoop or tablespoon to portion the batter into the prepared mini cupcake liners. Fill each liner about two-thirds full to allow room for rising without overflowing.
Try to keep the portions even so all cupcakes bake at the same rate. Gently tap the pan once to settle the batter if needed.
Bake & Cool Completely
Place the pan in the preheated oven. Bake for 10–12 minutes, checking early.
Insert a toothpick into the center of a cupcake; it should come out clean or with a few moist crumbs. Cool in the pan for 5 minutes, then transfer to a wire rack.
Let the mini cupcakes cool completely, about 25 minutes, before frosting.
Beat Cream Cheese Frosting
Combine the softened cream cheese and softened butter in a clean bowl. Beat with an electric mixer until smooth and creamy, with no visible lumps.
Add the sifted powdered sugar, vanilla extract, and a pinch of salt. Beat on low to combine, then increase speed until the frosting is thick, fluffy, and spreadable.
Frost & Chill Briefly
Spoon or pipe the cream cheese frosting onto the cooled mini cupcakes. Use a piping bag with your favorite tip for a decorative swirl, or simply dollop and swirl with a small spatula.
Arrange cupcakes on a tray and chill for 10–15 minutes if you prefer a slightly firmer frosting. Serve once set, or keep chilled until ready.
Ingredient Swaps
- No buttermilk: Use 1/2 cup milk mixed with 1/2 tablespoon white vinegar or lemon juice; rest 5 minutes before using.
- No red liquid food coloring: Use gel food color (start with 1/2 teaspoon and adjust) or beet powder (about 1–2 teaspoons, color will be more muted).
- Gluten-free: Swap the flour for a 1:1 gluten-free baking blend; avoid overmixing.
- Dairy-free: Use plant-based butter and cream cheese, and dairy-free milk + vinegar in place of buttermilk.
- Cocoa options: Any unsweetened cocoa works; for a milder chocolate note, slightly reduce to 2–3 teaspoons.
You Must Know
– Make-Ahead – To prep ahead without drying them out, cool cupcakes fully, then store unfrosted in an airtight container at room temperature for up to 24 hours; refrigerate the frosting separately for up to 3 days and let it stand 15–20 minutes, then re-whip briefly before topping so it’s smooth and fluffy again.
Serving Tips
- Arrange on a tiered stand and garnish with fresh berries for color.
- Serve chilled with hot coffee, black tea, or a glass of cold milk.
- Top each cupcake with chocolate shavings or red sprinkles for a festive look.
- Plate three minis per serving with a drizzle of raspberry sauce.
- Add a small heart-shaped sprinkle or candy for Valentine’s Day or anniversaries.
Storage & Make-Ahead
Store frosted mini red velvet cupcakes in an airtight container in the fridge for up to 4 days.
Bake the cupcakes a day ahead and frost closer to serving.
Unfrosted cupcakes freeze well for about 2 months.
Thaw in the fridge, then bring to room temperature before decorating.
Reheating
Reheat unfrosted cupcakes briefly.
Microwave 5–10 seconds, or warm in a 300°F (150°C) oven for 5–7 minutes.
Avoid stovetop methods.
Let frosted cupcakes come to room temperature instead.
Mini Red Velvet Traditions
When I pull a tray of mini red velvet cupcakes from the oven, I’m instantly back in my grandmother’s kitchen, where the air always smelled like cocoa and vanilla and every holiday started with a splash of food coloring.
I still hear the soft clink of measuring spoons and the low hum of her mixer, see the counter lined with tiny red domes waiting for swirls of cream cheese frosting.
Over time, I’ve woven my own rituals around these minis, and I love how easily you can, too:
- Box up a dozen for a neighbor you’ve been meaning to visit.
- Stack them on a cake stand for an effortless birthday centerpiece.
- Let kids decorate with sprinkles and crushed cookies.
- Bake a batch to celebrate small, quiet victories.
Final Thoughts
Give these mini red velvet cupcakes a try and see how quickly they disappear—they’re perfect for parties, holidays, or just because.
Feel free to tweak the colors, toppings, or sprinkles to make them your own.
Frequently Asked Questions
Can I Make These Mini Cupcakes Gluten-Free Without Compromising Texture?
Yes, you can. I’d swap the flour for a 1:1 gluten‑free blend with xanthan gum, then whisk it well. I’ve baked them this way for celiac friends—still tender, velvety, and joyfully shared.
How Do I Adjust Baking Time for High Altitude Locations?
I’d reduce bake time by 1–2 minutes, then start checking early; at my mountain cabin, I also lower sugar slightly, add a tablespoon more liquid, and trust the springy tops more than the clock.
What’s the Best Way Kids Can Help Safely With This Recipe?
Kids help best by stirring dry ingredients, whisking buttermilk mixture, and lining the pan. I’d let them scoop the batter, then decorate frosting like tiny snowdrifts—my niece’s proud, messy swirls always steal the show.
Can I Convert This Recipe Into a Full-Size Layer Cake?
Yes, you can—I’d triple the batter and bake it in two 8‑inch pans. I picture slicing into tall crimson layers, cream cheese clouds between them, like the cakes my grandma made for snow-day celebrations.
How Do I Calculate Nutrition Facts and Calories per Mini Cupcake?
You’ll total each ingredient’s calories from a database, divide by 24, and adjust for frosting. I picture you late-night at the kitchen table, scribbling numbers while the kitchen still smells sweet.
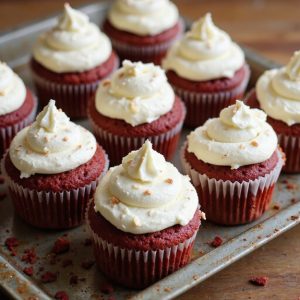
Mini Red Velvet Cupcakes
Equipment
- 1 mini muffin pan (24-cup)
- 24 mini cupcake liners
- 2 medium mixing bowls
- 1 Small mixing bowl
- 1 Whisk
- 1 Rubber spatula
- 1 electric hand mixer or stand mixer
- 1 Measuring cups set
- 1 Measuring spoons set
- 1 Small cookie scoop or tablespoon
- 1 wire cooling rack
Ingredients
- 1 1/4 cup all-purpose flour
- 1 tablespoon unsweetened cocoa powder
- 1/2 teaspoon baking soda
- 1/4 teaspoon fine salt
- 1/2 cup granulated sugar
- 1/4 cup unsalted butter softened
- 1 large egg room temperature
- 1/2 cup buttermilk room temperature
- 1 teaspoon vanilla extract
- 1 teaspoon white vinegar
- 1 tablespoon red liquid food coloring
- 4 ounce cream cheese softened
- 1/4 cup unsalted butter softened for frosting
- 1 1/2 cup powdered sugar sifted
- 1/2 teaspoon vanilla extract for frosting
- 1 pinch fine salt for frosting
Instructions
- Preheat the oven to 350°F (175°C) and line the mini muffin pan with mini cupcake liners.
- In a medium bowl whisk together the flour, cocoa powder, baking soda, and salt, then set aside.
- In another bowl beat the softened butter and granulated sugar with an electric mixer until light and fluffy.
- Add the egg to the butter mixture and beat until fully combined and creamy.
- In a small bowl stir together the buttermilk, vanilla extract, vinegar, and red food coloring until evenly tinted.
- Add one-third of the dry ingredients to the butter mixture and mix on low just until combined.
- Add half of the buttermilk mixture and mix, then repeat alternating dry ingredients and buttermilk, ending with dry, mixing just until smooth.
- Use a small cookie scoop or spoon to fill each mini liner about two-thirds full with batter.
- Bake the mini cupcakes for 10–12 minutes or until a toothpick inserted in the center comes out clean.
- Let the cupcakes cool in the pan for 5 minutes, then transfer them to a wire rack to cool completely, about 25 minutes.
- For the frosting beat the softened cream cheese and butter together until smooth and creamy.
- Add the powdered sugar, vanilla, and salt to the cream cheese mixture and beat until thick, smooth, and fluffy.
- Spoon or pipe the cream cheese frosting onto the cooled mini cupcakes.
- Chill the frosted cupcakes for 10–15 minutes if you want the frosting to firm up slightly before serving.
Notes

Cynthia Weatherford is a seasoned chef and culinary enthusiast who serves as the Recipe creator of Somonday. With decades of experience in the kitchen and a passion for exploring diverse cuisines, Cynthia brings a blend of creativity and technique to every dish. Known for transforming simple ingredients into show-stopping meals, Cynthia believes that cooking is an art form anyone can master. Dedicated to inspiring home cooks, Cynthia shares approachable recipes, pro tips, and culinary wisdom to make every meal memorable.