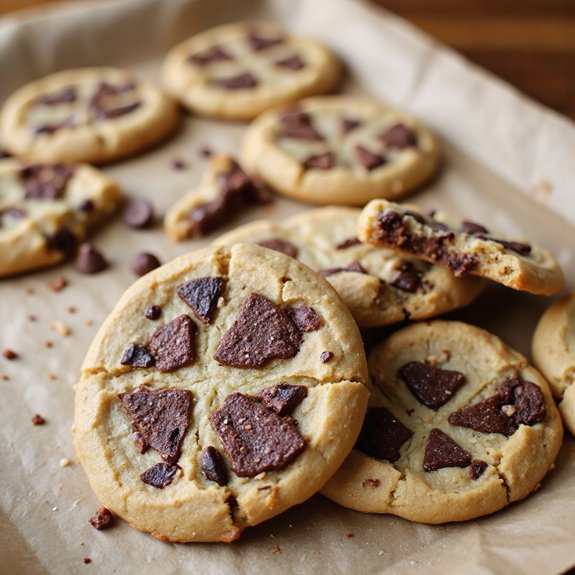
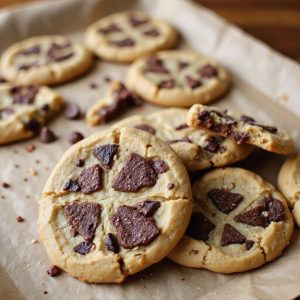
Picture warm swirls of cocoa and peanut butter marbling like sunset tones across a soft, crinkly cookie—edges gently crisp, centers plush and fudgy, each bite releasing a toasty peanut aroma and a hush of melty chocolate.
It’s the kind of bake that turns an ordinary afternoon into comfort: a tray cooling on the counter, a mug of milk or coffee nearby, and the house smelling like a hug.
These Brownie Peanut Butter Cookies matter to me because they bridge two cravings—brownie richness and peanut butter nostalgia—without choosing sides.
They’re perfect for busy weeknights, potlucks, or Sunday suppers when you want something crowd-pleasing, quick, and a little special.
When a last-minute school event popped up, this recipe saved me—easy pantry ingredients, no fuss, and I walked in with a plate that vanished before announcements ended.
Ready? Let’s cook!
Why You’ll Love It
- Delivers bold flavor: fudgy chocolate swirled with rich peanut butter
- Achieves bakery texture: soft centers, lightly crisp edges, ultra-moist bite
- Creates stunning marbling with simple press-and-twist shaping
- Uses pantry staples and one egg for easy prep
- Freezes beautifully; bake from frozen with minimal extra time
Ingredients
- 1/2 cup unsalted butter softened — room temp for easy creaming
- 3/4 cup creamy peanut butter room temperature — smooth, not natural/runny
- 3/4 cup light brown sugar packed — fresh, moist for chew
- 1/4 cup granulated sugar — superfine helps dissolve
- 1 large egg room temperature — brings dough together
- 1 teaspoon vanilla extract — pure, not imitation
- 1 1/4 cups all-purpose flour — measure with scoop-and-level
- 1/2 teaspoon baking soda — check freshness
- 1/2 teaspoon baking powder — aluminum-free preferred
- 1/4 teaspoon fine salt — balances sweetness
- 1/2 cup semi-sweet chocolate chips melted — quality chips melt smoother
- 1/4 cup cocoa powder unsweetened — Dutch-process for deeper color
- 2 tablespoons milk warm — whole milk for richer paste
- 1/3 cup mini chocolate chips optional for topping — adds texture on top
- 2 tablespoons granulated sugar for rolling optional — light sparkle and crust
Step-by-Step Method
Preheat & Prep Pans
Preheat oven to 350°F (175°C). Line two baking sheets with silicone mats or parchment for easy release. Clear space for cooling racks. Set out mixing bowls, mixer, whisk, spatula, and a 1.5-tablespoon cookie scoop. Make certain butter, peanut butter, and egg are at room temperature for even mixing and better texture.
Melt the Chocolate
Microwave semi-sweet chocolate chips in a small bowl for 20-second bursts. Stir between each until smooth and glossy. Avoid overheating.
Let the melted chocolate cool for about 3 minutes so it doesn’t seize or melt the dough when mixed. Set aside while you prepare the dry ingredients.
Whisk Dry Ingredients
Whisk flour, baking soda, baking powder, and salt in a medium bowl. Break up any clumps for a uniform mixture.
This makes sure even leavening and prevents pockets of baking soda or powder. Keep the bowl nearby to add to the wet mixture later without delay.
Cream Butter, PB & Sugars
Beat softened butter, creamy peanut butter, brown sugar, and granulated sugar on medium speed until light and fluffy, about 2 minutes. Scrape the bowl as needed.
Proper creaming incorporates air, helping the cookies lift and stay soft. Stop once the mixture looks pale and cohesive.
Add Egg & Vanilla
Beat in the egg and vanilla until fully combined and smooth. Mix just until the egg disappears and the batter looks silky.
Overmixing here can toughen cookies. Scrape the sides and bottom of the bowl to capture any unmixed peanut butter or sugar.
Combine Wet & Dry
Add the dry ingredients to the wet mixture. Mix on low just until a soft dough forms.
Avoid overmixing to keep cookies tender. Stop the mixer as soon as no dry streaks remain. Use a spatula to fold and finish blending for an even dough.
Make Cocoa Paste
Whisk unsweetened cocoa powder with warm milk in a separate bowl. Stir until a smooth, glossy paste forms with no lumps.
The warmth helps bloom the cocoa for deeper flavor and color. Make sure the paste is lump-free to avoid streaky, dusty bits in the brownie dough.
Divide & Flavor Doughs
Split the peanut butter dough roughly in half. Stir the cocoa paste and cooled melted chocolate into one half to create the brownie dough.
Mix until just combined and fudgy. Leave the other half plain peanut butter. Keep both doughs soft but not sticky.
Marble the Dough
Pinch off equal amounts of peanut butter and brownie dough. Press together and give a gentle twist to create a swirl.
Avoid overmixing to keep distinct ripples. Aim for balls about 1.5 tablespoons in size. If sticky, chill both doughs 15–20 minutes before shaping.
Roll, Top & Flatten
Optionally roll each dough ball lightly in granulated sugar for sparkle. Place on prepared sheets, spaced 2 inches apart.
Add a few mini chocolate chips on top if desired. Gently flatten each ball to about 3/4-inch thickness with fingertips or the bottom of a glass.
Bake to Just-Set
Bake one sheet at a time for 10–12 minutes. Start checking at 9 minutes.
Look for edges set and centers slightly underbaked and puffed. Rotate the sheet if your oven bakes unevenly. The cookies will firm as they cool, keeping a moist, soft bite.
Cool & Repeat
Let cookies cool on the sheet for 5 minutes to set. Transfer to a wire rack to cool an additional 10 minutes.
Repeat with remaining dough, alternating sheets for even heat. Store cooled cookies airtight. Add a slice of bread to keep them soft longer.
Ingredient Swaps
- Dairy-free: use vegan butter and plant milk; confirm chocolate chips are dairy-free.
- Gluten-free: swap all-purpose flour for a 1:1 gluten-free baking blend with xanthan gum.
- Nut-free flavor: replace peanut butter with sunflower seed butter; add 1–2 tbsp extra flour if dough seems loose.
- Refined sugar–light: use coconut sugar for brown sugar; roll in turbinado sugar or skip rolling.
- Budget/availability: use cocoa + 1 tsp oil instead of melting chips, or chopped chocolate; any smooth peanut butter works (avoid very runny natural types).
You Must Know
Doneness • If cookie edges look set but centers are glossy and puffed, pull the tray now; they’ll finish with carryover heat. Aim for very slight jiggle and matte edges at 10–12 minutes; they firm up after 5 minutes on the sheet.
Troubleshoot • If cookies spread too thin or marbling blurs, chill both dough halves 15–20 minutes, then portion. Cooler dough holds swirls and limits spread to about 2.5–3 inches diameter.
Scale • For 12 larger bakery-style cookies, portion 3 tablespoons each, flatten to ~1 inch thickness, and extend time to 12–14 minutes; for minis (36–40), use 1 tablespoon each, flatten to 1/2 inch, and check at 8–9 minutes.
Flavor Boost • For deeper peanut notes, swap 2 tablespoons flour with roasted peanut powder, or add 1/4 teaspoon espresso powder to the cocoa paste; both sharpen chocolate-peanut contrast without extra sweetness.
Make-Ahead • For freezing, marble and flatten, then freeze solid 1 hour and store up to 2 months; bake from frozen at 350°F, adding 1–2 minutes. Look for the same matte-edge/glossy-center cue.
Serving Tips
- Serve slightly warm with a cold glass of milk or vanilla ice cream.
- Drizzle with melted chocolate and sprinkle sea salt just before serving.
- Pair with coffee or hot cocoa; add mini chips for a café-style touch.
- Sandwich two cookies with peanut butter or chocolate frosting for decadence.
- Plate with fresh strawberries or banana slices to balance the richness.
Storage & Make-Ahead
Store cookies airtight at room temperature 3–4 days or in the fridge up to 1 week.
For make-ahead, refrigerate dough (both halves) tightly covered up to 3 days.
Freeze marbled dough balls or baked cookies in layers for up to 2 months.
Bake from frozen, adding 1–2 minutes.
Reheating
For gentle reheating, use: microwave at 50% power 8–12 seconds.
Oven at 300°F for 4–6 minutes on a sheet.
Stovetop skillet on low, covered, 1–2 minutes per side.
State Fair Nostalgia
Once they’re warm again, I can’t help but think of state fairs—the hum of the midway, paper plates dusted with powdered sugar, and sticky fingers clutching a prize.
These cookies bring that same cheerful hush before the first bite: the peanut butter’s carnival-sweet comfort, the brownie ripple like a ribbon of fudge from the taffy booth.
I bake them a touch under, so the centers stay plush—like biting into a still-warm fair brownie tucked inside a nutty cookie.
If you want that nostalgic finish, roll the dough balls lightly in sugar so the edges sparkle, then press on a few mini chips.
Serve them on napkins, not plates.
Stand, eat, and let crumbs fall.
I’ll handle the next batch while you take another lap.
Final Thoughts
Ready to bake a batch? Give these Brownie Peanut Butter Cookies a try as written, or tweak them with your favorite nut butter or a sprinkle of sea salt on top for your perfect twist!
Frequently Asked Questions
Can I Make These Cookies Gluten-Free Without Changing Texture?
Yes—you can. I’d swap the flour for a quality 1:1 gluten-free blend with xanthan gum. I’d keep ingredients room-warm, chill dough briefly, and watch bake time. You’ll still get tender centers, crisp edges, dreamy swirls.
How Do I Prevent Cross-Contamination for Peanut Allergies?
Avoid cross-contamination by dedicating spotless tools, bowls, and a peanut-free prep area; wash hands thoroughly; use new parchment; store ingredients separately; label everything. I’ll bake allergen-free first, then peanuts, keeping utensils apart like lit candles in calm twilight.
What Altitude Adjustments Are Needed for High-Elevation Baking?
Reduce sugar slightly, add 1–2 tablespoons extra flour, increase liquid a splash, and shorten bake time; I also raise oven temp 15–25°F. At altitude, I picture crisp air, steady hands, and confident, tender cookies.
Can I Reduce Sugar Without Affecting Spread and Chew?
Yes—reduce sugar by 15–20% and keep spread and chew. I’ll add 1–2 teaspoons milk, a touch more vanilla, and keep brown sugar dominant. Chill dough briefly; bake until edges set, centers whisper-soft.
Do These Cookies Ship Well for Care Packages?
Yes—they ship beautifully if packed snug. I let them cool fully, cushion layers with parchment, nestle pairs back-to-back, and seal airtight. Add a bread slice, choose fast shipping, and avoid heat. They’ll arrive soft, swirled, and smiling.
Moist Brownie Ripple Peanut Butter Cookies
Equipment
- 2 Mixing bowl
- 1 handheld mixer or stand mixer
- 1 Whisk
- 1 Rubber spatula
- 1 Wooden spoon
- 2 Baking sheet
- 2 silicone baking mat or 2 sheets parchment paper
- 1 Cookie scoop 1.5-tablespoon
- 1 Wire rack
- 1 Cooling rack
Ingredients
- 1/2 cup unsalted butter softened
- 3/4 cup creamy peanut butter room temperature
- 3/4 cup light brown sugar packed
- 1/4 cup granulated sugar
- 1 large egg room temperature
- 1 teaspoon vanilla extract
- 1 1/4 cups all-purpose flour
- 1/2 teaspoon baking soda
- 1/2 teaspoon baking powder
- 1/4 teaspoon fine salt
- 1/2 cup semi-sweet chocolate chips melted
- 1/4 cup cocoa powder unsweetened
- 2 tablespoons milk warm
- 1/3 cup mini chocolate chips optional for topping
- 2 tablespoons granulated sugar for rolling, optional
Instructions
- Preheat the oven to 350°F (175°C) and line two baking sheets with silicone mats or parchment.
- In a small microwave-safe bowl, melt the semi-sweet chocolate chips in 20-second bursts, stirring between each, until smooth; let cool 3 minutes.
- In a medium bowl, whisk flour, baking soda, baking powder, and salt until combined.
- In a large bowl, beat softened butter, peanut butter, brown sugar, and granulated sugar on medium speed until light and creamy, about 2 minutes.
- Beat in the egg and vanilla until fully incorporated and smooth.
- Add dry ingredients to the wet mixture and mix on low just until a soft dough forms.
- In a separate bowl, whisk cocoa powder with warm milk until a glossy paste forms with no lumps.
- Divide the peanut butter dough roughly in half, then stir the cocoa paste and melted chocolate into one half to create a brownie dough.
- Pinch off equal bits of peanut butter dough and brownie dough, press together, and twist gently to create a marbled ball about 1.5 tablespoons in size.
- If desired, roll each ball lightly in granulated sugar, then place on prepared sheets spaced 2 inches apart and top with a few mini chocolate chips.
- Gently flatten each dough ball to about 3/4-inch thickness with your fingers or the bottom of a glass.
- Bake one sheet at a time for 10 to 12 minutes until edges are set and centers look slightly underbaked.
- Cool cookies on the sheet for 5 minutes to set, then transfer to a wire rack to cool an additional 10 minutes.
- Repeat with remaining dough, rotating sheets between batches for even baking.
Notes

Cynthia Weatherford is a seasoned chef and culinary enthusiast who serves as the Recipe creator of Somonday. With decades of experience in the kitchen and a passion for exploring diverse cuisines, Cynthia brings a blend of creativity and technique to every dish. Known for transforming simple ingredients into show-stopping meals, Cynthia believes that cooking is an art form anyone can master. Dedicated to inspiring home cooks, Cynthia shares approachable recipes, pro tips, and culinary wisdom to make every meal memorable.


