Imagine crafting a Nilla Wafer Banana Pudding that’s both delightful and uncomplicated.
You’d start by layering creamy custard with ripe bananas and crisp wafers, creating an interplay of textures that’s hard to resist.
With just a few kitchen tools and straightforward steps, this classic American dessert becomes a centerpiece at any gathering.
But how do you guarantee the flavors meld perfectly and achieve that desired consistency? The answer lies in the details that follow.
Kitchen Tools Required
To create the perfect Nilla Wafer Banana Pudding, you’ll need a few essential kitchen tools.
Start with a reliable medium saucepan for combining your sugar, flour, and salt with milk, ensuring your pudding base thickens beautifully over medium heat.
A whisk is indispensable for smooth, lump-free mixing, especially when integrating the egg yolks into the heated mixture.
Shift to a large mixing bowl for beating the yolks, maintaining precision in texture.
The 9×13 inch baking dish is vital for constructing your pudding layers, offering ample space for Nilla Wafers and sliced bananas.
Secure the dish with plastic wrap to lock in moisture as it chills.
Finally, your refrigerator’s cool environment is key for setting the dessert to creamy perfection.
Recipe
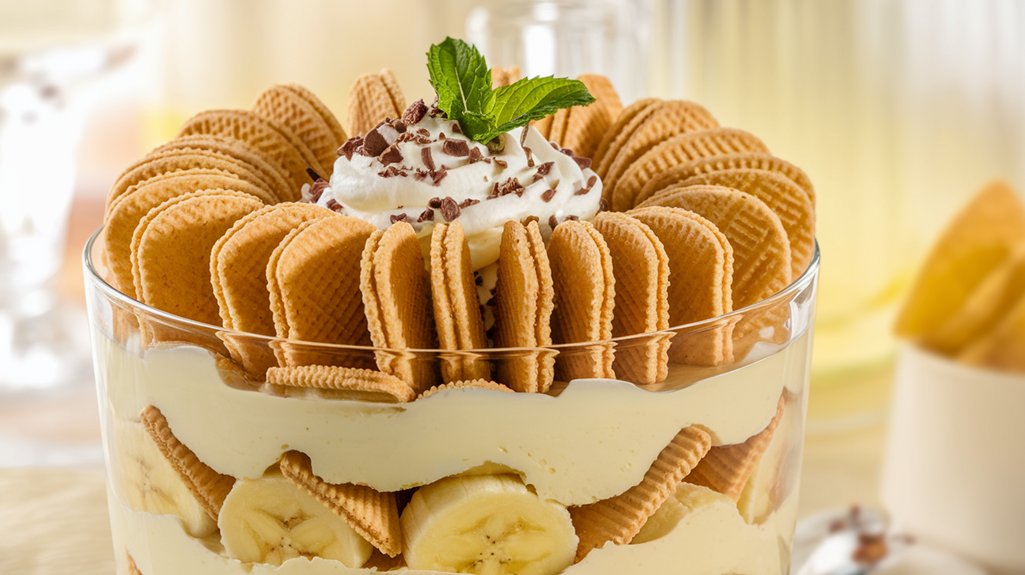
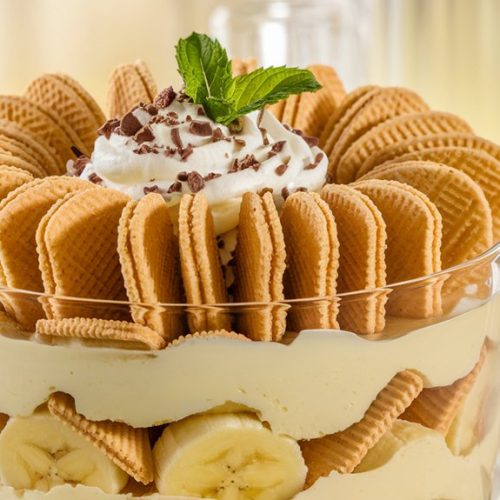
Nilla Wafer Banana Pudding is a classic American dessert that combines creamy vanilla pudding with layers of ripe bananas and crispy Nilla Wafers.
This delightful treat is perfect for any occasion, whether it’s a family gathering, potluck, or just a simple dessert craving.
The pudding’s smooth texture and the sweet, soft bananas create a harmonious blend that contrasts beautifully with the crunchy wafers, making it an irresistible choice for dessert lovers.
Not only is this dessert easy to prepare, but it also requires minimal ingredients, many of which you may already have in your pantry.
The preparation involves a simple process of making a homemade vanilla pudding, which is then layered with sliced bananas and Nilla Wafers.
Once assembled, the dessert is chilled to allow the flavors to meld together, resulting in a rich and satisfying treat that’s sure to please everyone.
Ingredients:
- 3/4 cup granulated sugar
- 1/3 cup all-purpose flour
- 1/4 teaspoon salt
- 3 cups whole milk
- 3 large egg yolks
- 2 teaspoons vanilla extract
- 1 box Nilla Wafers
- 4 large bananas, sliced
- 1 cup heavy whipping cream
- 2 tablespoons powdered sugar
To prepare the Nilla Wafer Banana Pudding, start by whisking together the sugar, flour, and salt in a medium saucepan.
Gradually add the milk, continuing to whisk as you cook the mixture over medium heat until it thickens.
In a separate bowl, beat the egg yolks, and then slowly incorporate a small amount of the hot milk mixture into the yolks.
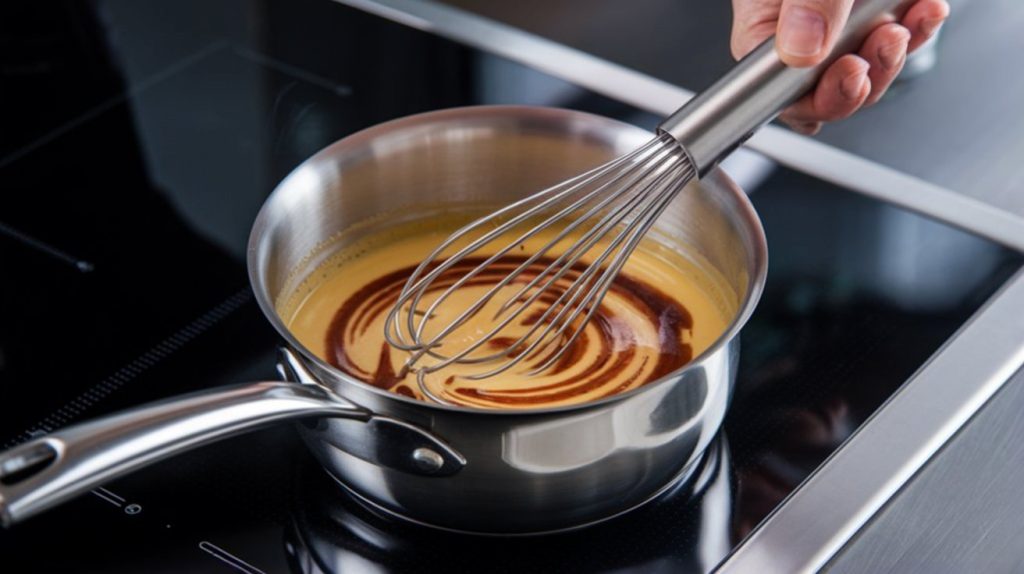
Pour this back into the saucepan and stir constantly for an additional two minutes over low heat.
Remove from heat and add the vanilla extract.
In a 9×13 inch baking dish, arrange layers of Nilla Wafers, banana slices, and half of the pudding.
Repeat the layers with the remaining ingredients.
Cover the dish with plastic wrap and refrigerate it for two hours.
Before serving, whip the heavy cream with powdered sugar until soft peaks form, then spread it over the chilled pudding.
Garnish with additional Nilla Wafers if desired.
For best results, use ripe but firm bananas to prevent them from becoming too mushy in the pudding.
If you prefer a more pronounced vanilla flavor, consider adding an extra half teaspoon of vanilla extract.
This dessert can be made a day ahead, which allows the flavors to blend even more, making it an excellent choice for preparing in advance for gatherings.
Enjoy the creamy and comforting taste of this timeless dessert!
Cook & Prep Time
Crafting the delectable Nilla Wafer Banana Pudding requires a keen eye on time management.
First, allocate 20 minutes for preparation, guaranteeing all ingredients are measured accurately and ready to go.
The cook time is a brief 10 minutes, where you’ll masterfully thicken the custard and integrate the egg yolk.
Precision during this phase is vital to prevent curdling.
Allow 2 hours for resting, as this dessert demands refrigeration for flavors to meld and textures to harmonize.
With a total time commitment of just over two and a half hours, you’ll yield a delightful dessert for eight servings.
The precise balance of prep, cooking, and resting guarantees a pudding that’s both luscious and perfectly set, ready to impress your guests.
Cooking Steps
To begin crafting your Nilla Wafer Banana Pudding, you’ll start by combining the granulated sugar, all-purpose flour, and salt in a medium saucepan, creating a smooth blend of dry ingredients.
Gradually whisk in the whole milk, ensuring a seamless incorporation while cooking over medium heat until the mixture thickens.
In a separate bowl, beat the egg yolks and carefully blend them with a small amount of the hot milk mixture before stirring the combined mixture back into the saucepan, finishing with a gentle infusion of vanilla extract for aromatic depth.
Step 1. Combine Dry Ingredients Saucepan
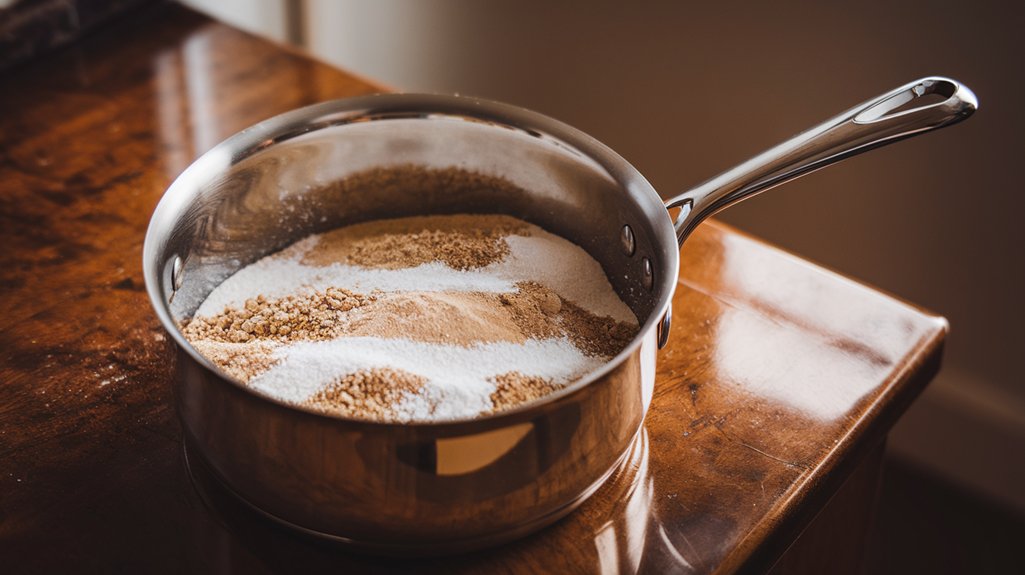
Start by whisking together the sugar, flour, and salt in a medium saucepan.
Guarantee these dry ingredients are evenly combined to create a smooth base for your pudding.
The sugar adds sweetness, while the flour acts as a thickening agent, and the salt enhances the flavors.
As you whisk, aim for a homogenous blend, free of clumps.
Hold the whisk firmly and use a consistent, circular motion to integrate the ingredients effectively.
This step is essential for a silky, lump-free pudding.
Use your precision to guarantee the mixture is well aerated and evenly distributed across the saucepan’s surface.
Once combined, your dry ingredients should resemble a fine, gritty sand, perfectly prepared for the next steps of the pudding-making process.
Step 2. Gradually Whisk in Whole Milk
Begin by pouring the whole milk into the saucepan gradually, ensuring a smooth incorporation with the dry ingredients.
As you whisk, maintain a steady rhythm to prevent lumps from forming in the mixture.
This gentle method allows the sugar, flour, and salt to dissolve harmoniously, resulting in a silky base for your pudding.
Keep your focus on achieving a uniform consistency, as this step is essential for the pudding’s texture.
Once the milk is fully integrated, place the saucepan over medium heat.
Continuously whisk to promote even heat distribution, avoiding scorching the bottom.
As the mixture heats, it’ll begin to thicken, transforming into a velvety custard.
Pay attention to subtle changes in viscosity, indicating it’s ready for the next step in your recipe.
Step 3. Beat Egg Yolks Separately

Crack the egg yolks into a separate mixing bowl, guaranteeing no whites are mixed in, as they can affect the texture of the custard.
Use a gentle hand to keep the yolks intact, as precision here guarantees a smooth, creamy consistency in your pudding.
Once separated, use a whisk to beat the yolks until they are pale yellow and slightly thickened.
This step is essential for achieving a rich custard that will elevate your dessert.
| Step | Tool | Action |
|---|---|---|
| Crack | Hands | Separate yolks |
| Beat | Whisk | Pale, thick texture |
| Monitor | Eyes | Avoid whites |
| Prepare | Bowl | Ready for mixing |
Your attention to detail in this step sets the foundation for a delectable banana pudding masterpiece.
Step 4. Blend Egg Yolk Mixture
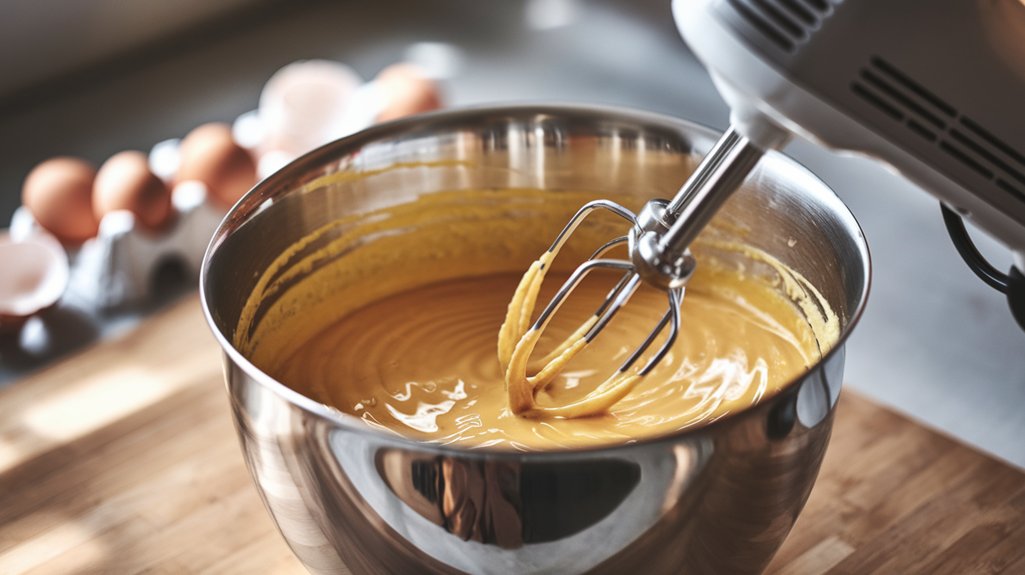
Gently incorporate the hot milk mixture into the beaten egg yolks to temper them.
This vital step prevents curdling by gradually raising the yolks’ temperature.
Use a ladle to transfer a small amount of the steaming milk mixture into the yolks, whisking continuously.
Maintain a steady hand and a rhythmic motion to guarantee uniformity.
Once the egg yolk mixture is evenly tempered, pour it back into the saucepan, joining the rest of the milk mixture.
Employ consistent stirring to achieve a seamless blend, preventing any lumps.
Keep the heat low, allowing the mixture to thicken gently.
The result should be a smooth, velvety consistency, signaling it’s ready for the next stage in crafting your delightful banana pudding masterpiece.
Step 5. Stir Vanilla Into Mixture
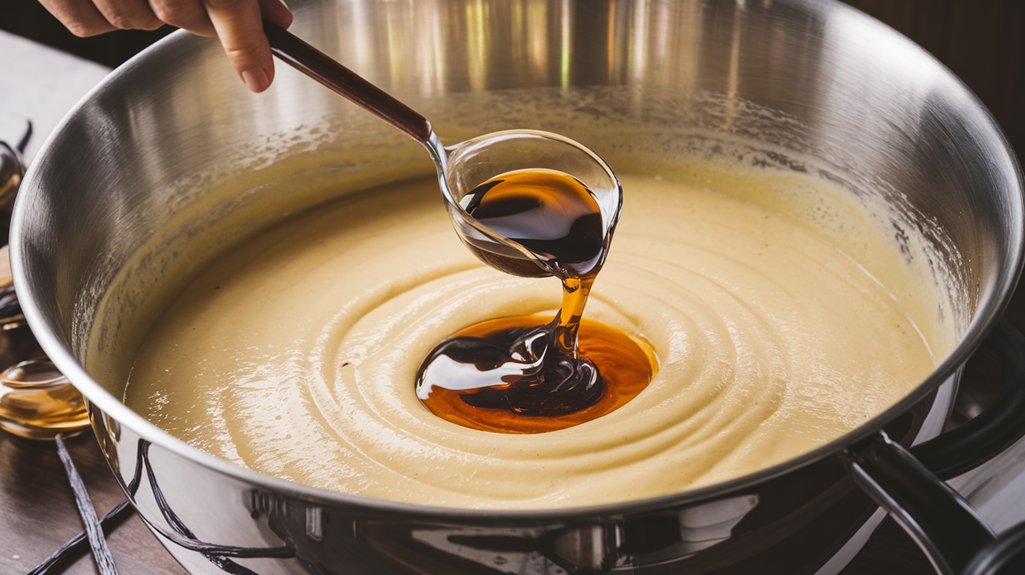
Infuse the mixture with a burst of vanilla by stirring in the extract.
As you drizzle the two teaspoons of pure vanilla extract into the warm custard, be certain to stir continuously.
This guarantees even distribution of the aromatic essence, enhancing the pudding’s depth of flavor.
Use a whisk to blend the vanilla smoothly into the mixture, preventing any potential clumping.
The heat from the custard will coax out the vanilla’s full-bodied fragrance, creating a symphony of sweet notes.
Confirm the mixture is off the heat to avoid overheating the delicate vanilla oils.
This step is essential, allowing the custard to capture the vanilla’s subtle complexity without losing its integrity.
Achieving a harmonious blend at this stage sets the foundation for a perfectly flavored dessert.
Final Thoughts
When it comes to classic American desserts, Nilla Wafer Banana Pudding stands out as a timeless favorite.
Its harmonious blend of creamy custard, ripe banana slices, and crisp Nilla Wafers offers a delightful textural contrast.
As you prepare this dish, remember to maintain precision with each step, ensuring the custard thickens properly and the layers remain distinct yet cohesive.
The resting period in the refrigerator allows the flavors to meld beautifully, enhancing the overall taste profile.
Using ripe yet firm bananas is essential, preventing a mushy texture while retaining their sweet essence.
Whipping the cream to soft peaks adds a luxurious finish.
Serve this pudding chilled for best enjoyment, and don’t hesitate to make it a day ahead for gatherings.
Its nostalgic charm will surely impress.
Frequently Asked Questions
Can I Use a Different Type of Cookie Instead of Nilla Wafers?
You can substitute different cookies, like graham crackers or shortbread. Consider their structural integrity and flavor profile to guarantee they complement the dish. Adjust layering technique and moisture absorption for ideal texture and taste balance.
How Do I Store Leftover Banana Pudding?
Store leftovers in an airtight container to maintain freshness. Keep it refrigerated at a temperature of 40°F or below. Consume within 2-3 days to guarantee peak taste and texture. Avoid freezing as it alters the pudding’s consistency.
Can I Substitute Almond Milk for Whole Milk?
Yes, you can substitute almond milk for whole milk. Make sure you’re using unsweetened almond milk to maintain flavor balance. The pudding may be slightly thinner, so consider adding a thickener like cornstarch to achieve desired consistency.
Is It Possible to Make This Dessert Gluten-Free?
Yes, you can make this dessert gluten-free. Substitute gluten-free all-purpose flour for regular flour and use gluten-free cookies instead of Nilla Wafers. Ascertain all other ingredients are gluten-free certified to maintain dietary compliance.
How Long in Advance Can I Prepare This Pudding?
You can prepare this pudding up to a day in advance. Doing so allows the flavors to meld ideally. Make certain the pudding is refrigerated, covered with plastic wrap, to maintain freshness and prevent any unwanted moisture absorption.
Nilla Wafer Banana Pudding
Equipment
- 1 Medium saucepan
- 1 Whisk
- 1 large mixing bowl
- 1 9×13 inch baking dish
- 1 plastic wrap
- 1 refrigerator
Ingredients
- 3/4 cup granulated sugar
- 1/3 cup all-purpose flour
- 1/4 teaspoon salt
- 3 cups whole milk
- 3 large egg yolks
- 2 teaspoons vanilla extract
- 1 box Nilla Wafers
- 4 large bananas sliced
- 1 cup heavy whipping cream
- 2 tablespoons powdered sugar
Instructions
- In a medium saucepan, whisk together sugar, flour, and salt.
- Gradually whisk in milk and cook over medium heat until thickened.
- In a separate bowl, beat egg yolks and slowly whisk in a small amount of the hot milk mixture.
- Pour the egg yolk mixture back into the saucepan, stirring constantly.
- Cook for an additional 2 minutes on low heat, then remove from heat and stir in vanilla extract.
- In a 9×13 inch baking dish, layer Nilla Wafers, banana slices, and half of the pudding.
- Repeat the layers with remaining wafers, bananas, and pudding.
- Cover with plastic wrap and refrigerate for 2 hours.
- Before serving, whip the heavy cream with powdered sugar until soft peaks form.
- Spread whipped cream over the chilled pudding and garnish with additional Nilla Wafers if desired.
Notes

Cynthia Weatherford is a seasoned chef and culinary enthusiast who serves as the Recipe creator of Somonday. With decades of experience in the kitchen and a passion for exploring diverse cuisines, Cynthia brings a blend of creativity and technique to every dish. Known for transforming simple ingredients into show-stopping meals, Cynthia believes that cooking is an art form anyone can master. Dedicated to inspiring home cooks, Cynthia shares approachable recipes, pro tips, and culinary wisdom to make every meal memorable.


