
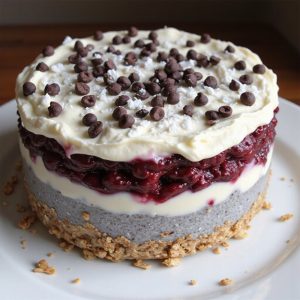
Imagine a vibrant, layered dessert that bursts with color and texture, where the deep purple of blended berries mingles with the creamy white of coconut, all atop a crunchy, golden granola base.
The aroma of vanilla and maple syrup evokes a sense of warm comfort, wrapping you in coziness with every bite.
This No-Bake Forest Cake is more than just a treat; it’s a demonstration of simplicity and elegance, perfect for those hectic weeknights when time is scarce but the desire for something special lingers.
I recall a time when unexpected guests arrived, and this dessert saved the day with its quick preparation and impressive presentation.
This cake isn’t only a lifesaver in moments like these but also an ideal centerpiece for leisurely Sunday suppers with family.
Ready to create a dessert that’s as delightful to make as it’s to eat? Let’s cook!
Why You’ll Love It
- Delivers bold flavor with layers of berries, chia, and coconut.
- Uses pantry staples like chia seeds, almond milk, and granola.
- Provides a nutritious dessert option with rich chia seed pudding.
- Offers a customizable recipe with various fruits and nuts.
- Requires zero baking, making it a quick and easy dessert option.
Ingredients
- 1 cup chia seeds — verify they’re fresh for best texture.
- 2 cups almond milk — choose unsweetened for a lighter taste.
- 1/4 cup maple syrup — opt for pure maple syrup for authentic flavor.
- 1 teaspoon vanilla extract — use pure extract for the best aroma.
- 1 cup mixed berries — fresh or frozen can be used.
- 2 cups granola — select a brand with minimal added sugars.
- 1 cup coconut cream — chill in advance for easier handling.
- 1/2 cup dark chocolate chips — aim for at least 70% cocoa content.
- 1/4 cup shredded coconut — unsweetened is preferable.
Step-by-Step Method
Prepare the Chia Mixture
Combine chia seeds, almond milk, maple syrup, and vanilla extract in a mixing bowl. Whisk the mixture until all ingredients are well blended.
Let the mixture rest for about 10 minutes to allow the chia seeds to begin absorbing the liquid. Whisk again to guarantee an even distribution and set aside. This step is vital to avoid clumping and guarantee a smooth texture.
Blend the Berries
Blend the mixed berries until smooth using a blender. This will create a berry puree that adds a fresh and fruity layer to the cake.
Set the puree aside once it reaches your desired consistency. If you prefer, you can strain the puree to remove any seeds for a finer texture.
Layer the Granola
Spread a layer of granola evenly at the bottom of an 8-inch springform pan. The granola will form the base of your no-bake cake, providing a crunchy contrast to the creamy layers.
Guarantee the granola is evenly distributed to support the layers that will follow.
Assemble the Chia Pudding Layer
Pour half of the prepared chia pudding over the granola layer. Use a spatula to spread it evenly, covering the granola completely.
This layer will provide a creamy and nutritious component to the cake, contrasting with the crunch of the granola.
Add the Berry Puree
Spread a layer of the prepared berry puree over the chia pudding. Use the spatula to guarantee an even distribution.
The berry layer adds a burst of flavor and color, enhancing both the appearance and taste of the cake.
Spread the Coconut Cream
Spread a layer of coconut cream over the berry puree. The coconut cream adds a rich and creamy layer, complementing the tartness of the berries.
Guarantee the layer is smooth and even to maintain the structure of the cake.
Repeat the Layers
Repeat the process by adding another layer of chia pudding, followed by berry puree, and then coconut cream.
This repetition guarantees that every slice of cake has a balanced combination of textures and flavors.
Top with Chocolate and Coconut
Sprinkle dark chocolate chips and shredded coconut over the top layer of coconut cream.
These toppings add a touch of sweetness and a hint of texture, completing the cake beautifully.
Refrigerate to Set
Cover the springform pan and refrigerate the cake for at least 4 hours.
This allows all the layers to set properly and the flavors to meld together. Once set, the cake will hold its shape and be ready to serve.
Ingredient Swaps
- For a dairy-free option, continue using almond milk or substitute with any other plant-based milk like oat or soy milk.
- If maple syrup is unavailable or too expensive, you can use honey or agave syrup as a sweetener.
- Replace coconut cream with whipped regular cream or a dairy-free alternative if preferred.
- Use any available fresh fruits in place of mixed berries, such as peaches, bananas, or mangos, depending on regional availability.
- Substitute dark chocolate chips with milk chocolate or white chocolate chips if desired.
You Must Know
- Whisk Thoroughly: Confirm to whisk the chia mixture after the initial 10-minute rest to prevent clumping and achieve a smooth, even texture.
- Blend Carefully: Make certain to blend the mixed berries until completely smooth for a consistent berry puree layer.
- Evenly Distribute: Spread each layer evenly with a spatula to confirm a uniform texture and appearance throughout the cake.
- Refrigerate Properly: Allow the cake to set in the refrigerator for at least 4 hours to confirm it holds its shape when served.
- Customize Flavors: Feel free to adjust the sweetness with more maple syrup or add your favorite fruits and nuts for a personalized touch.
Serving Tips
- Serve chilled with a dollop of whipped coconut cream on top.
- Garnish with fresh mint leaves for a pop of color and freshness.
- Pair with a glass of chilled almond milk or herbal tea.
- Add a sprinkle of crushed nuts for extra crunch and flavor.
- Serve each slice with a side of fresh mixed berries for added vibrancy.
Storage & Make-Ahead
The No-Bake Forest Cake can be stored in the refrigerator for up to three days.
Maintaining its freshness and texture.
It doesn’t freeze well due to the chia pudding’s consistency.
However, you can prepare the layers a day ahead and assemble the cake right before serving for convenience.
Reheating
The No-Bake Forest Cake is best enjoyed cold.
For a gentle reheating, use a microwave on a low setting briefly, or a warm oven.
Avoid stovetop to maintain texture.
Culinary Traditions and Innovations
While exploring the world of culinary traditions and innovations, I’ve found that no-bake desserts like the Forest Cake offer a revitalizing twist on classic sweets.
They marry the ease of modern cooking with timeless flavors, creating an inviting experience without the fuss of baking.
Imagine the joy of layering chia pudding, berries, and coconut cream, each bite a delightful dance of textures and tastes.
No-bake creations especially thrive in warm weather, where the oven stays off, yet the cravings for something decadent persist.
The Forest Cake is a canvas of innovation, inviting you to experiment with ingredients—perhaps a splash of citrus or a sprinkle of nuts.
This dessert not only honors tradition but also celebrates creativity, proving the kitchen is a playground for delicious discovery.
Final Thoughts
Why not give this No-Bake Forest Cake a try and let your creativity shine by adding your favorite fruits or nuts? It’s a delightful and versatile dessert that’s sure to impress!
Frequently Asked Questions
Can I Use a Different Type of Milk for the Chia Pudding?
Of course, you can! I often swap almond milk for coconut, oat, or even cashew milk. Each brings its own delightful twist to the flavor. Try experimenting with different milks to find your perfect match. Enjoy the adventure!
What Can I Substitute for Coconut Cream if I Have an Allergy?
If you’re allergic to coconut cream, I’d suggest using whipped cashew cream or a thick Greek yogurt instead. They’re both delicious substitutes that’ll still give your dessert a creamy, luxurious texture without the coconut. Enjoy!
How Can I Prevent the Granola Layer From Becoming Soggy?
To keep the granola layer crunchy, I place it on a lightly toasted baking sheet first. This adds a protective barrier, and you’ll love the extra crisp texture. I promise, it’s worth the effort!
Can I Make This Cake Gluten-Free?
You can absolutely make this cake gluten-free! Just swap the granola with a gluten-free version. It’s simple, delicious, and perfect for satisfying your sweet tooth without the gluten. You’ll love how easy it is to customize!
Is It Possible to Freeze the No-Bake Cake for Longer Storage?
I’ve tried freezing the no-bake cake, and it works! Just wrap it well to prevent freezer burn. Allow it to thaw in the fridge before serving. The texture stays delightful, and it’s perfect for prepping ahead!
No-Bake Forest Cake with Chia Pudding Layers
Equipment
- 1 Mixing bowl
- 1 Whisk
- 1 Blender
- 1 Spatula
- 1 8-inch springform pan
- 1 refrigerator
Ingredients
- 1 cup chia seeds
- 2 cup almond milk
- 1/4 cup maple syrup
- 1 teaspoon vanilla extract
- 1 cup mixed berries
- 2 cup granola
- 1 cup coconut cream
- 1/2 cup dark chocolate chips
- 1/4 cup shredded coconut
Instructions
- In a mixing bowl, combine chia seeds, almond milk, maple syrup, and vanilla extract, then whisk until well mixed.
- Let the chia mixture rest for about 10 minutes, then whisk again to prevent clumping, and set aside.
- Blend mixed berries until smooth and set aside.
- In the springform pan, spread a layer of granola evenly at the bottom.
- Pour half of the chia pudding over the granola layer, spreading it evenly with a spatula.
- Add a layer of berry puree over the chia pudding.
- Spread a layer of coconut cream over the berry puree.
- Repeat the chia pudding, berry puree, and coconut cream layers.
- Top with a sprinkle of dark chocolate chips and shredded coconut.
- Cover and refrigerate the cake for at least 4 hours to set well before serving.
Notes

Cynthia Weatherford is a seasoned chef and culinary enthusiast who serves as the Recipe creator of Somonday. With decades of experience in the kitchen and a passion for exploring diverse cuisines, Cynthia brings a blend of creativity and technique to every dish. Known for transforming simple ingredients into show-stopping meals, Cynthia believes that cooking is an art form anyone can master. Dedicated to inspiring home cooks, Cynthia shares approachable recipes, pro tips, and culinary wisdom to make every meal memorable.


