
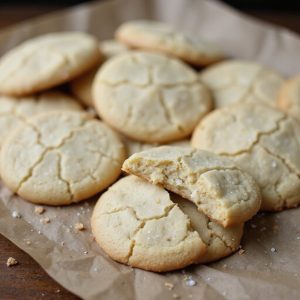
Picture a tray of sugar-dusted cookies emerging golden at the edges, their centers soft and plush like pillow clouds, perfuming the kitchen with warm vanilla and buttery sweetness.
Imagine cracking one open: a tender, chewy middle that gives way to crisp, sparkling rims—comfort in every bite. These NY Sugar Cookies are my reset button, the kind I bake when the week feels loud and I need something simple, nostalgic, and reliably irresistible.
They’re perfect for after-school treats, quick desserts for busy weeknights, or a cozy finish to Sunday suppers—and they hold up beautifully for gifts and cookie swaps.
Once, a last-minute playdate turned into a small crowd; this dough came together fast, chilled while we set the table, and delivered bakery-level cookies right on time. You’ll get that classic chew, polished look, and pure vanilla glow without fuss.
Ready? Let’s cook!
Why You’ll Love It
- Uses pantry staples you likely already have
- Delivers bakery-style chew with tender centers
- Mixes quickly; minimal prep and equipment
- Chills briefly for better flavor and thickness
- Adapts easily with toppings and flavor variations
Ingredients
- 2 3/4 cups all-purpose flour — scoop and level for accuracy (unbleached, if possible)
- 1 teaspoon baking powder — fresh and aluminum-free
- 1/2 teaspoon baking soda — check it’s active
- 1/2 teaspoon fine sea salt — not coarse
- 1 cup unsalted butter, softened — room temp, not greasy
- 1 1/4 cups granulated sugar — plus extra for rolling
- 1/4 cup light brown sugar, packed — soft, no hard clumps
- 1 large egg, room temperature — brings better emulsion
- 1 large egg yolk, room temperature — adds chew and richness
- 2 teaspoons pure vanilla extract — real vanilla, not imitation
- 1 tablespoon whole milk — just to loosen the dough
- 1/4 cup coarse sanding sugar (optional) — for a sparkly crunch
Step-by-Step Method
Cream the Butter & Sugars
Beat softened butter with granulated and brown sugar until pale and fluffy, 2 to 3 minutes. Use medium speed to incorporate air for lift. Scrape the bowl halfway through. Proper creaming guarantees tender cookies with a slight chew. Avoid overmixing once light and airy; you want a creamy, spreadable base.
Whisk the Dry Ingredients
Combine flour, baking powder, baking soda, and salt in a medium bowl. Whisk to evenly distribute leaveners and salt. Breaking up any flour clumps prevents streaks later. Set the bowl aside. Having the dry mixture ready streamlines the process once the wet ingredients are combined.
Add Eggs, Yolks & Vanilla
Beat in the egg, extra yolk, and vanilla until smooth and glossy. Mix just until fully incorporated, avoiding overbeating. The yolk adds richness and chew. Scrape the bowl to ensure no butter pockets remain. A cohesive mixture sets the stage for even dough.
Stir in the Milk
Mix in the milk on low speed just until combined. This loosens the batter slightly and aids tenderness. Avoid overmixing, which can create excess gluten later. The mixture should look creamy and uniform without streaks of liquid or fat.
Fold in Dry Ingredients
Add the dry ingredients in two additions on low speed. Mix just until no dry streaks remain and a soft dough forms. Stop as soon as everything is combined to preserve a tender crumb. Use a spatula to finish folding and clean the bowl sides.
Chill to Firm the Dough
Cover the bowl and chill for 1 hour. This firms the butter, concentrates flavor, and reduces spread. If dough feels sticky after chilling, give it 15 more minutes. Cooler dough scoops cleanly and handles better, producing thicker cookies.
Preheat & Prepare Pans
Heat the oven to 350°F (175°C). Line baking sheets with parchment or silicone mats. Prepare two sheets to rotate batches efficiently. Have a cooling rack ready. Preheating guarantees the cookies set quickly and bake evenly from the start.
Portion & Roll the Dough
Scoop 1.5-tablespoon portions with a cookie scoop for consistent size. Roll into smooth balls. For a sparkly finish, roll each ball in granulated or sanding sugar. Lightly dust hands with flour if dough is tacky. Keep remaining dough chilled while working.
Arrange & Gently Flatten
Place dough balls 2 inches apart on prepared sheets. Lightly press the tops to flatten slightly for even spread. For thicker cookies, flatten less. For crispier edges, press a touch more. Work quickly so dough stays cool, promoting better shape.
Bake Until Just Set
Bake one sheet at a time for 9 to 11 minutes. Pull when edges are set and centers look pale and slightly underdone. Residual heat finishes baking on the sheet. Avoid browning for a soft, chewy center with delicate edges.
Cool & Transfer
Let cookies rest on the sheet for 5 minutes to set structure. Transfer gently to a cooling rack to cool completely. This prevents soggy bottoms and preserves texture. Allow pans to cool between batches for consistent results.
Repeat & Store
Repeat with remaining dough, keeping unbaked portions chilled. Bake in batches for even doneness. Once fully cool, store cookies in an airtight container at room temperature for up to 4 days. For extra chew, add a slice of bread to the container.
Ingredient Swaps
- Flour: Use 1:1 gluten-free all-purpose blend; or swap 1/3 of the flour with cake flour for softer cookies.
- Butter: Replace with equal weight plant-based butter sticks; or use 3/4 cup neutral oil plus +2 tbsp flour to compensate (texture slightly different).
- Sugar: Use all granulated if no brown sugar (cookies will be crisper); or coconut sugar for deeper flavor (dough may brown faster).
- Eggs: For egg-free, use 1/4 cup unsweetened applesauce for the egg and 1 tbsp milk + 1 tsp oil for the yolk; or 2 flax eggs (2 tbsp ground flax + 5 tbsp water).
- Milk: Any dairy or unsweetened plant milk works.
- Vanilla: Substitute 1/2 tsp almond extract or 1 tsp vanilla bean paste; omit sanding sugar or use turbinado if unavailable.
- Leaveners: If out of baking soda, replace with an additional 1 tsp baking powder (total 2 tsp); expect slightly less spread.
- Salt: If using salted butter, reduce added salt to a pinch.
You Must Know
Doneness • If edges look set but centers are pale and slightly domed with faint sugar crackles, pull the tray; carryover sets in 5 minutes on-sheet, preventing dryness.
Troubleshoot • If cookies spread too thin and run into each other, chill shaped portions 20–30 minutes and switch to light-colored pans; look for 2 inches of space and a 1/2-inch rim of set edge.
Scale • For 12 cookies, halve all ingredients and use a 1.5 Tbsp scoop still; for minis (1 Tbsp, ~36 cookies), reduce oven time to 7–9 minutes and look for just-set edges.
Flavor Boost • For deeper bakery notes, brown 2–3 Tbsp of the butter (from the 1 cup) to amber and cool to room temp, or add 1/4 tsp almond extract; sniff for a warm, nutty aroma before combining.
Make-Ahead • For weeknight ease, portion and freeze dough balls until solid (2–3 hours), then bag; bake from frozen adding 1–2 minutes, pulling at the same pale, puffy center cue.
Serving Tips
- Serve warm with cold milk or vanilla bean ice cream scoops.
- Create a cookie sandwich with vanilla buttercream or lemon curd.
- Plate with fresh berries and a dusting of powdered sugar.
- Pair with hot coffee, earl grey, or chai for balance.
- Gift-wrap stacks in cellophane with a ribbon and flavor label.
Storage & Make-Ahead
Store cookies airtight at room temperature 4–5 days or in the fridge up to 1 week.
Bring to room temp before serving.
Dough can be made ahead.
Chill up to 72 hours.
Both baked cookies and scooped dough balls freeze well for 2–3 months.
Bake frozen dough adding 1–2 minutes.
Reheating
Reheat gently: microwave 1–2 cookies 8–12 seconds.
Oven at 300°F for 4–6 minutes on a sheet.
Stovetop skillet on low 1–2 minutes per side.
Avoid overbaking; tent foil if drying.
Grandma’s Stoop-Side Cookies
Lantern-glow evenings on a Brooklyn stoop inspired these Grandma’s Stoop-Side Cookies—soft-centered, sugar-crisped rounds you can tuck warm into a napkin. I mix butter and two sugars until airy, then fold in egg, yolk, vanilla, and a breath of milk—simple moves that lock in tenderness.
Chilled dough scoops clean; a quick roll through granulated or sanding sugar gives that streetlight sparkle. Bake just to pale puff, let them settle on the sheet, and you’ll hear the faint crackle as the crust sets.
- A napkin-wrapped cookie keeps fingers warm while the center stays plush.
- Dunk with tea or a glass of milk; the edges hold, the middle yields.
- Stash dough balls in the fridge for late-night stoop cravings, ready to bake.
Final Thoughts
Ready to bake? Give these NY Sugar Cookies a try, then tweak them to your taste—roll in sanding sugar, add a hint of almond extract, or finish with flaky salt for your perfect bite!
Frequently Asked Questions
Can I Freeze the Dough Balls and Bake Straight From Frozen?
Yes—you can freeze them. I flash-freeze scooped balls, then bake from frozen. Add 2–3 minutes, watch for set edges and pale, puffy centers. For thicker, chewier cookies, freeze shaped balls 20 minutes before baking, too.
How Do High-Altitude Adjustments Change Baking Time and Leavening?
At altitude, I shorten leavening slightly, add a touch more flour, and lower sugar. I bake a bit hotter, watch sooner, and extend minutes as needed—cookies set quicker outside, but centers need extra time to finish.
Which Gluten-Free Flour Blend Works Best for These Cookies?
Use a 1:1 swap of a high-starch blend like Bob’s 1:1 or King Arthur Measure for Measure. I add 1/4 teaspoon xanthan, chill longer, and bake just until pale—cookies emerge tender, golden, and beautifully chewy.
Can I Make Them Dairy-Free Without Sacrificing Texture?
Yes—you can. I swap butter with refined coconut oil or vegan butter, use oat milk, and add 1 teaspoon cornstarch. You’ll keep plush centers, delicate edges, and vanilla warmth, like soft lamplight on a winter evening.
How Do I Prevent Cookies From Spreading Too Much?
Chill scooped dough, use room-temp eggs, keep butter just softened, and weigh flour. I line light sheets, flatten lightly, bake one tray at a time. If it’s still spreading, I chill shaped balls 20 minutes—problem melts away.
NY Sugar Cookies
Equipment
- 2 Mixing bowl
- 1 electric hand mixer or stand mixer
- 1 Whisk
- 1 Rubber spatula
- 1 measuring cup set
- 1 Measuring spoons set
- 2 Baking sheet
- 2 silicone baking mat or sheet of parchment paper
- 1 Cooling rack
- 1 Cookie scoop 1.5 tablespoon
- 1 Rolling Pin optional
- 2 Small bowl for sanding sugar and egg wash, optional
Ingredients
- 2 3/4 cup all-purpose flour
- 1 teaspoon baking powder
- 1/2 teaspoon baking soda
- 1/2 teaspoon fine sea salt
- 1 cup unsalted butter softened
- 1 1/4 cup granulated sugar plus extra for rolling
- 1/4 cup light brown sugar packed
- 1 large egg room temperature
- 1 large egg yolk room temperature
- 2 teaspoon pure vanilla extract
- 1 tablespoon whole milk
- 1/4 cup coarse sanding sugar optional for topping
Instructions
- Whisk together the flour, baking powder, baking soda, and salt in a medium bowl and set aside.
- In a large bowl, beat the softened butter, granulated sugar, and brown sugar with a mixer on medium speed until pale and fluffy, 2 to 3 minutes.
- Add the egg, egg yolk, and vanilla to the butter mixture and beat until smooth and glossy.
- Mix in the milk just until combined.
- Add the dry ingredients to the wet in two additions, mixing on low just until a soft dough forms and no dry streaks remain.
- Cover the bowl and chill the dough for 1 hour to firm slightly for easier handling.
- Preheat the oven to 350°F (175°C) and line baking sheets with parchment paper or silicone mats.
- Scoop the dough into 1.5-tablespoon portions, roll into balls, and, if desired, roll each ball in granulated or sanding sugar to coat.
- Arrange dough balls 2 inches apart on prepared sheets and lightly flatten the tops with your fingertips for even spreading.
- Bake one sheet at a time for 9 to 11 minutes until edges are set and centers are just barely pale and puffy.
- Let cookies cool on the sheet for 5 minutes, then transfer to a cooling rack to cool completely.
- Repeat with remaining dough, keeping unbaked portions chilled between batches.
Notes

Cynthia Weatherford is a seasoned chef and culinary enthusiast who serves as the Recipe creator of Somonday. With decades of experience in the kitchen and a passion for exploring diverse cuisines, Cynthia brings a blend of creativity and technique to every dish. Known for transforming simple ingredients into show-stopping meals, Cynthia believes that cooking is an art form anyone can master. Dedicated to inspiring home cooks, Cynthia shares approachable recipes, pro tips, and culinary wisdom to make every meal memorable.


