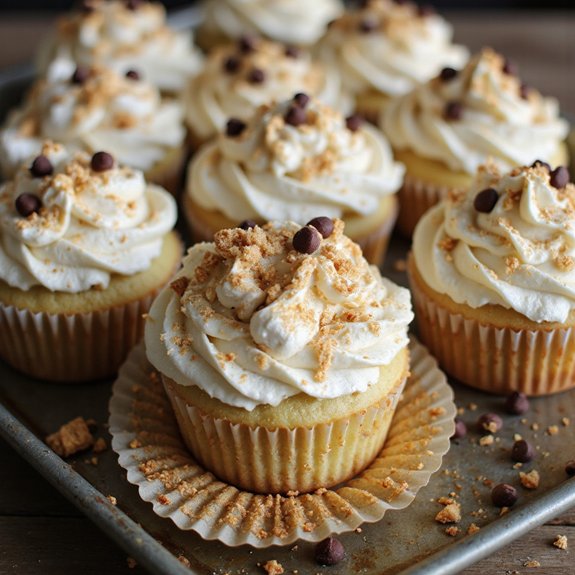
Picture a tray of cupcakes frosted to look like tiny campsites—swirls of mossy green buttercream “grass,” graham cracker “dirt,” and little chocolate tents just waiting to be admired.
These One Happy Camper Cupcakes are a cozy, whimsical dessert that comes together surprisingly quickly, perfect when you need something fun on the table in under an hour.
They’re ideal for family celebrations, kids’ parties, camping-themed birthdays, or anyone with a playful sweet tooth.
I still remember the rainy afternoon when our planned backyard campout was washed out. Spirits were low, so I pulled out a box of cupcake liners, and we built a “campground” on a baking sheet instead.
The kids decorated each cupcake like their own campsite, and suddenly no one missed the soggy tents.
These cupcakes shine for last-minute celebrations, classroom treats, or easy entertaining when you want maximum charm with minimal stress. Ready to bring this dish to life?
Why You’ll Love It
- Delivers nostalgic campfire s’mores flavor in soft, fluffy cupcake form
- Uses simple pantry ingredients and no special baking techniques required
- Bakes in under 20 minutes for fast, crowd-pleasing dessert
- Decorates easily with kid-friendly toppings and fun torch-toasted marshmallows
- Adapts well for make-ahead parties, potlucks, or classroom celebrations
Ingredients
- 190 g all-purpose flour — spoon and level for accuracy
- 10 g baking powder — guarantees a good rise
- 2 g fine salt — balances sweetness
- 150 g granulated sugar — white, standard grain
- 115 g unsalted butter, softened — room temperature for easy creaming
- 2 large eggs, room temperature — helps batter emulsify
- 5 ml vanilla extract — pure vanilla for best flavor
- 180 ml whole milk, room temperature — adds moisture and richness
- 90 g graham cracker crumbs — finely crushed for even mixing
- 90 g mini chocolate chips — semi-sweet for classic s’mores taste
- 90 g mini marshmallows — soft, fresh bag melts best
- 115 g unsalted butter, softened (for frosting) — room temperature for smooth frosting
- 240 g powdered sugar, sifted — removes lumps for silky texture
- 30 ml heavy cream — adjusts frosting to spreadable consistency
- 5 ml vanilla extract (for frosting) — rounds out sweetness
- 60 g graham cracker crumbs (for topping) — for crunchy finish
- 60 g mini chocolate chips (for topping) — extra chocolatey bite
- 60 g mini marshmallows (for topping) — toast lightly for campfire look
Step-by-Step Method
Preheat the Oven & Prep the Pan
Preheat the oven to 175°C (350°F). Line a standard 12-cup muffin tin with paper liners, pressing them firmly into each cup. Set the pan aside on a flat surface. This guarantees even baking and easy removal.
Gather all ingredients and equipment now so you can work efficiently once you start mixing.
Combine the Dry Ingredients
Whisk together the flour, baking powder, and salt in a medium mixing bowl. Break up any lumps and guarantees the leavening is evenly distributed.
Keep the mixture light and airy by not pressing it down. Set the bowl aside. Having the dry ingredients ready makes it easier to alternate with the wet ingredients later.
Cream Butter & Sugar
Beat the softened butter and granulated sugar in a large mixing bowl using a hand or stand mixer. Mix on medium speed for 2–3 minutes until the mixture looks pale, light, and fluffy.
Scrape down the sides of the bowl once or twice. Proper creaming helps create tender, well-risen cupcakes with a fine crumb.
Add Eggs & Vanilla
Add the eggs one at a time to the creamed butter mixture. Beat well after each addition until fully incorporated and smooth.
Pour in the vanilla extract and mix briefly to combine. Scrape down the bowl again. This step guarantees the eggs emulsify with the fat, helping the batter stay stable and evenly textured.
Start Adding Dry Ingredients
Add half of the dry ingredient mixture to the wet batter. Mix on low speed just until the flour is almost blended in. Avoid overmixing at this stage.
Overworking the flour can develop gluten and make the cupcakes dense. Stop as soon as you no longer see large streaks of dry flour.
Incorporate the Milk
Pour in the room-temperature milk and mix on low speed until it’s fully combined and the batter looks smooth.
Scrape around the bottom and sides of the bowl with a spatula to catch any unmixed portions. Keeping the mixer on low prevents splashing and helps the milk blend gently into the batter.
Finish the Batter & Fold in Mix-Ins
Add the remaining dry ingredients and mix on low just until no dry streaks remain. Switch to a rubber spatula and gently fold in the graham cracker crumbs and mini chocolate chips.
Use light motions to keep the batter airy. Make sure the mix-ins are evenly dispersed throughout so each cupcake has balanced flavor.
Fill the Cupcake Liners
Divide the batter evenly among the 12 cupcake liners. Fill each liner about two-thirds full, using a spoon or scoop for consistency.
Try to keep each portion similar so they bake evenly. Gently tap the pan on the counter once to settle the batter and release any large air pockets before baking.
Bake & Test for Doneness
Place the muffin tin in the preheated oven. Bake for 16–18 minutes, rotating the pan halfway if your oven has hot spots.
Check doneness by inserting a wooden skewer or toothpick into the center of a cupcake. It should come out clean or with a few moist crumbs, not wet batter.
Cool the Cupcakes Completely
Remove the cupcakes from the oven and let them cool in the pan for about 5 minutes. Carefully transfer them to a wire cooling rack using your hands or tongs.
Let them cool completely before frosting. Cooling on a rack prevents soggy bottoms and keeps the cupcakes’ texture light and pleasant.
Beat the Butter for Frosting
Prepare the frosting while the cupcakes cool. Place the softened butter in a medium mixing bowl. Beat it with a mixer on medium speed until smooth, creamy, and slightly lighter in color.
This usually takes 1–2 minutes. Properly creamed butter creates a silky base for the frosting and improves spreadability.
Add Powdered Sugar Gradually
Add the powdered sugar in small portions, mixing on low speed after each addition to prevent a sugar cloud. Once incorporated, increase to medium speed and beat until the mixture becomes fluffy.
Scrape down the bowl as needed. Continue until all the powdered sugar is blended smoothly into the butter mixture.
Mix In Vanilla & Cream
Pour in the vanilla extract and heavy cream. Beat the frosting for 1–2 minutes on medium speed until it becomes smooth, light, and spreadable.
If the frosting feels too thick, add an extra teaspoon of cream and mix again. Aim for a consistency that holds its shape but is easy to pipe or spread.
Frost the Cooled Cupcakes
Guarantee the cupcakes are completely cool before frosting. Transfer the frosting to a piping bag fitted with a round or star tip, or use a spatula.
Pipe or spread a generous swirl of frosting onto each cupcake, covering the top fully. Work carefully to keep the frosting neat and even on all cupcakes.
Add Graham Crumbs & Chocolate Chips
Sprinkle each frosted cupcake with graham cracker crumbs. Let some fall around the edges for a campfire-sand effect.
Add mini chocolate chips on top of the crumbs, pressing very lightly so they adhere without sinking too much. Aim for an even distribution so each bite includes both crunchy and chocolatey bits.
Top with Mini Marshmallows
Place several mini marshmallows on top of each cupcake, arranging them in a small cluster. Gently press them into the frosting so they stay in place but keep their shape.
Vary the orientation for a playful, campfire-inspired look. Make sure they’re secure if you plan to toast them in the next step.
Toast the Marshmallows (Optional)
Briefly toast the marshmallows using a kitchen torch or a hot grill/broiler. Keep the flame or heating element at a distance and move it constantly.
Toast for 15–30 seconds until the marshmallows are golden. Watch closely to prevent burning or melting the frosting. Remove immediately once they reach your desired color.
Let the Cupcakes Rest & Serve
Allow the decorated cupcakes to rest for at least 25 minutes. This gives the frosting time to set and the toppings to adhere firmly.
Keep them at room temperature during this time. Once set, serve the cupcakes as a fun, campfire-style treat. Store any leftovers in an airtight container at room temperature.
Ingredient Swaps
- Use an equal amount of margarine or neutral oil in place of butter, and any plant-based milk (soy, oat, almond) instead of whole milk for a dairy-free version.
- Swap eggs with 2 “flax eggs” (2 Tbsp ground flaxseed + 6 Tbsp water, rested 5–10 minutes) to make the cupcakes egg-free.
- Replace graham cracker crumbs with digestive biscuits, Marie biscuits, or other lightly sweet plain cookies if grahams aren’t available.
- Use dark or semi-sweet chocolate chips to tone down sweetness, or a chopped chocolate bar if chips are hard to find.
- For gluten-free cupcakes, substitute a 1:1 gluten-free all-purpose flour blend and use certified gluten-free cookies for the “graham” crumbs.
You Must Know
– Safety – *When using a torch or broiler for the marshmallows,* maintain at least 10–13 cm (4–5 inches) distance and limit exposure to 10–20 seconds per batch; this gives distinct golden spots and a toasted smell while minimizing the chance of the frosting liquefying or catching hot spots.
Serving Tips
- Serve on a wooden board with scattered graham crumbs for a campfire “trail” effect.
- Pair with cold milk, hot cocoa, or coffee for a cozy snack-time treat.
- Add a small chocolate square or mini graham wedge upright in the frosting.
- Arrange around a candle lantern centerpiece for a camp-themed party display.
- Serve slightly chilled so frosting is firm but marshmallows stay soft and chewy.
Storage & Make-Ahead
Store cooled, unfrosted cupcakes in an airtight container in the fridge for up to 4 days.
Frosted cupcakes keep 2–3 days.
For make-ahead, bake and cool, then wrap individually and freeze up to 2 months.
Thaw at room temperature, then frost and garnish just before serving.
Reheating
Reheat cupcakes gently.
Microwave 5–10 seconds (one at a time, unfrosted if possible), or warm in a 150°C (300°F) oven for 5–8 minutes.
Avoid stovetop to prevent drying.
Cupcake Campfire Treats in Culture
Once those cupcakes are warm and gooey again, they don’t just taste like a treat—they feel like a tiny campfire you can hold in your hand, and that feeling has deep roots in our culture.
When I bite into one, I’m pulled back to childhood nights, knees dusty, hoodie smelling like smoke, everyone leaning toward the same flickering flame.
We’ve told stories, sung off-key songs, and shared secrets around campfires for generations. Now, those graham-cracker crumbs and blistered marshmallows carry that tradition straight to the table.
I’ve watched friends relax the moment they taste that familiar mix of smoke, sugar, and chocolate. It’s nostalgia you can eat—a reminder that we belong, right here, in this circle of warmth.
Final Thoughts
Give these One Happy Camper Cupcakes a try and bring that cozy campfire magic straight into your kitchen.
Have fun putting your own spin on them with different chocolates, toppings, or fun add-ins to make them uniquely yours.
Frequently Asked Questions
Can I Make These Cupcakes Gluten-Free Without Sacrificing Texture?
Yes, you can. I swap the flour for a good 1:1 gluten‑free blend and add ½ teaspoon xanthan gum. The cupcakes still rise beautifully, taste buttery-sweet, and friends never notice they’re gluten-free.
How Can Kids Safely Help With the Toasting Step?
Kids can watch at a safe distance while I handle the torch or broiler, with oven mitts and a sheet pan ready. I narrate the sizzling marshmallows’ smell and glow so they still feel involved.
What’s the Best Way to Transport These Cupcakes to a Campsite?
I’d nestle them in a lidded cupcake carrier, chill briefly so frosting firms, then cushion gaps with paper towels. I’ve bumped along gravel roads this way and still opened perfectly swirled, marshmallow-topped beauties by the fire.
Can I Turn This Cupcake Recipe Into a Sheet Cake?
Yes, you can. I’d pour the batter into a greased 9×13 pan, bake longer (check at 22–25 minutes), and swirl the frosting thick on top so every slice tastes like warm, gooey campfire memories.
How Do I Scale the Recipe for a Large Group Event?
You can comfortably triple the recipe for 36 servings; I’d bake in three batches so the kitchen still smells warm and buttery. I do this for family reunions and everyone swarms the dessert table.

One Happy Camper Cupcakes
Equipment
- 1 standard 12-cup muffin tin
- 12 paper cupcake liners
- 2 medium mixing bowls
- 1 large mixing bowl
- 1 Whisk
- 1 Rubber spatula
- 1 hand mixer or stand mixer
- 1 Medium saucepan
- 1 wire cooling rack
- 1 piping bag with round or star tip (optional)
- 1 wooden skewer or toothpick
Ingredients
- 190 gram all-purpose flour
- 10 gram baking powder
- 2 gram fine salt
- 150 gram granulated sugar
- 115 gram unsalted butter softened
- 2 large eggs room temperature
- 5 milliliter vanilla extract
- 180 milliliter whole milk room temperature
- 90 gram graham cracker crumbs
- 90 gram mini chocolate chips
- 90 gram mini marshmallows
- 115 gram unsalted butter for frosting; softened
- 240 gram powdered sugar sifted
- 30 milliliter heavy cream
- 5 milliliter vanilla extract for frosting
- 60 gram graham cracker crumbs for topping
- 60 gram mini chocolate chips for topping
- 60 gram mini marshmallows for topping
Instructions
- Preheat the oven to 175°C (350°F) and line the muffin tin with paper cupcake liners.
- In a medium bowl, whisk together the flour, baking powder, and salt.
- In a large mixing bowl, beat the softened butter and granulated sugar with a mixer until light and fluffy, about 2–3 minutes.
- Add the eggs to the butter mixture one at a time, beating well after each addition, then mix in the vanilla extract.
- Add half of the dry ingredients to the wet mixture and mix on low speed just until combined.
- Pour in the milk and mix on low speed until incorporated.
- Add the remaining dry ingredients and mix just until no dry streaks remain, then gently fold in the graham cracker crumbs and mini chocolate chips.
- Divide the batter evenly among the 12 cupcake liners, filling each about two-thirds full.
- Bake for 16–18 minutes, or until a skewer inserted in the center comes out clean or with a few moist crumbs.
- Remove the cupcakes from the oven and let them cool in the pan for 5 minutes, then transfer to a wire rack to cool completely.
- While the cupcakes cool, prepare the frosting by beating the softened butter in a medium bowl until creamy.
- Gradually add the powdered sugar, mixing on low speed until combined, then increase to medium speed and beat until fluffy.
- Add the vanilla extract and heavy cream, then beat for 1–2 minutes until the frosting is smooth and spreadable, adding an extra teaspoon of cream if needed.
- Once the cupcakes are completely cool, transfer the frosting to a piping bag or use a spatula to frost the tops of the cupcakes.
- Sprinkle each frosted cupcake with graham cracker crumbs and mini chocolate chips.
- Top each cupcake with several mini marshmallows.
- Optionally, briefly toast the marshmallows on top with a kitchen torch or under a hot grill/broiler for 15–30 seconds, watching very closely.
- Let the cupcakes rest for at least 25 minutes after decorating to allow the frosting to set before serving.
Notes

Cynthia Weatherford is a seasoned chef and culinary enthusiast who serves as the Recipe creator of Somonday. With decades of experience in the kitchen and a passion for exploring diverse cuisines, Cynthia brings a blend of creativity and technique to every dish. Known for transforming simple ingredients into show-stopping meals, Cynthia believes that cooking is an art form anyone can master. Dedicated to inspiring home cooks, Cynthia shares approachable recipes, pro tips, and culinary wisdom to make every meal memorable.


