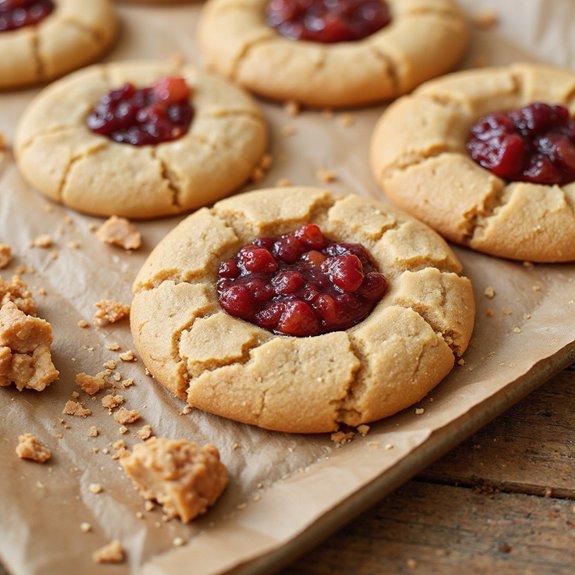
Picture warm, golden cookies with crackled tops and ruby-red centers, their buttery edges giving way to soft, peanutty middles and a glossy swirl of strawberry jam.
Imagine the cozy aroma of roasted peanuts and caramelized sugar drifting through the kitchen, the kind of scent that feels like a hug after a long day.
Peanut butter and jelly is more than a lunchbox classic—it’s a nostalgia button, a shortcut to comfort that never outgrows its charm.
These cookies capture that feeling in a tidy, bake-ahead treat perfect for busy weeknights, school bake sales, after-practice snacks, or lingering Sunday suppers when everyone needs a little something sweet.
One hectic afternoon, these thumbprint-style cookies saved dessert when I’d just one bowl, a half jar of jam, and twenty minutes to spare before guests arrived.
They baked up beautifully—and disappeared even faster.
Ready? Let’s cook!
Why You’ll Love It
- Delivers nostalgic PB&J flavor in a tender, chewy cookie
- Uses simple pantry staples and one bowl for easy prep
- Bakes fast; ready to eat in about 30 minutes
- Customizable with your favorite jams or chunky peanut butter
- Freezes beautifully for make-ahead treats or lunchbox snacks
Ingredients
- 113 g unsalted butter, softened — room temperature for easy creaming
- 190 g creamy peanut butter — smooth, no-stir if possible
- 100 g granulated sugar — superfine dissolves best
- 110 g light brown sugar, packed — adds moisture and chew
- 1 large egg, room temperature — binds and enriches
- 1 tsp vanilla extract — pure, not imitation
- 156 g all-purpose flour — spoon and level for accuracy
- 1/2 tsp baking soda — guarantees lift and spread control
- 1/4 tsp baking powder — lightens texture slightly
- 1/4 tsp fine salt — balances sweetness
- 120 g strawberry jam or jelly — good-quality, not too runny
- 50 g granulated sugar, for rolling (optional) — gives sparkly crust
Step-by-Step Method
Preheat & Prep Pans
Preheat the oven to 350°F (175°C). Line two baking sheets with parchment paper to prevent sticking and promote even browning. Gather all equipment and ingredients so everything is ready to go.
Assure the butter and egg are at room temperature. This helps create a smooth, well-emulsified dough and a tender texture in the baked cookies.
Cream Butter, Peanut Butter & Sugars
Beat the softened butter, peanut butter, granulated sugar, and brown sugar together until light and fluffy, about two minutes. Use a hand or stand mixer on medium speed. Scrape the bowl and paddle to assure even mixing.
Proper creaming aerates the dough, helping the cookies bake with soft centers and lightly set edges.
Add Egg & Vanilla
Beat in the egg and vanilla extract until fully combined and glossy. Mix just until incorporated to avoid overworking the dough. Scrape the sides and bottom of the bowl again.
A well-mixed wet base assures the dry ingredients will hydrate evenly and produce a cohesive cookie dough.
Whisk Dry Ingredients
In a separate bowl, whisk together the all-purpose flour, baking soda, baking powder, and salt. Break up any lumps and distribute the leaveners evenly.
Properly blended dry ingredients prevent pockets of baking soda or powder and help the cookies rise consistently without tunneling or uneven spreading.
Combine Wet & Dry
Add the dry ingredients to the wet mixture. Mix on low speed just until a soft dough forms and no dry streaks remain. Avoid overmixing to keep the crumb tender.
If the dough feels sticky or warm, cover and chill for 15 to 20 minutes to make shaping easier and reduce spreading in the oven.
Portion & Roll
Scoop 1.5-tablespoon portions of dough using a cookie scoop for uniform size. Roll each portion into smooth balls between your palms.
For a sparkly finish, roll the balls in granulated sugar, if desired. Evenly sized dough balls assure consistent baking time and help the cookies maintain a tidy shape.
Arrange & Space
Place dough balls on the prepared baking sheets, spacing them about two inches apart to allow for spread. Stagger rows for peak air circulation.
Work quickly if the kitchen is warm to prevent the dough from softening too much. Chill sheeted dough briefly if needed to help maintain definition.
Make Wells Neatly
Use a teaspoon to press a shallow well into the center of each dough ball. Smooth or pinch closed any cracks around the edges to prevent jam leaks during baking.
Keep the wells centered and not too deep. Aim for a tidy cavity that will hold the filling without compromising the cookie’s structure.
Fill with Jam
Spoon about 1/2 teaspoon of strawberry jam or jelly into each well. Avoid overfilling to prevent bubbling over in the oven.
For variety, swap in grape, raspberry, or apricot jam. If using chunky peanut butter in the dough, pair with a smoother jam for pleasant contrast and clean definition.
Bake Until Just Set
Bake one sheet at a time for 9 to 11 minutes, until edges are set and tops look dry but not browned. Rotate the sheet once if your oven has hot spots.
Don’t overbake. The cookies should appear slightly underdone in the center; they’ll firm up as they cool, staying soft and tender.
Cool & Finish
Let cookies cool on the baking sheet for five minutes to set. Transfer them to a cooling rack and rest another five minutes before serving.
If any jam spread, nudge it back with a spoon while warm. Enjoy fresh or store in an airtight container for up to three days. Freeze for longer storage.
Ingredient Swaps
- Nut-free: Replace peanut butter with creamy sunflower seed butter or soy nut butter; choose seed-based “jelly” or fruit spread without cross-contamination.
- Gluten-free: Use a 1:1 gluten-free all-purpose flour blend with xanthan gum; check baking powder is GF.
- Dairy-free/vegan: Swap butter with plant butter, egg with flax egg (1 tbsp ground flax + 3 tbsp water); use vegan sugar and jam.
- Budget/availability: Use store-brand peanut butter and any fruit jam; brown sugar can be DIY (granulated sugar + a little molasses).
- Flavor swaps: Try almond or cashew butter; jam options like grape, raspberry, apricot, or marmalade; add chopped peanuts if using smooth PB.
You Must Know
- Doneness • If edges look set but centers still look glossy and domed at 9 minutes, pull the tray; they’ll finish setting on the sheet in 5 minutes. Why: carryover heat. Visual anchor: matte tops, no browning, jam bubbling gently at the edges.
- Troubleshoot • If wells fill with runny jam that bleeds out, stir 1/2 teaspoon cornstarch into each 1/2 cup jam or use a thicker preserve. Why: reduces water activity and spread. Cue: jam should mound slightly and not level immediately.
- Scale • For smaller bites, portion 1 tablespoon (about 20 g) and use 1/4 teaspoon jam; for bakery-size, portion 2 tablespoons (about 40 g) and 3/4 teaspoon jam. Why: keeps jam-to-dough ratio balanced. Time cue: smaller cookies set in ~8 minutes; larger in ~11–12.
- Make-Ahead • To serve warm later, shape and sugar-roll, press wells, then chill on trays until firm (45–60 minutes) and store airtight up to 48 hours. Why: cold dough controls spread. Visual cue: dough balls should feel firm, not tacky, before going into the oven.
- Flavor Boost • For a nutty edge, roll dough in 1/4 cup finely chopped roasted peanuts instead of sugar; or add 1/2 teaspoon cinnamon to the dry mix. Why: adds crunch/aroma without changing structure. Sensory cue: fragrant peanut aroma at ~8 minutes signals near-done.
Serving Tips
- Serve warm with cold milk or creamy hot chocolate.
- Pair with vanilla ice cream and a drizzle of warm peanut butter.
- Plate alongside fresh strawberries or grapes for a bright, fruity contrast.
- Offer a trio: strawberry, raspberry, and apricot jam-topped cookies.
- Sprinkle with flaky sea salt just before serving for sweet-salty balance.
Storage & Make-Ahead
Store cookies in an airtight container at room temperature for 3 days or refrigerate up to 1 week.
For make-ahead, chill dough balls 24–48 hours to improve flavor and control spread.
Freeze baked cookies or unbaked dough balls up to 2 months; if freezing dough, add jam after baking.
Reheating
To reheat gently, warm cookies 10–15 seconds in the microwave.
275°F oven for 5–7 minutes.
Or covered on a low-heat skillet briefly.
Avoid overheating to preserve softness and jam texture.
School-Cafeteria Nostalgia
Sometimes one bite takes me straight back to the lunchroom—plastic trays, milk cartons sweating on Formica, and that sweet-salty PB&J comfort.
I remember the clang of lockers, the whistle of recess dying down, and that familiar sandwich waiting like a promise.
These cookies capture that memory in a neater, shinier package—soft peanut butter cushions, a glossy thumbprint of jam, and a whiff of childhood that still feels grown-up.
Bake a batch, and I’ll show you how to lean into nostalgia without making it saccharine.
Choose strawberry for the classic vibe, grape for pure school-spirit.
Keep the edges just set, so the centers stay tender—like the best parts of memory.
Then share them warm, and watch everyone’s shoulders drop, smiles widen, voices soften.
Final Thoughts
Ready to bake a batch? Give these PB&J cookies a try as written, or have fun swapping in your favorite jam and nut butter to make them your own!
Frequently Asked Questions
Can I Make Them Gluten-Free Without Gritty Texture?
Yes. I swap the flour for a high-quality 1:1 gluten-free blend with sorghum and rice, add 1/4 teaspoon xanthan gum, and rest the dough 20 minutes. You’ll get tender, sandy-free bites that sing.
How Do I Prevent Jam From Leaking During Shipping?
Seal the jam by baking wells slightly deeper, cooling fully, then piping a firmer jam or gelled filling. I chill cookies, wrap each snugly, cushion with parchment layers, and ship upright in a tight, shock-absorbing box.
What’s the Best Way to Scale the Recipe for Crowds?
Double or triple all ingredients by weight; I batch-mix dry and wet separately, combine gently, and bake sheets sequentially. I chill dough between rounds, pre-portion with a scoop, and fill after baking for swift, tidy assembly.
Are There Nut-Free Alternatives That Mimic Peanut Flavor?
Yes—I’d use roasted sunflower seed butter; it echoes peanut’s toastiness. For deeper “peanuty” notes, I’ll blend in a touch of toasted sesame tahini and a drizzle of maple. Add vanilla and salt; your taste buds will swear.
How Can I Adjust for High-Altitude Baking?
I reduce sugar 1–2 tablespoons, increase flour 1–2 tablespoons, add a splash more liquid, and raise oven temp 15°F. I slightly decrease leaveners, chill dough briefly, and bake shorter—watch for set edges, pale tops.

Peanut Butter and Jelly Cookies
Equipment
- 2 baking sheets
- 1 Parchment paper roll
- 2 Mixing bowls
- 1 hand mixer or stand mixer
- 1 Rubber spatula
- 1 Measuring cups set
- 1 Measuring spoons set
- 1 Cookie scoop 1.5 tablespoons
- 1 Cooling rack
- 1 teaspoon for making wells
Ingredients
- 1/2 cup unsalted butter softened
- 3/4 cup creamy peanut butter
- 1/2 cup granulated sugar
- 1/2 cup light brown sugar packed
- 1 large egg room temperature
- 1 teaspoon vanilla extract
- 1 1/4 cups all-purpose flour
- 1/2 teaspoon baking soda
- 1/4 teaspoon baking powder
- 1/4 teaspoon fine salt
- 1/2 cup strawberry jam or jelly
- 1/4 cup granulated sugar for rolling, optional
Instructions
- Preheat the oven to 350°F (175°C) and line two baking sheets with parchment paper.
- In a mixing bowl, cream the softened butter, peanut butter, granulated sugar, and brown sugar until light and fluffy, about 2 minutes.
- Beat in the egg and vanilla extract until fully combined.
- In a separate bowl, whisk together the flour, baking soda, baking powder, and salt.
- Add the dry ingredients to the wet mixture and mix on low just until a soft dough forms.
- If desired, pour the extra granulated sugar into a shallow bowl for rolling.
- Scoop 1.5-tablespoon portions of dough, roll into balls, and optionally roll each ball in sugar.
- Arrange dough balls 2 inches apart on the prepared baking sheets.
- Use a teaspoon to press a shallow well in the center of each ball, smoothing any cracks.
- Fill each well with about 1/2 teaspoon of strawberry jam or jelly.
- Bake one sheet at a time for 9 to 11 minutes until the edges are set and the tops look dry but not browned.
- Cool on the sheet for 5 minutes, then transfer cookies to a cooling rack to rest for another 5 minutes before serving.
Notes

Cynthia Weatherford is a seasoned chef and culinary enthusiast who serves as the Recipe creator of Somonday. With decades of experience in the kitchen and a passion for exploring diverse cuisines, Cynthia brings a blend of creativity and technique to every dish. Known for transforming simple ingredients into show-stopping meals, Cynthia believes that cooking is an art form anyone can master. Dedicated to inspiring home cooks, Cynthia shares approachable recipes, pro tips, and culinary wisdom to make every meal memorable.


