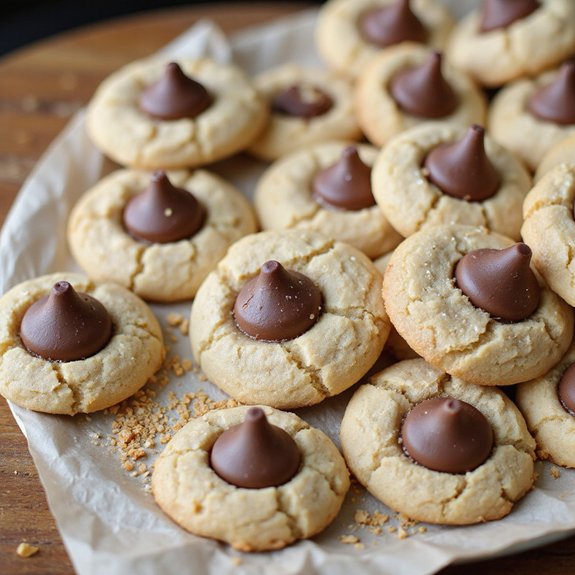
Picture warm, golden cookies emerging from the oven, their sugar-dusted tops gently cracking to reveal a tender, peanut-buttery center and the glossy crown of a melting chocolate kiss.
Imagine the toasty aroma filling your kitchen—nutty, sweet, and just a touch salty—wrapping everyone in the kind of comfort that turns ordinary moments into mini celebrations.
These classic Peanut Butter Kiss Cookies matter to me because they’re a reliable joy-maker: simple to mix, quick to bake, and guaranteed to disappear fast.
They’re perfect for busy weeknights when you need a sweet finish without fuss, bake sales where you want a sure hit, or Sunday suppers that call for a nostalgic treat.
Once, a last-minute school event had me scrambling; this recipe saved the day, yielding two trays of crowd-pleasers in under an hour.
They’re approachable, consistent, and delightfully homey.
Ready? Let’s cook!
Why You’ll Love It
- Delivers nostalgic peanut butter–chocolate flavor in every bite
- Uses simple pantry staples you likely already have
- Bakes quickly; perfect for last-minute treats
- Stays soft and chewy after cooling
- Freezes well for make-ahead baking sessions
Ingredients
- 1/2 cup unsalted butter, softened — pliable but not greasy for better creaming
- 3/4 cup creamy peanut butter, smooth — classic no-stir style works best
- 1/2 cup granulated sugar — superfine dissolves evenly
- 1/2 cup light brown sugar, packed — adds moisture and chew
- 1 large egg, room temperature — mixes in without curdling
- 1 teaspoon vanilla extract — pure extract, not imitation
- 1 1/2 cups all-purpose flour — weigh for accuracy if possible
- 1 teaspoon baking soda — check freshness for proper lift
- 1/4 teaspoon kosher salt — balances sweetness and peanut flavor
- 1/4 cup granulated sugar, for rolling — creates a crinkly crust
- 36 pieces chocolate kiss candies, unwrapped — unwrap ahead for quick pressing
Step-by-Step Method
Cream the Fats and Sugars
Beat softened butter, creamy peanut butter, granulated sugar, and brown sugar until light and fluffy, about 2 minutes. Use medium speed for aeration. Scrape the bowl to guarantee even mixing. Proper creaming creates tender cookies with good lift. If the mixture looks greasy or dense, beat 30 seconds more until visibly lighter.
Whisk the Dry Ingredients
Combine all-purpose flour, baking soda, and kosher salt in a separate bowl. Whisk to evenly distribute leavening and salt. Break up any flour clumps. Even mixing prevents uneven rise and pockets of salt. Set the bowl aside near your mixer so you can add it quickly without losing momentum.
Blend in Egg and Vanilla
Add the egg and vanilla extract to the creamed mixture. Beat until smooth, glossy, and fully incorporated. Scrape down the bowl and beater to avoid streaks. Don’t overmix. Aim for a cohesive, creamy base that will accept the dry ingredients without curdling or separating.
Mix the Dough Gently
Add the dry ingredients to the wet mixture. Mix on low just until a soft dough forms. Stop as soon as no dry flour remains. Overmixing develops gluten and makes cookies tough. Scrape the bowl bottom to catch hidden flour pockets. If the kitchen is warm, chill dough 20–30 minutes.
Portion and Sugar-Coat
Scoop 1-tablespoon portions using a cookie scoop for uniform size. Roll each portion into a smooth ball between your palms. Toss or roll the balls in granulated sugar to coat evenly. For extra crinkle, roll twice. Place coated balls on a parchment-lined sheet while you finish shaping.
Preheat and Arrange
Preheat the oven to 350°F (175°C). Line two baking sheets with parchment paper. Space dough balls 2 inches apart to allow even heat circulation and minimal spreading. Unwrap chocolate kisses now so they’re ready. Keep shaped dough chilled if your kitchen runs warm.
Bake to Just-Set
Bake cookies for 8–10 minutes. Look for set edges and slightly cracked, still-pale tops. Don’t wait for browning. Rotate pans halfway if needed for even baking. Bake one test cookie to dial in timing. Pull early for softer cookies that stay tender after cooling.
Top with Chocolate Kisses
Remove trays from the oven and immediately press one chocolate kiss into the center of each cookie. Press gently to seat without cracking the cookie. The heat helps the chocolate adhere without melting out of shape. Work quickly while cookies are hot and pliable.
Set and Cool
Let cookies rest on the baking sheet for 5 minutes to set structure. Transfer carefully to a wire rack to cool completely. Allow chocolate to firm before stacking. Store in an airtight container at room temperature up to 4 days. Freeze if needed, separating layers with parchment.
Ingredient Swaps
- Dairy-free: Use vegan butter or refined coconut oil; make certain chocolate kisses are dairy-free alternatives (use vegan “kiss” or solid dark chocolate squares).
- Gluten-free: Substitute a 1:1 gluten-free all-purpose flour blend with xanthan gum.
- Nut-free: Swap peanut butter with sunflower seed butter (stir well; add 1–2 teaspoons extra flour if dough is sticky).
- Egg-free: Replace egg with 3 tablespoons aquafaba or a flax egg (1 tablespoon ground flax + 3 tablespoons water, rested 5 minutes).
- Sugar options: Use all granulated or all light brown sugar; coconut sugar works but yields a slightly darker, less chewy cookie.
- Budget/availability: Any smooth peanut butter works (avoid “natural” very oily types unless well-stirred); use chocolate chips or chunks if kisses aren’t available.
You Must Know
- Doneness • If edges look set but centers seem puffy and pale, pull the tray now; cookies should show fine surface cracks and feel soft in the middle. They’ll finish firming on the sheet in 5 minutes, preventing dryness.
- Troubleshoot • If cookies spread too much into saucers, chill portioned dough 20–30 minutes and check oven temp with a thermometer (target 350°F). Warm dough or a hot oven (≥375°F) causes excess spread and thin edges.
- Swap • For chewier texture or gluten-free needs, replace 1/3 of the flour (1/2 cup) with oat flour; dough will be slightly softer—look for the same pale, cracked tops at 8–10 minutes.
- Flavor Boost • Roll in a 50/50 mix of granulated sugar and turbinado (2–3 tablespoons each) to add crunch and caramel notes; the larger crystals give a pronounced crackle you can see before pressing the kiss.
- Make-Ahead • To streamline, portion and sugar-coat dough, then freeze on a sheet until firm and store airtight up to 2 months; bake from frozen, adding 1–2 minutes, and press kisses while tops are still glossy-hot.
Serving Tips
- Serve slightly warm so the chocolate softens but holds shape.
- Pair with cold milk, hot cocoa, or a latte for contrast.
- Arrange on a tiered platter with mini peanut butter cups.
- Dust lightly with powdered sugar for a festive look.
- Add a drizzle of melted chocolate and sprinkle crushed peanuts.
Storage & Make-Ahead
Store cookies airtight at room temperature up to 4 days or in the fridge 1 week.
For make-ahead, refrigerate dough balls (sugar-coated) up to 2 days; bake from chilled.
Freeze unbaked dough balls or baked cookies separately up to 2 months; add kisses after thawing to prevent bloom and smudging.
Reheating
For gentle reheating: Microwave 1–2 cookies 8–12 seconds.
Oven: 300°F for 4–6 minutes on a sheet.
Stovetop: cover in a dry skillet on low 2–3 minutes, warming through.
Hershey’s 1957 Cookbook Mention
Warm cookies in hand always spark nostalgia, and these Peanut Butter Kiss Cookies trace that feeling back to a charming note in Hershey’s 1957 cookbook.
When I flip through that slim, timeworn collection, I can almost hear cellophane crinkle and smell cocoa blooming. The cookbook’s mention hints at the playful idea: nestle a glossy chocolate kiss into a sugared peanut butter round, letting warmth soften the point just enough to glisten.
I imagine home bakers in crisp aprons, measuring by feel, pressing candies into tiny sunbursts of dough. That early nod didn’t just suggest a garnish; it sparked a ritual. I follow it still—sugar crust crackling, chocolate catching the light—grateful for a few printed lines that taught a cookie to kiss back.
Final Thoughts
Ready to bake a batch? Give these Peanut Butter Kiss Cookies a try as written, or tweak them with crunchy peanut butter, a sprinkle of flaky salt, or festive colored sugar for your own signature spin!
Frequently Asked Questions
Can I Make These Cookies Gluten-Free Without Gritty Texture?
Yes. I swap in a high-quality 1:1 gluten-free flour with xanthan gum, sift it, and chill the dough. I add a tablespoon milk, mix gently, and underbake slightly. You’ll get tender, sandy-free bites.
How Do High Altitudes Affect Bake Time and Spread?
At high altitude, I bake longer and reduce spread. I lower leavening slightly, add a splash more liquid, and chill dough. Cookies set slower; I watch pale tops, cracked edges, and inhale that toasty, nutty perfume.
What’s the Best Way to Gift-Wrap Without Crushing Kisses?
Use rigid tins or cookie boxes with cupcake liners; nestle each cookie upright. I add parchment layers, bubble wrap around the box, and a ribboned note. Cool completely first—kisses stay proud, uncrushed, and gleaming like little stars.
Are There Nut-Free Alternatives That Mimic Peanut Flavor?
Yes—roasted sunflower seed butter or soy-based Wowbutter mimics peanut’s nutty warmth. I swirl one in, breathe toasty aromas, taste gentle salt-sweet depth, and feel that familiar, tender chew while keeping your kitchen safe for nut-free hearts.
How Can I Scale the Recipe for a Bake Sale?
Scale by doubling or tripling every ingredient; I keep batch size per sheet unchanged. I stagger bakes, rotate pans, and pre-unwrap kisses. I label allergens, pack by dozens, and let warm, sugary aromas beckon buyers.

Peanut Butter Kiss Cookies
Equipment
- 2 Baking sheet
- 1 stand mixer or hand mixer
- 2 Mixing bowl
- 1 Whisk
- 1 Rubber spatula
- 1 Cookie scoop 1 tablespoon
- 1 wire cooling rack
- 1 Measuring cups set
- 1 Measuring spoons set
- 1 Parchment paper roll
Ingredients
- 1/2 cup unsalted butter softened
- 3/4 cup creamy peanut butter smooth
- 1/2 cup granulated sugar
- 1/2 cup light brown sugar packed
- 1 large egg room temperature
- 1 teaspoon vanilla extract
- 1 1/2 cup all-purpose flour
- 1 teaspoon baking soda
- 1/4 teaspoon kosher salt
- 1/4 cup granulated sugar for rolling
- 36 chocolate kiss candies unwrapped
Instructions
- Preheat the oven to 350°F (175°C) and line baking sheets with parchment paper.
- In a mixing bowl whisk together flour, baking soda, and salt.
- In a separate bowl beat butter, peanut butter, granulated sugar, and brown sugar until light and fluffy, about 2 minutes.
- Beat in egg and vanilla until fully combined and creamy.
- Add the dry ingredients to the wet mixture and mix on low just until a soft dough forms.
- Scoop 1-tablespoon portions of dough, roll into balls, and coat each in the extra granulated sugar.
- Arrange dough balls 2 inches apart on prepared baking sheets.
- Bake for 8–10 minutes until edges are set and tops are slightly cracked but still pale.
- Remove from the oven and immediately press one chocolate kiss into the center of each cookie.
- Let cookies rest on the sheet for 5 minutes to set, then transfer to a wire rack to cool completely.
Notes

Cynthia Weatherford is a seasoned chef and culinary enthusiast who serves as the Recipe creator of Somonday. With decades of experience in the kitchen and a passion for exploring diverse cuisines, Cynthia brings a blend of creativity and technique to every dish. Known for transforming simple ingredients into show-stopping meals, Cynthia believes that cooking is an art form anyone can master. Dedicated to inspiring home cooks, Cynthia shares approachable recipes, pro tips, and culinary wisdom to make every meal memorable.


