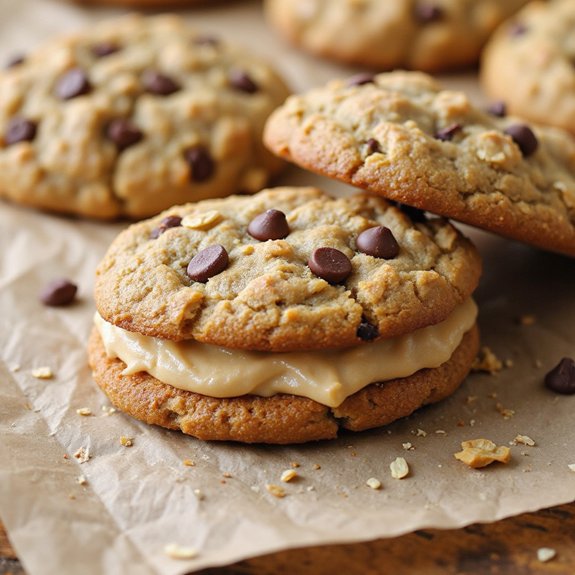
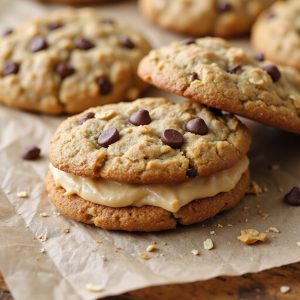
Picture a tray of golden, crinkly oatmeal cookies, freckled with mini chocolate chips, their edges just crisp while the centers stay soft and chewy.
Imagine the warm scent of toasted oats and roasted peanuts drifting through the kitchen, a cozy hug of sweetness that feels like home.
These sandwich cookies are comfort you can hold—rich peanut butter cream nestled between two tender cookies, the kind of treat that quiets a long day in one bite.
They’re perfect for busy weeknights when you crave a quick reward, easy Sunday suppers, lunchbox surprises, or a make-ahead dessert for guests.
When my son’s team showed up early after practice, this recipe saved me—twenty minutes to mix, ten to bake, and suddenly I’d a platter of smiles.
The ingredients are simple, the method reliable, and the results taste like a bakery secret you’ve always known.
Ready? Let’s cook!
Why You’ll Love It
- Delivers bold flavor: nutty peanut butter, oats, and chocolate
- Achieves perfect texture: chewy cookies with creamy, fluffy filling
- Uses pantry staples you likely already have on hand
- Quick to make: ready to enjoy in under an hour
- Freezes beautifully for easy, make-ahead treats
Ingredients
- 1/2 cup unsalted butter, softened — room temp blends best (use fresh, quality butter)
- 1/2 cup creamy peanut butter — no-stir style for consistent texture
- 1/2 cup granulated sugar — fine cane sugar dissolves evenly
- 1/2 cup light brown sugar, packed — adds moisture and caramel notes
- 1 large egg, room temperature — helps emulsify batter
- 1 teaspoon vanilla extract — pure extract for best flavor
- 3/4 cup all-purpose flour — standard unbleached AP works great
- 1/2 teaspoon baking soda — guarantees proper spread and lift
- 1/4 teaspoon baking powder — adds a gentle rise
- 1/4 teaspoon fine salt — balances sweetness
- 1 cup old-fashioned rolled oats — for chew; avoid instant oats
- 3/4 cup mini chocolate chips — minis sandwich more neatly
- 1/2 cup creamy peanut butter (for filling) — smooth style for spreadability
- 2 tablespoons powdered sugar, sifted — prevents lumps in filling
- 1 tablespoon milk, as needed — adjust to spreadable consistency
- 1/4 teaspoon vanilla extract (for filling) — rounds out flavor
Step-by-Step Method
Cream the Fats and Sugars
Preheat oven to 350°F (175°C). Line two baking sheets with parchment.
In a bowl, cream softened butter, peanut butter, granulated sugar, and brown sugar until light and fluffy, 2 to 3 minutes. Scrape the bowl.
Beat until the mixture looks pale and airy for tender cookies.
Beat in Egg and Vanilla
Add the egg and vanilla. Beat until smooth and fully combined, about 30 seconds. Scrape down the bowl to make sure no streaks remain.
Don’t overmix. The batter should look creamy and cohesive with no visible egg.
Whisk Dry Ingredients
In a separate bowl, whisk flour, baking soda, baking powder, and salt until evenly combined.
Break up any clumps. This prevents uneven leavening and guarantees a consistent texture.
Keep the dry mix ready to add to the wet mixture.
Combine Wet and Dry
Add the dry ingredients to the creamed mixture. Mix on low just until the flour disappears.
Stop as soon as no dry patches remain. Overmixing develops gluten, which can make cookies tough.
The dough should be soft and slightly sticky.
Fold in Oats and Chips
Switch to a spatula. Fold in the rolled oats and mini chocolate chips until evenly distributed.
Scrape the bottom and sides of the bowl. If the dough feels overly sticky, chill it for 15 minutes to help the cookies hold shape.
Scoop and Space
Use a 1.5-tablespoon cookie scoop to portion dough onto prepared sheets.
Space mounds 2 inches apart to allow spreading. Keep sizes even for better sandwiching.
If needed, lightly oil or dampen the scoop for cleaner releases.
Flatten Slightly
Dampen your fingers and gently press each mound to slightly flatten. Aim for uniform thickness.
This promotes even baking and prevents domed centers. Avoid over-flattening to maintain a chewy middle and crisp edges.
Bake to Just-Set
Bake 8 to 10 minutes until edges are set and lightly golden while centers look just underdone. Rotate pans halfway if needed.
Pull early for chewier cookies. Remember, carryover heat finishes the bake on the sheet.
Cool Completely
Let cookies cool on the sheets for 5 minutes. Transfer to a wire rack and cool completely.
Don’t rush this step. Filling warm cookies will melt the filling and cause slipping. Match cookies by similar sizes while they cool.
Mix the Filling
Beat peanut butter, powdered sugar, milk, and vanilla until smooth and spreadable.
Adjust consistency: add a teaspoon of milk if too thick or a spoon of powdered sugar if too thin. Aim for a creamy, pipeable texture.
Assemble the Sandwiches
Pair cookies by size. Spread 1 to 1.5 tablespoons of filling on the underside of one cookie.
Top with its match and gently press to spread the filling to the edges. Wipe any excess. Repeat with remaining cookies.
Set and Store
Let sandwiches rest 15 to 20 minutes to set. Store in an airtight container at room temperature for 2 days or refrigerate up to 5 days.
For longer storage, wrap individually and freeze up to 2 months. Thaw at room temperature.
Ingredient Swaps
- Gluten-free: Use a 1:1 gluten-free all-purpose flour blend and certified gluten-free oats.
- Dairy-free: Swap butter with vegan butter or refined coconut oil; use dairy-free chocolate chips; use plant milk in the filling.
- Nut-free: Replace peanut butter with sunflower seed butter (note: color may darken slightly); use nut-free chocolate chips.
- Lower sugar: Reduce granulated sugar to 1/3 cup and brown sugar to 1/3 cup; use no-sugar-added peanut butter; choose 60–70% dark mini chips.
- Budget/availability: Regular rolled oats can be pulsed briefly in a blender if you only have old-fashioned thick-cut; substitute mini chips with chopped chocolate or omit.
- Flavor twists: Almond butter or cashew butter in place of peanut butter; add 1/2 teaspoon cinnamon or espresso powder to the dough; use butterscotch or peanut butter chips instead of chocolate.
You Must Know
Doneness • If edges are golden but centers look a touch glossy and puffed at 8–10 minutes, pull them; they’ll collapse slightly as they cool for a chewy sandwich texture. Why: carryover sets starches without drying. Anchor: edges lightly golden, centers matte within 5–7 minutes of cooling.
Troubleshoot • If cookies spread too thin into lace, chill the dough 20–30 minutes and reduce oven temp by 10–15°F next round. Why: cooler, firmer fat slows spread. Anchor: dough should scoop cleanly and hold a rounded mound.
Flavor Boost • For deeper nutty notes, swap 2–3 tablespoons of oats with toasted, finely chopped peanuts or add 1/4 teaspoon cinnamon. Why: adds roasted aromatics and contrast. Anchor: toast nuts 6–8 minutes at 350°F until fragrant.
Scale • For smaller bites, use a 1-tablespoon scoop and bake 7–8 minutes; for larger, use 2 tablespoons and bake 9–11 minutes. Why: thickness and diameter change heat-through time. Anchor: keep 2 inches spacing; aim for 2.25–2.5 inch finished cookies for neat sandwiches.
Make-Ahead • To streamline, portion dough and freeze on a sheet, then bag and bake from frozen adding 1–2 minutes. Why: preserves texture and prevents overworking. Anchor: frozen pucks feel firm like hard clay; total freezer life up to 2 months.
Serving Tips
- Pair with cold milk, hot cocoa, or a creamy vanilla latte.
- Plate in a spiral on a cake stand; dust edges with powdered sugar.
- Serve with sliced bananas or strawberries for a fresh, fruity contrast.
- Warm briefly and drizzle with melted chocolate or peanut butter.
- Offer mini sandwiches alongside vanilla ice cream for a playful dessert.
Storage & Make-Ahead
Refrigerate assembled sandwiches in an airtight container up to 5 days; they’ll stay soft and chewy.
Make ahead by baking cookies, cooling completely, and storing at room temperature 2 days, or refrigerating 5 days.
Fill just before serving for freshest texture.
Freeze individually wrapped sandwiches up to 2 months.
Reheating
Reheat gently: microwave 5–10 seconds to soften centers.
Oven at 300°F for 3–5 minutes to refresh edges.
Stovetop skillet on lowest heat 1–2 minutes per side, covered, to warm through.
Back-To-School Bake Sales
Once those sandwiches are warmed just right, I start thinking bigger: these Peanut Butter Oatmeal Chocolate Chip Sandwiches make standout back-to-school bake sale stars.
I picture a cheerful table, crisp labels, and neat stacks of golden cookies hugging creamy peanut butter filling—irresistible.
I price per sandwich or offer a bundle of three; both sell fast.
I bake ahead, cool completely, then tuck each sandwich in a parchment sleeve so the chocolate chips don’t smudge.
A simple sign with allergen notes—contains peanuts, dairy, gluten—builds trust with parents.
For variety, I add a drizzle of melted chocolate or a sprinkle of crushed peanuts on a few.
Pack them in airtight containers, layer with parchment, and rest easy—they travel beautifully.
Final Thoughts
Ready to bake? Give these Peanut Butter Oatmeal Chocolate Chip Sandwiches a try, and feel free to tweak the filling (extra peanut butter, a pinch of salt, or a drizzle of honey) to make them your own!
Frequently Asked Questions
Can I Make These Cookies Vegan Without Sacrificing Texture?
Yes—you can. I swap vegan butter, creamy peanut butter, and a flax egg, then use oat milk and dairy-free chips. I chill dough briefly, bake just until set, and the cookies stay plush, nubby, and delightfully chewy.
How Do Altitude Adjustments Affect Baking Time and Spread?
At higher altitudes, I bake longer and see less spread. I tell you: raise oven temp 15–25°F, add a tablespoon flour, increase liquid slightly, and watch early. I pull cookies when edges set, centers softly puffed.
What’s the Best Way to Ship These Without Squishing?
Pack them frozen. I’ll sandwich parchment between cookies, wrap each snugly, cushion with crinkle paper in a tight box, then double-box. I’ll ship fast, avoid weekend delays, and mark “fragile—this side up” to prevent squishing.
Are There Nut-Free Alternatives That Mimic Peanut Flavor?
Yes—use roasted chickpea butter or toasted pumpkin seed butter with a splash of roasted sesame (tahini) and a hint of maple. I’d add salt and a drop of coffee extract to deepen that peanutty illusion.
How Can Kids Safely Help at Different Ages?
Kids can help by age: toddlers pour and sprinkle; preschoolers whisk and scoop; grade-schoolers measure and mix; tweens read steps and portion; teens handle ovens. I’ll supervise closely, model hygiene, set clear tasks, and celebrate every small victory.
Peanut Butter Oatmeal Chocolate Chip Sandwiches
Equipment
- 2 Baking sheet
- 1 stand mixer or hand mixer
- 2 Mixing bowl
- 1 Whisk
- 1 Rubber spatula
- 1 Measuring cups set
- 1 Measuring spoons set
- 1 Cookie scoop 1.5-tablespoon
- 1 wire cooling rack
- 1 Parchment paper roll
Ingredients
- 1/2 cup unsalted butter softened
- 1/2 cup creamy peanut butter
- 1/2 cup granulated sugar
- 1/2 cup light brown sugar packed
- 1 large egg room temperature
- 1 teaspoon vanilla extract
- 3/4 cup all-purpose flour
- 1/2 teaspoon baking soda
- 1/4 teaspoon baking powder
- 1/4 teaspoon fine salt
- 1 cup old-fashioned rolled oats
- 3/4 cup mini chocolate chips
- 1/2 cup creamy peanut butter for filling
- 2 tablespoon powdered sugar sifted
- 1 tablespoon milk as needed
- 1/4 teaspoon vanilla extract for filling
Instructions
- Preheat oven to 350°F (175°C) and line two baking sheets with parchment paper.
- Cream softened butter, peanut butter, granulated sugar, and brown sugar together until light and fluffy, 2 to 3 minutes.
- Beat in the egg and vanilla until smooth.
- Whisk flour, baking soda, baking powder, and salt in a separate bowl.
- Add dry ingredients to the wet mixture and mix on low just until combined.
- Fold in oats and mini chocolate chips with a spatula.
- Scoop 1.5-tablespoon mounds onto prepared sheets, spacing 2 inches apart.
- Gently flatten each mound slightly with damp fingers for even baking.
- Bake 8 to 10 minutes until edges are set and centers look just underdone.
- Cool on sheets 5 minutes, then transfer cookies to a wire rack to cool completely.
- For the filling, beat peanut butter, powdered sugar, milk, and vanilla until smooth and spreadable.
- Match cookies by size, spread 1 to 1.5 tablespoons filling on the underside of one, and gently sandwich with its pair.
Notes

Cynthia Weatherford is a seasoned chef and culinary enthusiast who serves as the Recipe creator of Somonday. With decades of experience in the kitchen and a passion for exploring diverse cuisines, Cynthia brings a blend of creativity and technique to every dish. Known for transforming simple ingredients into show-stopping meals, Cynthia believes that cooking is an art form anyone can master. Dedicated to inspiring home cooks, Cynthia shares approachable recipes, pro tips, and culinary wisdom to make every meal memorable.


