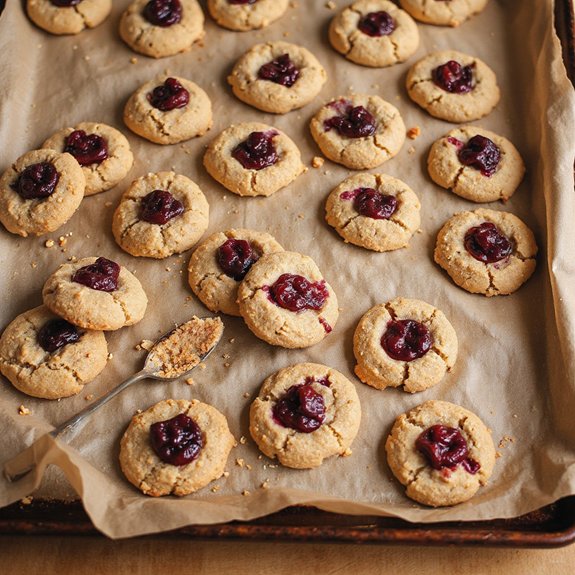
Picture a tray of golden, sugar-dusted cookies, their crinkled edges soft as velvet and warm centers gleaming with ruby jam or glossy chocolate.
Imagine the cozy aroma of roasted peanuts and butter drifting through your kitchen, the kind of scent that wraps around you like a favorite sweater and turns any ordinary day into a little celebration.
These thumbprints matter to me because they’re pure, pocket-sized comfort—nostalgia and sweetness you can share, perfect for busy weeknights, classroom treats, or a simple finish to Sunday suppers.
Once, a last-minute school bake sale popped up on my calendar; this recipe saved the day with pantry staples, a short chill, and a quick bake that looked—and tasted—like hours of effort.
They’re tender, gently chewy, and endlessly adaptable: jam for bright fruitiness, chocolate for melt-in-the-middle bliss.
You’ll love how easily they come together and how quickly they disappear.
Ready? Let’s cook!
Why You’ll Love It
- Delivers bold, nostalgic peanut butter flavor in every bite
- Uses simple pantry staples you likely already have
- Bakes quickly for fast, weeknight-friendly treats
- Offers versatile fillings: jammy centers or chocolate kisses
- Freezes beautifully for make-ahead cookie cravings
Ingredients
- 113 g unsalted butter softened — room temp for easy creaming (use real butter, not spread)
- 128 g creamy peanut butter room temperature — smooth, not natural if possible (no-stir style)
- 100 g granulated sugar plus extra for rolling — fine white sugar (keep some for coating)
- 110 g light brown sugar packed — fresh, soft brown sugar (no hard clumps)
- 1 large egg room temperature — grade A (bring to room temp)
- 1 teaspoon vanilla extract — pure, not imitation (good aroma matters)
- 156 g all-purpose flour — measured by weight for accuracy (scoop-and-level if no scale)
- 1/2 teaspoon baking soda — fresh leavening (check date)
- 1/4 teaspoon baking powder — aluminum-free if preferred (neutral taste)
- 1/4 teaspoon fine salt — fine-grain mixes best (not flaky)
- 24 teaspoons jam raspberry or strawberry, or chocolate kisses, for filling — thicker, seedless jam or wrapped kisses (no runny fillings)
Step-by-Step Method
Cream the Fats and Sugars
Beat softened butter, creamy peanut butter, granulated sugar, and brown sugar until light and fluffy, about 2 minutes. Scrape the bowl.
Create a smooth, airy base for tender cookies. Make sure no sugar pockets remain. Proper creaming improves spread and texture. If mixture looks greasy, keep beating until it lightens and slightly increases in volume.
Add Egg and Vanilla
Crack in the room-temperature egg and pour in vanilla extract. Beat until fully emulsified and glossy. Scrape the bowl to capture any unmixed bits. Avoid overbeating.
The mixture should appear cohesive and slightly thick. Room-temperature ingredients blend better, preventing separation and make certain even structure in the finished cookies.
Whisk Dry Ingredients
In a small bowl, whisk flour, baking soda, baking powder, and salt until evenly combined. Break up any flour clumps.
Distribute leaveners thoroughly for consistent rise. Accurate measuring matters. Level off cups and spoons. A quick whisk prevents pockets of baking soda, avoiding off flavors and uneven texture in the baked cookies.
Combine Wet and Dry
Add the dry ingredients to the creamed mixture. Mix on low just until a soft dough forms.
Stop when streaks of flour disappear to prevent toughness. Scrape down the bowl with a spatula. If dough seems sticky or warm, cover and chill briefly. Proper mixing keeps cookies tender and helps them hold a neat thumbprint.
Portion and Sugar-Coat
Scoop 1-tablespoon portions of dough. Roll each into smooth balls. Toss lightly in granulated sugar to coat.
The sugar adds sparkle and gentle crunch. Arrange balls on parchment-lined baking sheets, spacing them 2 inches apart. Keep sizes uniform for even baking. If dough softens, chill 10–20 minutes to maintain shape.
Bake Until Just Set
Preheat the oven to 350°F (175°C). Bake cookies for 8–10 minutes. Look for set edges and soft centers.
Avoid browning to keep cookies tender. Rotate pans if needed for even heat. Remove promptly once done. Slight underbaking prevents dryness and helps the thumbprint indent hold without cracking excessively.
Indent the Centers
Immediately press a 1/2-teaspoon or your thumb into each hot cookie to form a well. Work quickly before they firm up. If cookies puff, gently re-indent after 1 minute.
Avoid cracking by pressing straight down. Keep wells centered and about halfway deep. Let cookies rest on the sheet for 5 minutes to set.
Fill with Jam or Chocolate
Spoon about 1 teaspoon of thick, seedless jam into each indentation, or press a chocolate kiss into the center. Use jam after baking for a glossy finish and to prevent runoff.
Choose raspberry or strawberry for classic flavor. If using chocolate, seat it while warm so it adheres firmly as the cookie cools.
Cool and Store Properly
Transfer cookies to a wire rack to cool completely. Allow fillings to set before stacking. Store in an airtight container for up to 4 days.
For longer storage, freeze unfilled cookies up to 2 months. Thaw, then fill before serving for best texture. Keep at room temperature, away from heat and sunlight.
Ingredient Swaps
- Dairy-free: Replace butter with equal amount of vegan butter or refined coconut oil (add a pinch of salt if using oil).
- Gluten-free: Use a 1:1 gluten-free all-purpose flour blend; if dough feels soft, add 1–2 teaspoons more.
- No egg: Substitute 1 flax egg (1 tbsp ground flax + 3 tbsp water, rested 5–10 min) or 3 tablespoons unsweetened applesauce.
- Sugar alternatives: Swap granulated/brown sugar with coconut sugar; for lower sugar, use a 1:1 baking sweetener (erythritol/monk fruit) and expect slightly drier texture.
- Peanut allergy or regional availability: Use equal amounts of almond butter, cashew butter, or sunflower seed butter (note that sunflower can green slightly—harmless).
- Filling swaps: Thick jam, lemon curd, dulce de leche, caramel, Nutella, or chocolate squares/chips; choose thicker spreads to prevent runoff.
You Must Know
Doneness • If cookie edges look set but centers are puffy and matte, press the well again after 2 minutes on the sheet; this collapses steam so centers stay defined and jam doesn’t overflow.
Visual cue: faint cracks around the rim, tops no longer shiny.
Troubleshoot • When cookies spread too much (diameter > 2.5 inches or wells collapse), chill dough 20–30 minutes and add 1–2 teaspoons flour; warmer kitchens (>75°F) and natural PB loosen structure.
Flavor Boost • For deeper peanut flavor, swap 2 tablespoons flour for roasted peanut powder or finely ground roasted peanuts; toast peanuts 8–10 minutes at 350°F until fragrant for a nutty, salty edge.
Swap • If using natural peanut butter (drippy), stir until homogenous and weigh 140 g; add 1 tablespoon flour if dough feels greasy or sticky to the touch; you want a soft dough that doesn’t cling to your palm.
Make-Ahead • To streamline, portion and sugar-roll dough balls, then freeze on a sheet until firm (1–2 hours).
Store airtight up to 2 months; bake from frozen, adding 1–2 minutes, and indent immediately after removal for clean wells.
Serving Tips
- Serve on a platter with assorted jams and chocolate kisses for variety.
- Pair with cold milk, hot cocoa, or coffee for a cozy treat.
- Dust edges lightly with powdered sugar for a festive finish.
- Add a sprinkle of flaky salt on chocolate-filled cookies to enhance flavor.
- Plate alongside sliced fresh berries to balance sweetness.
Storage & Make-Ahead
Store cookies in an airtight container at room temperature for 4 days or in the fridge up to 1 week.
For make-ahead, chill dough 20–48 hours to enhance flavor and shape.
Freeze unfilled dough balls or baked cookies up to 2 months.
Thaw, then fill just before serving.
Reheating
For gentle reheating, use:
Microwave 5–10 seconds per cookie.
Oven at 300°F for 3–5 minutes on a sheet.
Or stovetop skillet on low, covered, 2–3 minutes to refresh.
Elvis-Era Bake Sale Favorite
Sometimes I channel a little rock ’n’ roll nostalgia and turn these thumbprints into an Elvis-era bake sale star: peanut butter cookies filled with glossy strawberry jam and a whisper of banana.
I bake the peanutty bases until the edges set, then press warm wells so the centers stay soft and tender. For the Elvis wink, I spoon in thick, seedless strawberry jam after baking, then add tiny banana bits—just a few—so the fruit perfumes the jam without making it runny.
I roll the dough balls lightly in sugar for a delicate crunch that contrasts the plush center. The scent—roasted peanut, sunny strawberry, mellow banana—pulls people from across a room.
Stack them on a vintage plate, and watch them vanish like a chart-topping hit.
Final Thoughts
Ready to bake a batch? Give these Peanut Butter Thumbprint Cookies a try as written, or have fun tweaking the fillings—swap in different jams, caramel, or even a dark chocolate square to make them your own!
Frequently Asked Questions
Can I Make Them Gluten-Free Without Gritty Texture?
Yes. I use a 1:1 gluten-free flour blend with xanthan gum, plus 1 tablespoon cornstarch. I chill the dough 30 minutes. The cookies bake tender, not gritty—soft centers, crisp edges, and a fragrant, peanutty snap.
How Do I Scale the Recipe for 100 Cookies?
Scale to about 4.2×: use 2.1 cups butter, 2.1 cups peanut butter, 2.1 cups each sugars, 4–5 eggs, 4.2 tsp vanilla, 5.25 cups flour, leavening/salt ×4.2. Mix batches, chill dough, rotate sheets, re-indent gently.
What’s the Best Way to Ship These Without Smushing Centers?
I ship them unfilled, chilled, and nested in cupcake liners. I pack a snug tin, cushion with crumpled parchment, then include jam or kisses separately. You’ll fill on arrival—centers stay pristine, textures crisp, flavors vivid.
Are There Nut-Free Alternatives That Mimic Peanut Flavor?
Yes—try roasted chickpea or sunflower seed butter with a splash of toasted sesame oil. I’ve added a hint of maple and miso for deeper “nutty” notes. It smells warm, tastes rich, and bakes beautifully.
How Do Altitude Adjustments Affect Spread and Bake Time?
At high altitude, cookies spread less and bake faster. I lower sugar slightly, add a tablespoon flour, bump oven 15°F, and shorten bake a minute. I watch edges set, centers soft, aroma nutty-sweet, then pull.
Peanut Butter Thumbprint Cookies
Equipment
- 2 Baking sheet
- 1 Mixing bowl
- 1 hand mixer or stand mixer
- 1 Rubber spatula
- 1 Measuring cups set
- 1 Measuring spoons set
- 1 Small bowl
- 1 wire cooling rack
- 1 Parchment paper roll
- 1 teaspoon for indentations
- 1 Small saucepan if making chocolate filling, optional
Ingredients
- 1/2 cup unsalted butter softened
- 1/2 cup creamy peanut butter room temperature
- 1/2 cup granulated sugar plus extra for rolling
- 1/2 cup light brown sugar packed
- 1 large egg room temperature
- 1 teaspoon vanilla extract
- 1 1/4 cups all-purpose flour
- 1/2 teaspoon baking soda
- 1/4 teaspoon baking powder
- 1/4 teaspoon fine salt
- 24 teaspoons jam raspberry or strawberry, or chocolate kisses, for filling
Instructions
- Preheat the oven to 350°F (175°C) and line two baking sheets with parchment paper.
- In a mixing bowl beat the butter, peanut butter, granulated sugar, and brown sugar until light and creamy, about 2 minutes.
- Add the egg and vanilla and beat until fully combined.
- In a small bowl whisk together the flour, baking soda, baking powder, and salt.
- Add the dry ingredients to the wet mixture and mix on low just until a soft dough forms.
- Scoop 1-tablespoon portions of dough, roll into balls, and then roll each ball lightly in granulated sugar.
- Arrange dough balls 2 inches apart on prepared baking sheets.
- Bake for 8–10 minutes until the edges are set but centers still look soft.
- Remove from the oven and immediately press a 1/2-teaspoon or your thumb into the center of each cookie to create a well.
- Fill each indentation with 1 teaspoon of jam or press a chocolate kiss into the center.
- Let cookies rest on the sheet for 5 minutes, then transfer to a wire rack to cool completely.
Notes

Cynthia Weatherford is a seasoned chef and culinary enthusiast who serves as the Recipe creator of Somonday. With decades of experience in the kitchen and a passion for exploring diverse cuisines, Cynthia brings a blend of creativity and technique to every dish. Known for transforming simple ingredients into show-stopping meals, Cynthia believes that cooking is an art form anyone can master. Dedicated to inspiring home cooks, Cynthia shares approachable recipes, pro tips, and culinary wisdom to make every meal memorable.


