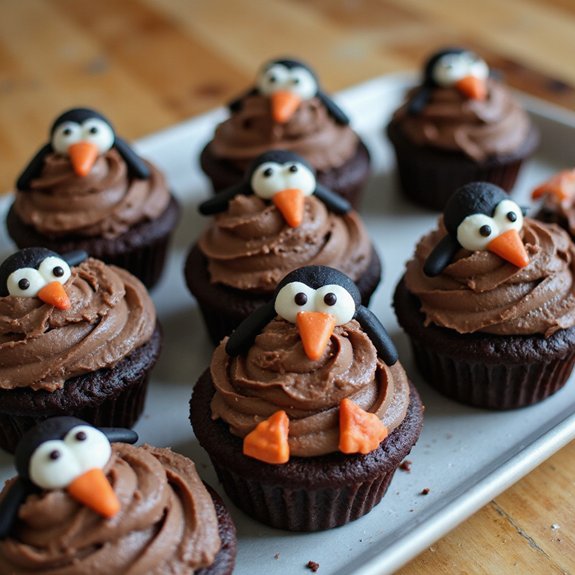
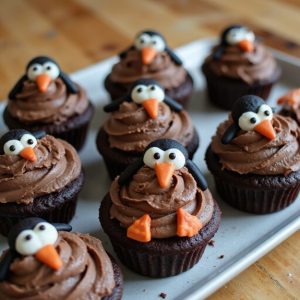
Imagine a tray of tiny tuxedoed penguins marching across your countertop, their glossy chocolate “jackets” gleaming and little white bellies peeking through.
These penguin cupcakes are a cozy dessert that feels whimsical and special, yet they’re simple enough to pull together in under an hour.
They’re perfect for sweet-tooth fans, families with enthusiastic little helpers, and anyone who needs a fun, low-stress baking project for birthdays, winter parties, or last-minute classroom treats.
I still remember a snowed-in afternoon when plans were canceled and cabin fever was setting in.
A quick batch of these cupcakes turned the day around—kids focused on placing candy “beaks” and cookie “wings,” and suddenly the storm outside felt magical instead of dreary.
These cupcakes shine at holiday gatherings, movie nights, or whenever you need a conversation-starting dessert that makes people smile before they even take a bite.
Ready to bring this dish to life?
Why You’ll Love It
- Delivers rich chocolate flavor in a soft, tender crumb
- Doubles as an adorable, kid-friendly party centerpiece and dessert
- Uses simple, everyday ingredients and basic baking equipment
- Invites creativity with customizable fondant faces, wings, and feet
- Preps well ahead; decorations can be made the day before
Ingredients
- 190 g all-purpose flour — spoon and level for accuracy
- 150 g granulated sugar — standard white sugar works best
- 10 g baking powder — make certain it’s fresh for proper rise
- 2 g fine salt — balances sweetness and enhances flavor
- 120 ml whole milk, room temperature — brings batter together smoothly
- 60 ml vegetable oil — neutral oil like canola or sunflower
- 2 large eggs, room temperature — helps batter emulsify evenly
- 5 ml vanilla extract — pure vanilla for best flavor
- 30 g unsweetened cocoa powder — use natural cocoa, not hot cocoa mix
- 115 g unsalted butter, softened — should be pliable but not greasy
- 240 g powdered sugar, sifted — removes lumps for smooth frosting
- 30 ml heavy cream or milk — adjust for desired frosting consistency
- 5 ml vanilla extract for frosting — adds flavor to the buttercream
- 45 g dark chocolate chips, melted — cool slightly before mixing into frosting
- 150 g white fondant — forms bellies and face patches
- 80 g black fondant — used for heads and wings
- 40 g orange fondant — shapes beaks and feet
- 24 mini chocolate chips for eyes (optional) — easy alternative to tiny fondant eyes
Step-by-Step Method
Preheat & Prepare Tin
Preheat the oven to 175°C. Line a standard 12-cup muffin tin with paper cupcake liners. Clear your workspace and gather all ingredients and equipment. This makes the process smoother.
Make sure the oven rack is in the center position for even baking. Set the tin aside while you mix the batter.
Mix Dry Ingredients
Combine flour, cocoa powder, baking powder, and salt in a medium bowl. Whisk until the mixture looks uniform and no cocoa streaks remain. Breaking up any lumps now makes for a smoother batter later. Set this bowl aside so it’s ready to add to the wet ingredients.
Whisk Wet Ingredients
In a large bowl, whisk together sugar, milk, vegetable oil, eggs, and vanilla extract. Mix until the sugar begins to dissolve and the mixture looks smooth and cohesive.
Make sure there are no streaks of egg. This wet base helps the dry ingredients incorporate evenly without overmixing.
Combine Wet & Dry Mixtures
Add the dry ingredients to the wet ingredients. Use a silicone spatula to fold and stir gently. Mix only until no dry flour patches remain.
Avoid overmixing, which can make cupcakes dense or tough. Scrape the bowl sides and bottom so everything is evenly combined.
Fill Liners & Bake
Divide the batter evenly among the 12 cupcake liners, filling each about two-thirds full. Use a measuring cup or scoop for consistency. Place the tin in the preheated oven.
Bake for 16–18 minutes, or until a toothpick inserted in the center comes out clean or with a few moist crumbs.
Cool Cupcakes Completely
Remove the pan from the oven and place it on a wire rack. Let cupcakes cool in the tin for 10 minutes to set their structure. Then carefully transfer each cupcake to the rack.
Allow them to cool completely for at least 30 minutes before frosting, to prevent melting and sliding decorations.
Beat Butter & Add Sugar
In a medium bowl, beat softened butter with an electric mixer until creamy and pale, about 2 minutes. Gradually add sifted powdered sugar on low speed to avoid a sugar cloud.
Increase speed to medium once incorporated. Continue beating until the frosting looks fluffy and light.
Add Cream & Reserve Frosting
Pour in the heavy cream and vanilla extract. Beat until the frosting is smooth, spreadable, and holds soft peaks. If it’s too thick, add a tiny splash more cream.
Transfer about 3 tablespoons of this vanilla frosting to a small bowl. Reserve it for the penguin bellies and faces.
Melt Chocolate & Flavor Frosting
Place dark chocolate chips in a microwave-safe bowl. Heat in 20-second bursts, stirring between each, until completely smooth. Allow the chocolate to cool slightly but not harden. Add the melted chocolate to the larger portion of frosting.
Beat until fully combined, creating rich chocolate frosting.
Frost Cupcake Bodies
Using an offset spatula or piping bag, spread or pipe a dome of chocolate frosting on each cooled cupcake. Aim for a rounded, slightly tall shape to mimic a penguin’s body.
Smooth the surface gently. Make sure the frosting layer is thick enough to hold fondant decorations securely in place.
Roll & Cut Black Fondant
Roll out black fondant to about 3 mm thickness on a surface dusted lightly with cornstarch or powdered sugar. Cut 12 small ovals for wings and 12 round shapes for heads.
Keep sizes consistent so all penguins look similar. Cover unused fondant pieces to prevent drying and cracking.
Shape White Bellies & Faces
Roll out white fondant to the same thickness. Cut 12 smaller ovals for bellies and 12 small circles or teardrop shapes for face patches.
Adjust sizes so they fit neatly on the black head circles and cupcake fronts. Set the pieces aside on parchment so they don’t stick to the surface.
Attach Bellies & Heads
Press one white fondant belly oval gently onto the front of each frosted cupcake. The frosting acts as glue.
Then place a black fondant head circle on the top front edge of each cupcake. Press lightly into the frosting to secure. Make sure heads sit slightly forward for a cute profile.
Add Face Patches & Beaks
Place a white fondant face patch onto each black head, pressing lightly so it adheres. Shape tiny triangles from orange fondant to form beaks.
Press one triangle onto the center of each white face patch. Adjust position so the beak sits midway between where the eyes will go.
Create Eyes & Wings
Use small balls of black fondant or mini chocolate chips for eyes. Press two onto each face above the beak, spacing them evenly.
Attach two black fondant ovals to the sides of each cupcake as wings. Angle them slightly outward to give each penguin a friendly, open-armed look.
Add Feet & Chill to Set
Shape small orange fondant ovals or wedges into feet. Place two at the base of each cupcake, just under the belly. Press gently so they stick to the frosting.
Arrange all decorated cupcakes on a tray. Refrigerate for 5–10 minutes to help the fondant and frosting firm before serving.
Ingredient Swaps
- Use any neutral oil (canola, sunflower) in place of vegetable oil; 2% milk works if you don’t have whole.
- Make it egg‑free by replacing each egg with 60 ml unsweetened applesauce or yogurt; use gluten‑free all‑purpose flour blend for a GF version.
- Swap buttercream with dairy‑free margarine and plant milk for a vegan frosting, and use dairy‑free chocolate chips.
- If you can’t find fondant, use colored modeling chocolate, marzipan, or simple candies (jelly beans, M&M’s, candy corn) for beaks, feet, and eyes.
You Must Know
– Flavor Boost – To deepen the chocolate profile, dissolve 3–5 g instant espresso powder into the 120 ml milk before combining with the sugar mixture.
You won’t taste coffee, but the cocoa notes will seem more intense and balanced.
Serving Tips
- Serve on a white platter “ice floe” sprinkled with shredded coconut snow.
- Pair with hot chocolate or milk for a cozy winter dessert spread.
- Arrange cupcakes in a circle around a small “polar pond” bowl of blue jelly.
- Add name flags or tiny scarf toppers for personalized party penguins.
- Display on tiered stands with silver or blue napkins for a festive winter theme.
Storage & Make-Ahead
Store penguin cupcakes in an airtight container in the fridge for up to 4 days.
Let them sit at room temperature 20–30 minutes before serving.
You can bake cupcakes a day ahead and decorate later.
They freeze (undecorated) up to 2 months.
Thaw overnight in the fridge.
Reheating
Reheating frosted cupcakes isn’t recommended; they’re best at room temperature.
If chilled, let sit 20–30 minutes.
Avoid microwave, oven, or stovetop heat, which melts frosting and softens fondant decorations.
Penguins in Winter Celebrations
When the days turn crisp and the windows fog with breath, I always find myself reaching for penguin-themed treats to anchor winter celebrations in something playful and sweet.
There’s something about their tidy tuxedos and round little bellies that makes a dark evening feel softer.
I like to line these penguin cupcakes in a marching row down the center of the table, as if they’ve waddled in from a snowstorm to join us.
Kids immediately start assigning them names; adults pretend they’re not delighted, then quietly choose “their” penguin.
With the smell of cocoa in the air and a kettle humming nearby, the cupcakes turn hot chocolate, board games, and story-swapping into a small, twinkling polar party right in the living room.
Final Thoughts
Give these Penguin Cupcakes a try and have fun bringing your own flock of adorable little birds to life in the kitchen.
Don’t be afraid to tweak the decorations or flavors to match your style, your party theme, or whatever ingredients you already have on hand.
Frequently Asked Questions
Can I Make These Penguin Cupcakes Gluten-Free or Dairy-Free?
Yes, you can. I’d swap in a trusted 1:1 gluten-free flour blend and use dairy-free milk, butter, and chocolate. I’ve baked them this way for a snowy movie night—everyone just tasted fudgy, wintry magic.
How Do I Price Penguin Cupcakes for Bake Sales or Parties?
I usually charge $3–$4 each, or $30–$40 per dozen. I picture your table glowing with little frosted faces and gently factor ingredients, time, and a tiny “joy tax” for all that careful decorating.
What’s the Best Way to Transport Decorated Penguin Cupcakes Safely?
I nestle each cupcake in a deep, lidded carrier, using a non‑slip mat and tall swirls of firm frosting. I imagine them like bundled travelers, snug and upright, surviving every pothole home.
Can Kids Help Decorate the Penguin Cupcakes, and Which Steps Are Safest?
Yes, kids can help; I’d invite them to press on bellies, faces, beaks, eyes, wings, and feet. I’d keep melting chocolate, mixing frosting, and sharp cutters to myself while they happily craft little winter friends.
How Can I Scale This Recipe for a Large Event or Classroom?
You can safely double or triple the recipe; I’ve baked 36 at once using three tins. I mix one big batter, bake in batches, then decorate assembly-line style so your classroom feels like a cozy little bakery.
Penguin Cupcakes
Equipment
- 1 standard 12-cup muffin tin
- 12 paper cupcake liners
- 2 medium mixing bowls
- 1 large mixing bowl
- 1 electric hand mixer or stand mixer
- 3 silicone spatulas
- 1 Whisk
- 1 Measuring cups set
- 1 Measuring spoons set
- 1 wire cooling rack
- 1 offset spatula or butter knife
- 1 Piping bag (optional)
- 1 small round piping tip (optional)
- 1 microwave-safe bowl
Ingredients
- 190 gram all-purpose flour
- 150 gram granulated sugar
- 10 gram baking powder
- 2 gram fine salt
- 120 milliliter whole milk room temperature
- 60 milliliter vegetable oil
- 2 large eggs room temperature
- 5 milliliter vanilla extract
- 30 gram unsweetened cocoa powder
- 115 gram unsalted butter softened
- 240 gram powdered sugar sifted
- 30 milliliter heavy cream or milk
- 5 milliliter vanilla extract for frosting
- 45 gram dark chocolate chips melted
- 150 gram white fondant
- 80 gram black fondant
- 40 gram orange fondant
- 24 mini chocolate chips for eyes optional
Instructions
- Preheat the oven to 175°C and line the muffin tin with 12 paper cupcake liners.
- In a medium bowl whisk together the flour, cocoa powder, baking powder, and salt until well combined.
- In a large bowl whisk together the sugar, milk, oil, eggs, and vanilla extract until smooth.
- Add the dry ingredients to the wet ingredients and mix with a spatula just until no dry streaks remain.
- Divide the batter evenly among the 12 liners, filling each about two-thirds full.
- Bake the cupcakes for 16 to 18 minutes or until a toothpick inserted in the center comes out clean.
- Remove the pan from the oven and let the cupcakes cool in the tin for 10 minutes.
- Transfer the cupcakes to a wire rack and let them cool completely for at least 30 minutes.
- While the cupcakes cool, beat the softened butter with an electric mixer in a medium bowl until creamy and pale, about 2 minutes.
- Gradually add the powdered sugar, mixing on low until incorporated, then increase to medium speed until fluffy.
- Add the heavy cream and vanilla to the frosting and beat until smooth and spreadable.
- Transfer 3 tablespoons of the vanilla frosting to a small bowl and set aside for the penguin bellies and faces.
- Melt the dark chocolate chips in a microwave-safe bowl in 20-second bursts, stirring between each, until smooth.
- Mix the melted chocolate into the larger portion of frosting and beat until fully combined and chocolatey.
- Spread or pipe a dome of chocolate frosting onto each cooled cupcake to form the penguin body.
- Roll out the black fondant to about 3 mm thickness and cut 12 small oval shapes for wings and 12 round shapes for heads.
- Roll out the white fondant and cut 12 smaller ovals for bellies and 12 small circles or teardrops for face patches.
- Attach a white belly oval to the front of each cupcake by gently pressing it into the chocolate frosting.
- Place one black fondant head circle on the top front edge of each cupcake, securing it into the frosting.
- Add a white fondant face patch onto each head, pressing lightly to adhere.
- Shape tiny triangles from the orange fondant and press one onto each face to create a beak.
- Roll small balls of black fondant or use mini chocolate chips and press two onto each face for eyes.
- Attach two black fondant ovals to the sides of each cupcake as wings, angling them slightly outward.
- Shape small orange fondant ovals or wedges and place two at the base of each cupcake to resemble feet.
- Refrigerate the decorated cupcakes for 5 to 10 minutes to help the fondant set before serving.
Notes

Cynthia Weatherford is a seasoned chef and culinary enthusiast who serves as the Recipe creator of Somonday. With decades of experience in the kitchen and a passion for exploring diverse cuisines, Cynthia brings a blend of creativity and technique to every dish. Known for transforming simple ingredients into show-stopping meals, Cynthia believes that cooking is an art form anyone can master. Dedicated to inspiring home cooks, Cynthia shares approachable recipes, pro tips, and culinary wisdom to make every meal memorable.


