
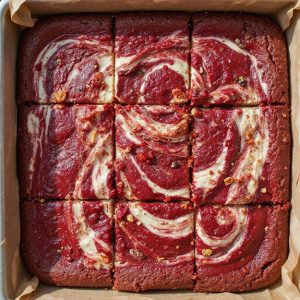
Picture glossy crimson ribbons marbling through velvety cream, the cocoa’s warmth meeting a whisper of tang as buttery sweetness rises from the oven.
Imagine slicing into fudgy squares with delicate cheesecake swirls, the edges lightly chewy, the center tender, every bite a comfort-blanket of color and aroma.
I return to this Red Velvet Brownie Swirl whenever I want something festive without fuss—it looks bakery-fancy but comes together with pantry staples and a single pan.
It matters to me because it turns small moments—busy weeknights, last‑minute potlucks, or slow Sunday suppers—into celebrations, no elaborate frosting required.
Once, when guests arrived early and dessert wasn’t planned, these bars saved the day: mixed in minutes, baked while we ate, and cooled just in time for coffee.
They slice clean, travel well, and feel special for birthdays, Valentine’s Day, or any cozy evening in.
Ready? Let’s cook!
Why You’ll Love It
- Delivers bold cocoa tang with classic red velvet richness
- Marries fudgy brownie and creamy cheesecake in one bite
- Swirls bake up stunning, bakery-worthy visuals effortlessly
- Uses simple pantry staples and basic equipment
- Slices cleanly; perfect for make-ahead entertaining
Ingredients
- 113 g unsalted butter, melted and cooled — use real butter for best flavor (use fresh cream butter)
- 200 g granulated sugar — superfine dissolves easily (choose pure cane)
- 2 large eggs, room temperature — guarantees smoother batter (check freshness)
- 2 tsp vanilla extract, divided — real vanilla adds depth (avoid imitation)
- 1 tbsp red liquid food coloring — adjust for desired hue (use high-quality)
- 1 tsp white vinegar — boosts red color and tenderness (distilled)
- 21 g unsweetened natural cocoa powder — not Dutch-process (fresh, aromatic)
- 95 g all-purpose flour, spooned and leveled — prevents dense bars (unbleached)
- 1/4 tsp baking powder — light lift without cakiness (fresh, active)
- 1/4 tsp fine sea salt — balances sweetness (avoid coarse crystals)
- 226 g cream cheese, softened — room temp prevents lumps (full-fat brick)
- 50 g granulated sugar (for cheesecake swirl) — keeps swirl silky (superfine ideal)
- 1 large egg (for cheesecake swirl) — binds the swirl (room temperature)
- 2 tbsp all-purpose flour (for cheesecake swirl) — sets the swirl (lightly spooned)
Step-by-Step Method
Prep the Pan and Oven
Preheat the oven to 350°F (175°C). Line a 9×9-inch pan with parchment paper, leaving overhang on two sides for easy lifting. Lightly grease the paper. Set out cream cheese to soften. Gather equipment and ingredients to streamline the process.
Whisk the Wet Ingredients
Whisk melted, cooled butter with 1 cup granulated sugar until glossy. Add 2 room-temperature eggs, one at a time, whisking until smooth. Mix in 1 teaspoon vanilla. Stir in red liquid food coloring and white vinegar until the mixture turns a deep, even red.
Fold in the Dry Ingredients
Sift cocoa powder, all-purpose flour, baking powder, and fine sea salt over the red mixture. Fold gently with a spatula just until combined. Avoid overmixing to keep the crumb tender. The batter should be thick and smooth, with no dry streaks remaining.
Beat the Cheesecake Layer
In a separate bowl, beat softened cream cheese with 1/4 cup sugar until creamy and lump-free. Add the remaining 1 teaspoon vanilla and 1 egg; beat until silky. Sprinkle in 2 tablespoons flour and mix until fully incorporated and smooth.
Layer the Batters
Spread about two-thirds of the red velvet batter into an even layer in the prepared pan. Smooth the surface with a spatula, reaching all corners. Dollop spoonfuls of the cheesecake mixture across the top, spacing evenly for consistent swirls.
Dollop and Swirl
Spoon the remaining red velvet batter in between and over the cheesecake dollops. Drag a butter knife or skewer through the batters in gentle figure-eights. Create distinct ribbons without overmixing to preserve clean, defined swirls.
Bake to Doneness
Bake for 30 to 35 minutes. Look for set edges and a center that yields a toothpick with a few moist crumbs. For fudgier bars, remove when the center has a slight wobble. Rotate the pan once if needed for even baking.
Cool, Lift, and Slice
Cool the pan on a wire rack for 30 minutes. Use the parchment overhang to lift the slab onto a cutting board. Chill briefly for cleaner cuts if desired. Slice into 16 squares. Serve slightly chilled or at room temperature. Store covered in the fridge up to 5 days.
Ingredient Swaps
- No food coloring: use 2–3 tablespoons beet powder or 1/4 cup reduced beet puree; flavor stays mild and color vibrant.
- Gluten-free: swap all-purpose flour with a 1:1 gluten-free baking blend; add 1 tablespoon cornstarch for tenderness.
- Dairy-free: replace butter with refined coconut oil or vegan butter; use plant-based cream cheese (almond/cashew).
- Egg-free: use 2 flax eggs (2 tablespoons ground flax + 6 tablespoons water) total for the batter; for the swirl, use 2 tablespoons cornstarch or 1 tablespoon arrowroot + 1–2 tablespoons plant milk instead of the egg.
- Cocoa options: natural cocoa as written; if using Dutch-process, omit vinegar or add 1/8 teaspoon extra baking powder to balance acidity.
- Sugar swaps: use light brown sugar for extra moisture/caramel notes; coconut sugar works but yields a deeper color and less “red.”
- Budget/regional: substitute white vinegar with lemon juice; vanilla can be halved; brick-style neufchâtel can replace cream cheese.
- Flavor twists: add 1/2 teaspoon instant espresso to intensify cocoa; fold in 1/2 cup chocolate chips or chopped nuts.
You Must Know
Doneness • If the center looks set but the toothpick shows thick streaks of cheesecake, leave it in 3–5 more minutes; you want a few moist crimson crumbs and creamy smears, not wet batter—edges should be slightly pulling from the pan by ~1/8 inch.
Troubleshoot • When the swirl marbles into a pink mush, chill both batters 10–15 minutes until scoopable; cooler, thicker layers hold distinct ribbons and prevent bleed during the 30–35 minute bake.
Flavor Boost • For deeper cocoa notes without losing red color, bloom the cocoa with 1 tablespoon hot water, then cool; you’ll get a darker chocolate aroma and cleaner bitterness—look for the batter to smell like hot cocoa before coloring.
Swap • If using Dutch-process cocoa, add 1/8 teaspoon extra baking powder to keep lift (alkalized cocoa neutralizes acidity); the crumb stays tender and rises evenly to ~1–1.25 inches.
Scale • For a 9×13-inch pan, multiply all ingredients by 1.5 and extend time to 35–42 minutes; rotate at 20 minutes and check for the same moist-crumb cue in the center.
Serving Tips
- Serve chilled squares with a dusting of powdered sugar and fresh raspberries.
- Plate warm with a scoop of vanilla ice cream and chocolate drizzle.
- Cut into bite-size cubes for dessert boards with strawberries and pretzels.
- Pair with coffee or espresso; add a dollop of lightly sweetened whipped cream.
- Garnish with white chocolate shavings and a mint sprig for a festive look.
Storage & Make-Ahead
Refrigerate tightly covered up to 5 days.
The chill firms layers for cleaner slices.
For make-ahead, bake, cool completely, and cut.
Store in an airtight container with parchment between layers.
Freeze up to 2 months: wrap bars individually, then bag.
Thaw overnight in the fridge, or 30 minutes at room temperature.
Reheating
Reheat gently: microwave 10–15 seconds per square.
Oven at 300°F for 8–10 minutes, tented with foil.
Stovetop steam in a lidded skillet 2–3 minutes to warm without drying.
Juneteenth Picnic Favorite
Often, I tuck a pan of these red velvet brownie swirls into a gingham-lined basket, and the bright crimson ribbons feel right at home for a Juneteenth picnic.
Their color pops against watermelon wedges and glistening greens, a jubilant nod to the day’s legacy and joy.
I bake them the night before so the swirls set cleanly, then chill and slice into tidy squares that travel well.
At the park, I pass them around with paper napkins, and you’ll taste chocolate forward, velvety crumb, and that creamy cheesecake ripple. Sunlight catches the sheen, and every bite feels like a sweet drumbeat.
They’re simple to serve, unfussy to eat, and they hold beautifully on a shaded table—cool, vibrant, celebratory, and ready when the stories begin.
Final Thoughts
Ready to bake a batch? Give this Red Velvet Brownie Swirl a try as written, or make it your own by adjusting the bake time for fudgier or cakier bars and playing with the swirl pattern to match your style.
Frequently Asked Questions
Can I Make This Recipe Gluten-Free Without Compromising Texture?
Yes—you can. I swap the flour for a fine 1:1 gluten-free blend with xanthan gum, sift it, and fold gently. The brownies stay plush, ribbons luscious, and edges chewy—like warm velvet squares whispering comfort.
How Do I Fix an Oily or Greasy Batter?
Gently whisk in a tablespoon of flour, chill the bowl 10 minutes, then fold. I blot excess surface oil with a paper towel, warm cold fats to room temp next time, and avoid overmixing—silky batter, serene crumbs.
What Natural Alternatives Replace Red Food Coloring?
Use beet powder or beet puree; they paint batter ruby without chemicals. I also lean on pomegranate or hibiscus for blush, and a whisper of cocoa deepens hue. Strain purees, adjust moisture, and embrace nature’s warm glow.
Can I Freeze Unbaked Swirled Batter for Later?
You can, but I wouldn’t. Freezing muddles the swirl and can split the cream cheese. I’d assemble fresh, or freeze baked squares instead—wrapped snugly—then thaw, slice, and serve as velvety marbled treats by candlelight.
How Do Altitude Adjustments Affect Bake Time and Leavening?
At high altitude, I bake longer, reduce leavening slightly, and add a touch more liquid. Thin air speeds evaporation and overexpansion. I lower sugar a bit, raise oven temp 15–25°F, and watch doneness like moonlit edges.
Red Velvet Cake Brownie Swirl
Equipment
- 1 9×9 inch baking pan
- 2 Mixing bowl
- 1 Medium saucepan
- 1 Whisk
- 1 Rubber spatula
- 1 hand mixer or stand mixer
- 1 Wire rack
- 1 parchment paper sheet
- 1 toothpick
Ingredients
- 1/2 cup unsalted butter melted and cooled
- 1 cup granulated sugar
- 2 large eggs room temperature
- 2 teaspoon vanilla extract divided
- 1 tablespoon red liquid food coloring
- 1 teaspoon white vinegar
- 1/4 cup unsweetened natural cocoa powder
- 3/4 cup all-purpose flour spooned and leveled
- 1/4 teaspoon baking powder
- 1/4 teaspoon fine sea salt
- 8 ounce cream cheese softened
- 1/4 cup granulated sugar for cheesecake swirl
- 1 large egg for cheesecake swirl
- 2 tablespoon all-purpose flour for cheesecake swirl
Instructions
- Preheat the oven to 350°F (175°C) and line a 9×9-inch pan with parchment paper leaving overhang for easy lifting.
- In a bowl whisk melted butter and 1 cup sugar until glossy then whisk in 2 eggs one at a time and 1 teaspoon vanilla.
- Stir in food coloring and vinegar until the mixture turns a deep red.
- Sift cocoa powder, 3/4 cup flour, baking powder, and salt over the wet mixture and fold just until combined to make the red velvet brownie batter.
- In a separate bowl beat cream cheese with 1/4 cup sugar until smooth then mix in the remaining 1 teaspoon vanilla and the egg.
- Sprinkle in 2 tablespoons flour and beat until the cheesecake mixture is silky with no lumps.
- Spread about two-thirds of the red velvet batter evenly into the prepared pan.
- Dollop spoonfuls of the cheesecake mixture over the batter followed by spoonfuls of the remaining red velvet batter.
- Use a butter knife or skewer to gently swirl the mixtures together creating visible ribbons without overmixing.
- Bake for 30 to 35 minutes until the edges are set and a toothpick inserted in the center comes out with a few moist crumbs.
- Cool the pan on a wire rack for 30 minutes then lift out using parchment and slice into squares.
Notes

Cynthia Weatherford is a seasoned chef and culinary enthusiast who serves as the Recipe creator of Somonday. With decades of experience in the kitchen and a passion for exploring diverse cuisines, Cynthia brings a blend of creativity and technique to every dish. Known for transforming simple ingredients into show-stopping meals, Cynthia believes that cooking is an art form anyone can master. Dedicated to inspiring home cooks, Cynthia shares approachable recipes, pro tips, and culinary wisdom to make every meal memorable.


