
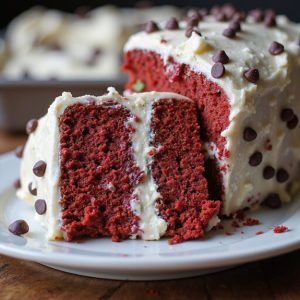
Picture a slice of scarlet cake, tender as velvet, releasing a whisper of cocoa as your fork sinks through creamy swirls studded with tiny chocolate gems.
Imagine the contrast: plush crumb, cool tang of cream cheese, and the gentle crunch of mini chips—comfort wrapped in celebration.
I return to this red velvet classic whenever I want dessert to feel like a hug with a little sparkle; the color alone turns an ordinary day festive.
It’s the kind of cake that earns smiles at birthdays, bridges the gap between casual Sunday suppers and milestone moments, and still fits a busy weeknight when you bake the layers ahead and frost later.
Once, this recipe saved my sanity when guests arrived early—I leaned on make-ahead layers, whipped the frosting fast, and the room fell quiet at first bite.
Ready? Let’s cook!
Why You’ll Love It
- Delivers classic red velvet tang with tender, moist crumb
- Whips up quickly with simple pantry staples
- Creamy frosting studded with mini chocolate chips
- Bakes evenly in two easy 9-inch layers
- Slices cleanly after a brief chill time
Ingredients
- 2 1/2 cups all-purpose flour, sifted — measure after sifting for accuracy
- 1 1/2 cups granulated sugar — fine granules dissolve evenly
- 1 teaspoon baking soda — fresh for proper rise
- 1 teaspoon fine salt — balances sweetness
- 2 tablespoons unsweetened natural cocoa powder — classic tang and hue
- 1 1/2 cups vegetable oil — neutral flavor keeps crumb moist
- 1 cup buttermilk, room temperature — tenderizes and adds tang
- 2 large eggs, room temperature — mix in more evenly
- 2 tablespoons red liquid food coloring — vibrant color throughout
- 1 teaspoon white vinegar — boosts red color reaction
- 2 teaspoons vanilla extract — rounds out flavor
- 4 ounces cream cheese, softened — guarantees silky frosting
- 1/2 cup unsalted butter, softened — creamy base for frosting
- 3 cups powdered sugar, sifted — lump-free, smooth finish
- 1/8 teaspoon fine salt — tempers sweetness
- 1 teaspoon vanilla extract — aromatic boost
- 1/3 cup heavy cream, cold — whips light and fluffy
- 1 cup mini chocolate chips — fold in so frosting spreads well
- Extra mini chocolate chips, for garnish — add texture and flair
Step-by-Step Method
Prep the Pans and Preheat
Heat oven to 350°F (175°C). Grease two 9-inch round cake pans. Line bottoms with parchment and lightly flour sides. Set a cooling rack nearby. Gather tools and ingredients. Bring eggs and buttermilk to room temperature. Sift dry ingredients to prevent lumps. This prep guarantees easy release and even baking.
Whisk the Dry Ingredients
Sift flour, granulated sugar, baking soda, salt, and natural cocoa into a large bowl. Whisk until evenly combined and aerated. Make certain no cocoa clumps remain.
Uniform mixing prevents tunnels and promotes a tender crumb. Set aside while you prepare the wet mixture to keep batters separate until combining.
Blend the Wet Ingredients
In a separate bowl, whisk vegetable oil, buttermilk, eggs, red food coloring, vinegar, and vanilla until smooth. Use room-temperature eggs and buttermilk for better emulsification. Mix until the color is uniform.
The vinegar activates baking soda and enhances the classic red velvet tang and hue.
Combine Wet into Dry
Pour the wet mixture into the dry ingredients. Fold gently with a rubber spatula just until no dry streaks remain. Avoid overmixing to prevent a tough cake.
If the batter seems thick, add 1–2 tablespoons buttermilk. If thin, rest 5 minutes to hydrate flour. Work efficiently to keep leavening active.
Divide and Smooth the Batter
Split the batter evenly between the two prepared pans. Smooth tops with an offset spatula for level layers. Tap pans lightly on the counter to release air bubbles.
Even distribution helps consistent rise and baking. Adjust batter if one pan looks fuller than the other.
Bake to Tender Doneness
Place pans in the center of the oven. Bake 28–32 minutes until a toothpick inserted in the center comes out with a few moist crumbs. Rotate pans once if your oven has hot spots.
Avoid overbaking to keep the crumb moist. The tops should spring back lightly to the touch.
Cool and Release the Layers
Cool cakes in pans on a rack for 10 minutes. Run a knife around edges, invert onto the rack, and peel away parchment. Cool completely before frosting to prevent melting.
If planning ahead, wrap cooled layers well and chill up to 1 day to firm for cleaner slicing and assembly.
Cream the Butter and Cheese
Beat softened cream cheese and unsalted butter in a mixer on medium-high for 2–3 minutes until creamy and fluffy. Scrape the bowl as needed for even texture. Proper aeration creates a light, smooth base for the frosting.
Avoid over-softening to maintain structure.
Sweeten and Flavor the Frosting
Reduce mixer speed to low. Gradually add sifted powdered sugar and a pinch of fine salt. Beat until incorporated, then mix in vanilla extract. Increase speed briefly to smooth.
Stream in cold heavy cream and whip 30–60 seconds until light and spreadable. Don’t overwhip to avoid a runny texture.
Fold in Chocolate Chips
Switch to a spatula. Fold in mini chocolate chips until evenly distributed. Use mini chips to keep spreading easy and slices neat.
Reserve extra chips for garnish. If frosting feels soft, chill 10 minutes, then re-stir. If too firm, let stand briefly and stir to loosen before assembling.
Level and Fill the Cake
Level domed tops with a serrated knife if needed. Place one layer on a stand. Spread about 1 cup frosting evenly to the edges. Position the second layer on top, aligning edges.
Press gently to set. Make certain an even filling layer for stability and clean, attractive slices.
Crumb Coat and Chill Briefly
Apply a thin layer of frosting over the top and sides to trap crumbs. Smooth with an offset spatula. Chill the cake for 15 minutes to set the crumb coat.
This step prevents crumbs from lifting into the final layer and helps achieve a polished, bakery-style finish.
Finish Frosting and Garnish
Spread a generous final coat of frosting over the cake. Smooth or create swirls as desired. Press extra mini chocolate chips along the sides or sprinkle on top.
Chill 20–30 minutes for cleaner slices. Wipe the knife between cuts. Serve and enjoy the tender, tangy red velvet with chocolate chip frosting.
Ingredient Swaps
- Buttermilk: 1 cup milk + 1 tbsp white vinegar or lemon juice (rest 5–10 min), or dairy-free: almond/soy milk + vinegar.
- Eggs: 2 flax eggs (2 tbsp ground flaxseed + 6 tbsp water, rest 10 min) or 1/2 cup unsweetened applesauce for a denser crumb.
- Red food coloring: beet powder (2–3 tbsp) or boiled beet juice reduction; for budget, skip color—flavor remains.
- Oil: any neutral oil (canola, sunflower) or 1 1/2 cups melted coconut oil; for lighter cake use 1 cup oil + 1/2 cup unsweetened applesauce.
- Flour: swap up to 1/3 with cake flour for extra tenderness; gluten-free: 1:1 baking blend + 1/2 tsp xanthan if blend lacks it.
- Cocoa: if using Dutch-process, add extra 1/4 tsp vinegar (as noted) to balance.
- Cream cheese/butter (frosting): dairy-free versions work; or make vanilla buttercream (omit cream cheese, add 1–2 tbsp milk).
- Heavy cream: half-and-half or milk works; dairy-free: canned full-fat coconut milk.
- Chocolate chips: dairy-free mini chips or finely chopped dark chocolate; omit for a smoother frosting.
- Vinegar: white or apple cider vinegar interchangeable. Vanilla extract: sub equal amount vanilla bean paste.
You Must Know
Doneness • If the cakes rise evenly but the centers jiggle when nudged, leave them in until the middle springs back lightly and a toothpick shows a few moist crumbs, not wet batter; typically 28–32 minutes, pan edges will look slightly pulled away.
Troubleshoot • If batter looks curdled after combining wet ingredients, add 1 tablespoon flour and fold just until it loosens and looks glossy; the small starch addition helps emulsify oil and buttermilk, preventing dense tunnels.
Avoid • To prevent a brown top and dry crumb, avoid shelf placement too high; center the pans so the internal temp hits 200–205°F at the core—use an instant-read probe for a reliably velvety texture.
Flavor Boost • For deeper cocoa-tang balance, add 1/4 teaspoon espresso powder and a pinch (1/8 teaspoon) extra salt to the dry mix; boosts chocolate perception without making it taste like coffee.
Scale • For a 3-layer 6-inch cake, use 2/3 of the batter and frosting weights (about 1.7 lb batter per pan and 1 1/3 cups frosting per layer); check doneness 5–7 minutes earlier due to smaller diameter.
Serving Tips
- Serve chilled slices with a cold glass of milk or hot coffee.
- Add fresh raspberries and a dusting of powdered sugar on plates.
- Drizzle warm chocolate sauce over each slice before garnishing with extra mini chips.
- Pair with vanilla bean ice cream or lightly sweetened whipped cream.
- Cut thinner wedges; richness pairs well with tart berries or citrus segments.
Storage & Make-Ahead
Refrigerate the frosted cake, covered, for up to 5 days.
Chill 20–30 minutes before slicing for clean cuts.
Bake layers a day ahead, wrap well, and chill.
Frosting keeps refrigerated 5 days.
Rewhip before using.
Cake freezes well.
Wrap layers or slices tightly and freeze up to 2 months.
Reheating
Reheat slices gently: microwave 10–15 seconds at 50% power.
Whole cake: oven at 275°F, loosely tented, 10–15 minutes.
For frosting-softening only, briefly warm a knife or offset spatula on stovetop.
Juneteenth Celebration Staple
While the grill sizzles and red drinks sparkle on the table, I bring out this red velvet cake as a proud nod to Juneteenth’s red-hued traditions—honoring resilience, joy, and freedom. Its scarlet crumb and cocoa whisper of history, while the tangy buttermilk keeps each slice tender.
I frost generously, letting mini chocolate chips freckle the cream like confetti—festive, familiar, and unfailingly celebratory.
I set the cake beside watermelon wedges and smoky ribs, inviting everyone to cut bold slices. You’ll taste balance: gentle cocoa, light tang, and a cool, speckled frosting that melts just enough in the heat.
Want clean cuts? Chill briefly, then serve. I scatter extra chips on top, because sparkle matters. Share seconds without apology—this cake’s meant for abundance.
Final Thoughts
Ready to bake? Give this red velvet cake a try as written, or make it your own—swap in different chip flavors, add a hint of orange zest, or play with decorations to suit the occasion.
Enjoy every slice!
Frequently Asked Questions
Can I Bake This as Cupcakes, and What’s the Adjusted Bake Time?
Yes—you can bake them as cupcakes. I fill liners two-thirds full and bake at 350°F for 16–20 minutes, until tops spring back. Let them cool, swirl on frosting, and shower with mini chips like confetti.
How Do I Convert This Recipe for a 9×13-Inch Pan?
Use the full batter in a greased 9×13 pan and bake at 350°F for 30–36 minutes. I cool until barely warm, frost in swirls, and cut generous squares—soft crumb, cozy slices, effortless and beautiful.
Is There a Natural Alternative to Red Liquid Food Coloring?
Yes—use beet powder or reduced beet juice for a warm crimson hue. I whisk it into the wet ingredients. Add lemon juice or vinegar to brighten. Expect subtler color, but the cake still whispers cozy, classic charm.
Can I Make the Frosting Without Cream Cheese?
Yes—you can. I’d whip butter, powdered sugar, vanilla, and cold cream into a fluffy cloud. For extra stability, add a spoon of cornstarch. Fold in mini chips; it’ll taste like sweet, snowy velvet without tang.
What Altitude Adjustments Are Needed for High-Elevation Baking?
Reduce sugar 1–2 tablespoons, increase flour 2–3 tablespoons, add 1–2 tablespoons extra buttermilk, cut leavening by 1/4 teaspoon, bake slightly hotter and shorter. I’ll guide you—watch batter like mountain light, tender crumb awaits.
Red Velvet Cake with Chocolate Chip Frosting
Equipment
- 2 9-inch round cake pan
- 1 stand mixer or hand mixer
- 3 Mixing bowl
- 1 Whisk
- 1 Rubber spatula
- 1 Measuring cups set
- 1 Measuring spoons set
- 1 sifter or fine-mesh sieve
- 1 Cooling rack
- 1 offset spatula
- 1 parchment paper sheet
- 1 toothpick
Ingredients
- 2 1/2 cup all-purpose flour sifted
- 1 1/2 cup granulated sugar
- 1 teaspoon baking soda
- 1 teaspoon fine salt
- 2 tablespoon unsweetened cocoa powder natural
- 1 1/2 cup vegetable oil
- 1 cup buttermilk room temperature
- 2 large eggs room temperature
- 2 tablespoon red liquid food coloring
- 1 teaspoon white vinegar
- 2 teaspoon vanilla extract
- 4 ounce cream cheese softened
- 1/2 cup unsalted butter softened
- 3 cup powdered sugar sifted
- 1/8 teaspoon fine salt
- 1 teaspoon vanilla extract
- 1/3 cup heavy cream cold
- 1 cup mini chocolate chips plus extra for garnish
Instructions
- Preheat the oven to 350°F (175°C), grease two 9-inch round pans, line bottoms with parchment, and lightly flour the sides.
- In a large bowl whisk flour, granulated sugar, baking soda, salt, and cocoa until evenly combined.
- In a separate bowl whisk oil, buttermilk, eggs, red food coloring, vinegar, and vanilla until smooth.
- Pour the wet mixture into the dry ingredients and mix with a spatula just until no dry streaks remain.
- Divide the batter evenly between prepared pans and smooth the tops.
- Bake for 28–32 minutes until a toothpick inserted in the center comes out with a few moist crumbs.
- Cool cakes in pans on a rack for 10 minutes, then turn out, peel parchment, and cool completely.
- For frosting, beat cream cheese and butter on medium-high until creamy and fluffy, 2–3 minutes.
- Add powdered sugar and salt gradually on low, then beat in vanilla.
- Stream in cold heavy cream and whip on medium-high until light and spreadable, 30–60 seconds.
- Fold in mini chocolate chips with a spatula until evenly distributed.
- Level cake layers if needed, place one layer on a stand, spread about 1 cup frosting, and top with second layer.
- Apply a thin crumb coat, chill 15 minutes, then finish with a generous layer of frosting all over.
- Garnish with extra mini chocolate chips along the sides or on top and slice to serve.
Notes

Cynthia Weatherford is a seasoned chef and culinary enthusiast who serves as the Recipe creator of Somonday. With decades of experience in the kitchen and a passion for exploring diverse cuisines, Cynthia brings a blend of creativity and technique to every dish. Known for transforming simple ingredients into show-stopping meals, Cynthia believes that cooking is an art form anyone can master. Dedicated to inspiring home cooks, Cynthia shares approachable recipes, pro tips, and culinary wisdom to make every meal memorable.


