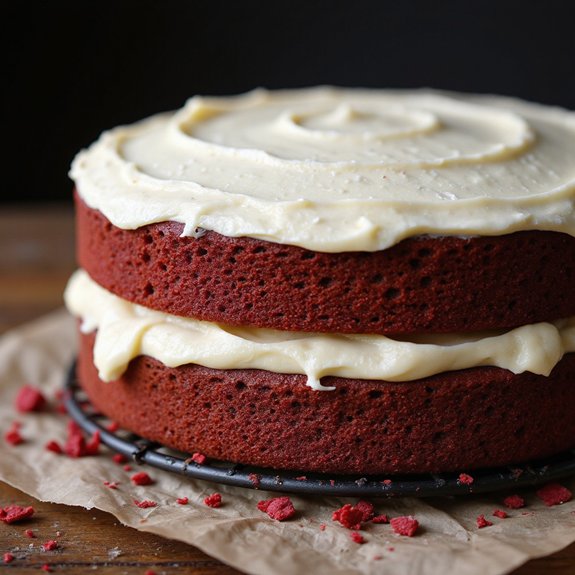
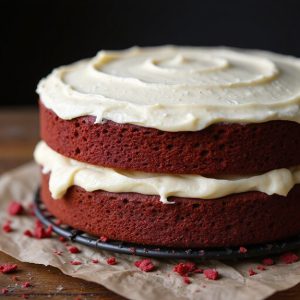
Picture a slice of deep-crimson cake, velvety and tender, its crumb whispering cocoa while a ribbon of cool vanilla custard gleams between layers.
Imagine the first forkful: cream-cheese frosting tangy and plush, custard silky as satin, the aroma of warm cocoa and vanilla drifting like a hug from the oven.
This cake matters to me because it’s comfort dressed in celebration—reliable enough for a Tuesday craving, special enough for birthdays and anniversaries.
It’s the dessert I turn to when I want color at the table and calm in the room—after busy weeknights, for Sunday suppers, or when a friend needs cheering.
Once, during a power-shortened holiday, this recipe saved our gathering—layers baked ahead, custard chilled, and we frosted by candlelight; everyone exhaled at the first bite.
I’ll show you how to capture that same ease and glow in your kitchen, step by step.
Ready? Let’s cook!
Why You’ll Love It
- Delivers classic red velvet flavor with ultra-moist, tender crumb
- Balances tangy cream cheese frosting with silky vanilla custard
- Impresses guests with bakery-worthy layers and clean slices
- Assembles easily with simple, step-by-step guidance
- Stays fresh and sliceable for days in the fridge
Ingredients
- 2 1/2 cups all-purpose flour, sifted — fluff, spoon, and level for accuracy
- 1 1/2 cups granulated sugar — standard white sugar
- 1 teaspoon baking soda — fresh, not clumpy
- 1 teaspoon fine salt — fine grain dissolves evenly
- 1 tablespoon natural cocoa powder, unsweetened — natural keeps color bright
- 1 1/2 cups vegetable oil, neutral — canola or grapeseed work well
- 2 large eggs, room temperature — brings batter together smoothly
- 1 cup buttermilk, room temperature — real cultured buttermilk
- 2 teaspoons vanilla extract — pure, not imitation
- 1 teaspoon white vinegar — reacts with baking soda for lift
- 2 tablespoons red liquid food coloring — gel may need less
- 1/2 cup unsalted butter, softened — for frosting base
- 8 ounces cream cheese, softened — full-fat for best texture
- 2 cups powdered sugar, sifted — prevents frosting lumps
- 1 teaspoon vanilla extract — for frosting flavor
- 2 cups whole milk — for custard richness
- 4 large egg yolks — save whites for another use
- 1/2 cup granulated sugar — sweetens the custard
- 3 tablespoons cornstarch — thickens custard to sliceable
- 1 tablespoon unsalted butter — adds custard silkiness
- 1 teaspoon vanilla extract — finishes custard flavor
- 1 pinch fine salt — balances sweetness
Step-by-Step Method
Preheat, Prep Pans, and Gather Tools
Preheat the oven to 350°F. Line two 9-inch round pans with parchment and grease the sides. Set out mixer, bowls, sifter, whisk, spatula, and measuring sets. Bring eggs, buttermilk, butter, and cream cheese to room temperature. Sift flour and powdered sugar to remove lumps and guarantee light textures throughout the batter and frosting.
Whisk Dry Ingredients Until Uniform
In a large bowl, whisk flour, granulated sugar, baking soda, fine salt, and natural cocoa powder. Distribute leavening evenly to avoid tunneling. Break up any cocoa clumps with the whisk. Keep the bowl nearby so you can swiftly combine with the wet mixture later. Even dry blending promotes a tender, even crumb.
Combine Wet Mixture to Smooth Red
In another bowl, whisk vegetable oil, eggs, buttermilk, vanilla, white vinegar, and red liquid food coloring. Mix until completely smooth and uniformly red. Guarantee no streaks of egg remain. The vinegar reacts with baking soda for lift. Using room-temperature ingredients helps emulsify for a consistent batter texture.
Bring Batter Together Without Overmixing
Pour wet ingredients into dry. Mix on low speed just until a smooth batter forms. Scrape the bowl and fold to incorporate flour pockets. Avoid overmixing to prevent toughness. The batter should be thick, glossy, and pourable. Stop as soon as it’s uniform with no dry streaks remaining.
Divide Batter and Release Bubbles
Evenly distribute batter between prepared pans. Use a scale for accuracy if available. Smooth the tops with a spatula. Tap pans firmly on the counter to release large air bubbles that could cause tunnels. Work quickly to preserve leavening action before the cakes go into the oven.
Bake Until Moist Crumbs Show
Bake 28 to 32 minutes, rotating pans halfway if needed. Test with a toothpick; it should emerge with a few moist crumbs, not wet batter. The tops should spring back lightly to touch. Avoid overbaking to keep the crumb tender. Remove to a wire rack to begin cooling.
Cool, Invert, and Rest Completely
Let cakes cool in pans for 10 minutes to set structure. Invert onto a wire rack, peel off parchment, and cool completely. Don’t frost warm layers or the filling may melt. If you plan to assemble later, wrap cooled layers tightly and refrigerate for easier handling and cleaner cuts.
Heat Milk and Temper Custard
Warm whole milk in a medium saucepan over medium heat until steaming but not boiling. In a bowl, whisk egg yolks, sugar, cornstarch, and a pinch of salt until pale and thick. Slowly whisk in half the hot milk to temper. Return the mixture to the saucepan while whisking constantly.
Thicken Custard and Chill Firm
Cook over medium heat, whisking constantly, until thick bubbles pop and the custard holds whisk trails, 2 to 3 minutes. Remove from heat and whisk in butter and vanilla. Pour into a shallow dish, press plastic wrap directly on the surface, and chill until cold. Aim for a slightly thicker-than-pie consistency.
Beat Cream Cheese Frosting Fluffy
Beat softened butter and cream cheese on medium speed until creamy and smooth, about 2 minutes. Add sifted powdered sugar and vanilla. Mix on low to incorporate, then beat on medium until fluffy, about 2 minutes more. Scrape the bowl as needed. Chill briefly if your kitchen is warm.
Level Layers and Save Crumbs
Check cooled cakes for domed tops. Level gently with a serrated knife to create flat, even surfaces. Save the red crumbs for garnish if desired. Brush away loose crumbs from the layers to keep the assembly neat. Place the first layer on a board or turntable for easy frosting.
Pipe a Frosting Dam and Fill Custard
Load frosting into a piping bag and pipe a 1/2-inch tall ring around the edge of the bottom layer to form a dam. Spoon chilled custard inside and spread evenly to about 1/2 inch thick. Keep the filling level and inside the barrier to prevent oozing. Don’t overfill the center.
Stack, Crumb-Coat, and Chill Briefly
Place the second cake layer on top and press gently to set. Apply a thin crumb coat of frosting over the top and sides to lock in crumbs. Smooth with an offset spatula. Chill the cake 20 to 30 minutes to firm the crumb coat. This step guarantees clean, sharp final frosting.
Frost Smoothly and Finish Clean
Spread remaining frosting over the top and sides. Use long strokes and a warmed spatula for a smooth finish. Add reserved cake crumbs or chocolate shavings around the base or top for contrast. Wipe the board edges for a tidy presentation. Chill briefly if needed to set the finish.
Slice Neatly and Serve
Warm a serrated knife under hot water, wipe dry, and cut clean slices. Serve immediately or refrigerate leftovers covered for up to 4 days. Bring slices to room temperature before serving for best texture and flavor. Enjoy the contrast of plush red velvet, silky custard, and tangy cream cheese.
Ingredient Swaps
- Buttermilk: mix 1 cup milk with 1 tablespoon white vinegar or lemon juice; or use kefir or thinned yogurt (3/4 cup yogurt + 1/4 cup water).
- Oil: swap with 1 1/2 cups melted neutral butter (richer) or 1 1/2 cups light olive oil; for budget, use canola.
- Eggs: for egg-free cake, use 1/2 cup unsweetened applesauce + 2 tablespoons oil for the 2 eggs (texture slightly denser).
- Food coloring: use gel color (about 1 tablespoon) or natural beet powder (2–3 tablespoons, deepen cocoa slightly); can omit for “brown velvet.”
- Dairy-free: use plant milk + 1 tablespoon acid for buttermilk; vegan butter and vegan cream cheese for frosting; for custard, use plant milk and 3 tablespoons cornstarch (omit yolks) with 2–3 tablespoons vegan butter.
- Flour: 1:1 gluten-free baking blend works; add 1/4 teaspoon xanthan gum if your blend lacks it.
- Cocoa: Dutch-process can sub for natural; expect a deeper, less vibrant red—add a little extra coloring if desired.
You Must Know
Doneness • To check cake doneness, press lightly near center; it should spring back and a toothpick shows a few moist crumbs, not wet batter (28–32 minutes). Pull at 205–210°F internal if using a probe to avoid dryness.
Troubleshoot • If layers dome or sink in the middle, your batter was overworked or oven temp ran hot. Next time, use room‑temp ingredients and weigh flour (300 g for 2 1/2 cups).
An oven thermometer should read 350°F; rotate pans at 20 minutes for even rise.
Avoid • Avoid a runny custard filling by ensuring it passes the “ribbon hold” test: drag a whisk through; tracks should remain for 2–3 seconds. If too loose after chilling 2 hours, rewarm gently and whisk in 1 extra teaspoon cornstarch slurry, then chill again.
Flavor Boost • For deeper cocoa notes without dulling the color, add 1 teaspoon espresso powder and 1/4 teaspoon cider vinegar extra; the acid keeps the red vibrant while coffee amplifies chocolate.
Taste the frosting: a pinch (1/8 tsp) of fine salt sharpens the tang.
Scale • For a taller 3-layer 8-inch cake, scale ingredients by 1.5× (batter ~1.9–2.0 kg total). Bake three 8-inch pans ~22–26 minutes each.
Custard should be ~1.5× (yields ~3 cups) to maintain a 1/2-inch center layer with a frosting dam.
Serving Tips
- Serve chilled slices with a dollop of whipped cream and fresh berries.
- Drizzle warm chocolate ganache over each slice; finish with cake crumb sprinkle.
- Pair with hot coffee, black tea, or a lightly sweet dessert wine.
- Plate with a scoop of vanilla bean ice cream and a mint sprig.
- Add a thin raspberry coulis swoosh under the slice for color and tang.
Storage & Make-Ahead
Refrigerate the assembled cake, covered, for up to 4 days.
Bring slices to room temperature before serving for best texture.
Layers can be baked a day ahead, wrapped, and chilled for easier stacking.
The frosted cake and custard don’t freeze well.
Unfrosted cake layers freeze up to 2 months, tightly wrapped.
Reheating
Reheat gently.
Microwave slices 10–15 seconds at 50% power.
Oven: 275°F, covered, 8–10 minutes.
For custard-only, warm on stovetop low, stirring constantly.
Avoid overheating to prevent drying or curdling.
Juneteenth Celebration Staple
Sometimes a slice of red velvet with custard feels like more than dessert—it’s a bright, tender tribute on the Juneteenth table. I set it down beside smoky ribs and collards, and the red crumb glows like a small lantern—honoring resilience, joy, and hard-won freedom.
The cocoa-kissed layers taste plush, almost velvet for real, while the chilled custard sighs into each forkful—cool, silken, and faintly vanilla. I love how the cream cheese frosting brings tang that lifts the sweetness, like a chorus answering a solo.
When we cut, crumbs freckle the platter. Laughter rises. I pass you a slice and watch the custard hold steady, thanks to that frosting dam, the texture clean and celebratory. One bite, and the moment feels gathered, kept, shared.
Final Thoughts
Ready to bake? Give this red velvet cake a try and make it your own—tweak the food coloring, add a hint of citrus to the custard, or finish with your favorite garnish.
We can’t wait to hear how you customize it!
Frequently Asked Questions
Can I Bake This as Cupcakes and Adjust Custard Accordingly?
Yes—you can bake cupcakes and adjust the custard. I’d fill liners 2/3 full, bake 18–22 minutes, thicken custard slightly, core cooled cupcakes, spoon or pipe filling, then swirl frosting. Warm aromas, tender crumbs, creamy centers—pure comfort.
How Do I Prevent Red Food Coloring Stains on Tools?
I wear gloves, use stainless or glass bowls, and oil measuring spoons first. I wipe spills immediately with vinegar water, then wash with hot, soapy suds. Sunlight fades stubborn blushes—tools bask, stains sigh away.
What Altitude Adjustments Are Needed for the Cake?
At 3,000–7,500 feet, I reduce sugar by 2 tablespoons, increase flour by 2 tablespoons, add 1 tablespoon extra buttermilk, another 1/4 teaspoon baking soda, and bake slightly hotter. I picture crimson layers rising steadily, kitchen warm, vanilla whispering.
Is There a Gelatin-Free Way to Stabilize the Custard?
Yes—thicken with extra cornstarch and a touch of butter. I gently cook to pudding-thick, whisk in butter, chill until spoon-set, then fold in softly whipped cream. It slices clean, tastes plush, and holds like velvet.
Can I Freeze Slices With Custard Without Texture Changes?
No—you’ll get weeping custard and grainy crumb after thawing. I’d chill slices instead. If you must freeze, wrap snugly, freeze fast, thaw overnight in the fridge, then revive with a whisper of fresh frosting and berries.
Red Velvet Cake with Custard Filling
Equipment
- 2 round cake pan 9-inch
- 1 stand mixer or hand mixer
- 3 Mixing bowl large
- 1 Saucepan medium
- 1 Whisk
- 1 Rubber spatula
- 1 Wire rack
- 1 measuring cup set
- 1 measuring spoon set
- 1 Sifter
- 1 offset spatula
- 1 Serrated knife
- 2 parchment paper sheet
- 1 Cooling rack
Ingredients
- 2 1/2 cup all-purpose flour sifted
- 1 1/2 cup granulated sugar
- 1 teaspoon baking soda
- 1 teaspoon fine salt
- 1 tablespoon natural cocoa powder unsweetened
- 1 1/2 cup vegetable oil neutral
- 2 large eggs room temperature
- 1 cup buttermilk room temperature
- 2 teaspoon vanilla extract
- 1 teaspoon white vinegar
- 2 tablespoon red liquid food coloring
- 1/2 cup unsalted butter softened
- 8 ounce cream cheese softened
- 2 cup powdered sugar sifted
- 1 teaspoon vanilla extract
- 2 cup whole milk
- 4 large egg yolks
- 1/2 cup granulated sugar
- 3 tablespoon cornstarch
- 1 tablespoon unsalted butter
- 1 teaspoon vanilla extract
- 1 pinch fine salt
Instructions
- Preheat the oven to 350°F and line two 9-inch round cake pans with parchment circles and lightly grease the sides.
- In a large bowl whisk together flour, granulated sugar, baking soda, salt, and cocoa powder until evenly combined.
- In another bowl whisk oil, eggs, buttermilk, vanilla, vinegar, and red food coloring until smooth and uniformly red.
- Add the wet ingredients to the dry ingredients and mix with a mixer on low just until a smooth batter forms without overmixing.
- Divide the batter evenly between the prepared pans and tap pans gently to release large air bubbles.
- Bake the cakes for 28 to 32 minutes until a toothpick inserted in the center comes out with a few moist crumbs.
- Cool cakes in pans on a wire rack for 10 minutes, then invert onto the rack, peel parchment, and cool completely.
- For the custard, heat milk in a medium saucepan over medium heat until steaming but not boiling.
- In a bowl whisk egg yolks, sugar, cornstarch, and a pinch of salt until pale and thick.
- Slowly whisk half the hot milk into the yolk mixture to temper, then return the mixture to the saucepan while whisking.
- Cook over medium heat, whisking constantly, until thick bubbles pop and the custard holds whisk trails, about 2 to 3 minutes.
- Remove from heat and whisk in butter and vanilla, then transfer to a shallow dish, press plastic wrap on the surface, and chill until cold.
- For the frosting, beat softened butter and cream cheese on medium speed until creamy and smooth, about 2 minutes.
- Add powdered sugar and vanilla to the mixer and beat on low until incorporated, then on medium until fluffy, 2 minutes more.
- Level the cooled cake layers with a serrated knife if domed, reserving crumbs for garnish if desired.
- Place the first cake layer on a board, pipe a 1/2-inch tall ring of cream cheese frosting around the edge to form a dam.
- Spoon and spread the chilled custard inside the frosting dam in an even layer to about 1/2 inch thick.
- Top with the second cake layer and press gently to set, then crumb-coat the cake with a thin layer of frosting.
- Chill the cake for 20 to 30 minutes to set the crumb coat, then finish frosting smoothly with the remaining frosting.
- Garnish with reserved cake crumbs or chocolate shavings if desired, slice with a warm knife, and serve.
Notes

Cynthia Weatherford is a seasoned chef and culinary enthusiast who serves as the Recipe creator of Somonday. With decades of experience in the kitchen and a passion for exploring diverse cuisines, Cynthia brings a blend of creativity and technique to every dish. Known for transforming simple ingredients into show-stopping meals, Cynthia believes that cooking is an art form anyone can master. Dedicated to inspiring home cooks, Cynthia shares approachable recipes, pro tips, and culinary wisdom to make every meal memorable.