Picture a glossy crimson cake, tender as velvet, catching the light under a soft cascade of vanilla glaze that smells like warm sugar and quiet afternoons.
Imagine slicing through plush layers, hearing the faint sigh of crumb meeting glaze, then tasting cocoa-kissed comfort that lingers like a hug.
This red velvet cake matters to me because it turns ordinary moments into small celebrations—proof that a simple pantry bake can feel special without fuss.
It’s the kind of dessert that fits weeknight birthdays, Sunday suppers, or a bring-and-share at work, looking impressive while staying wonderfully approachable.
Once, a last-minute dinner invite had me short on time and energy; this cake saved the evening—quick to mix, steady to bake, and elegant with a pour-over finish.
We’ll keep the steps simple, the color vibrant, and the texture irresistibly soft.
Ready? Let’s cook!
Why You’ll Love It
- Delivers classic cocoa-vanilla flavor with plush, tender crumb
- Comes together quickly with simple pantry staples
- Stays moist for days; slices beautifully without crumbling
- Eye-catching red hue with elegant, pour-over vanilla glaze
- Easy, fuss-free mixing—no creaming butter required
Ingredients
- 2 1/2 cups all-purpose flour, sifted — use fresh for best rise (choose unbleached, finely milled)
- 1 1/2 cups granulated sugar — standard white works well (look for fine crystals)
- 1 teaspoon baking soda — guarantees lift (check freshness date)
- 1 teaspoon fine salt — balances sweetness (use fine sea salt)
- 2 tablespoons unsweetened cocoa powder, natural — keeps color vibrant (avoid Dutch-process)
- 1 cup buttermilk, room temperature — tender crumb (shake carton before measuring)
- 1 1/2 cups vegetable oil — keeps cake moist (neutral flavor, like canola)
- 2 large eggs, room temperature — better emulsion (choose Grade AA)
- 2 tablespoons red liquid food coloring — adjust as needed (use gel for stronger hue)
- 2 teaspoons vanilla extract, divided — warm flavor (pure, not imitation)
- 1 teaspoon distilled white vinegar — reacts with soda (fresh bottle, no off odor)
- 1/2 cup unsalted butter, melted — for glaze (cool slightly before mixing)
- 1 1/2 cups powdered sugar, sifted — for glaze (prevents lumps)
- 2–3 tablespoons milk — for glaze consistency (start with 2 tbsp, add to thin)
- 1 pinch fine salt — for glaze balance (enhances vanilla)
Step-by-Step Method
Preheat, Prep Pans
Preheat oven to 350°F (175°C). Line two 9-inch round pans with parchment; lightly grease sides. Gather equipment and ingredients. Bring buttermilk and eggs to room temperature for an even rise. Sift flour and powdered sugar to remove lumps. Set a cooling rack nearby. Make certain food coloring, vanilla, and vinegar are measured and ready to streamline mixing.
Whisk Dry Ingredients
In a large bowl, whisk flour, granulated sugar, baking soda, fine salt, and natural cocoa powder until evenly combined. Break up any clumps for a smooth batter later. Keep the whisk moving to aerate slightly without overworking.
Create a uniform mixture so leavening distributes evenly and the cake rises consistently in the oven.
Combine Wet Ingredients
In a medium bowl, whisk buttermilk, vegetable oil, eggs, red food coloring, 1 teaspoon vanilla, and vinegar until smooth and cohesive. Adjust the food coloring to a vibrant red, remembering baking mutes color slightly. Make certain the mixture is fully emulsified.
Room-temperature ingredients help prevent curdling and produce a silky, pourable base.
Blend Wet into Dry
Pour the wet mixture into the dry ingredients. Mix on low with a mixer just until a smooth batter forms. Scrape the bowl and beaters to incorporate pockets of flour. Avoid overmixing to keep the crumb tender.
If the batter seems overly thick, add a tablespoon of milk to loosen slightly without thinning too much.
Divide, Tap Pans
Divide the batter evenly between the two prepared pans. Use a scale or eyeball carefully for even layers. Smooth tops with a spatula. Tap each pan gently on the counter to release trapped air bubbles.
This helps prevent tunnels and domes. Rotate pans to confirm level distribution around the edges.
Bake Until Set
Place pans on the center rack and bake 28–32 minutes. Check doneness when centers spring back lightly to the touch. Insert a toothpick; it should emerge with a few moist crumbs, not wet batter.
Avoid overbaking to keep the cake moist. Rotate pans once if your oven has hot spots.
Cool, Release Layers
Cool cakes in pans on a rack for 10 minutes to set the structure. Run a knife around edges if needed. Invert onto the rack, peel off parchment, and cool completely.
For neater glazing and sturdier handling, chill cooled layers for 20 minutes. Don’t glaze warm cakes, or the topping will slide off.
Whisk Vanilla Glaze
In a small bowl, whisk melted unsalted butter, powdered sugar, remaining 1 teaspoon vanilla, 2 tablespoons milk, and a pinch of salt until smooth. Aim for a pourable consistency that ribbons.
Adjust with more milk by the teaspoon if too thick, or powdered sugar if too thin. Use immediately for the best flow.
Glaze and Stack
Place the first cake layer on a serving plate. Spoon some glaze over the top, letting it spread to the edges. Set the second layer gently on top.
Pour remaining glaze over the center and guide it to the edges, encouraging drips down the sides. Smooth lightly without overworking to maintain a glossy finish.
Set, Slice, Store
Let the glazed cake rest 30–45 minutes until the glaze sets. Slice with a sharp, warm knife for clean cuts, wiping between slices. Serve at room temperature for the best texture.
Store covered at room temperature for 1 day or refrigerate up to 4 days. Bring chilled slices to room temp before serving.
Ingredient Swaps
- Buttermilk: 1 cup milk + 1 tbsp white vinegar or lemon juice (rest 5 minutes); dairy-free use unsweetened almond/soy milk + acid as above.
- Eggs: 2 flax eggs (2 tbsp ground flax + 6 tbsp water, rest 10 min) or 1/2 cup unsweetened applesauce for a softer crumb.
- Vegetable oil: same amount of neutral oil (canola, sunflower) or 3/4 cup melted coconut oil; for richer flavor use 1 cup light olive oil.
- Food coloring: 2–3 tablespoons beet juice concentrate or 1–2 teaspoons red gel color; or omit for a “cocoa velvet” cake.
- Cocoa powder: natural cocoa recommended; if using Dutch-process, increase vinegar to 1 1/2 teaspoons to maintain lift and color.
- Flour: use cake flour for a softer crumb (same volume, or 2 1/2 cups minus 5 tbsp AP flour + 5 tbsp cornstarch); gluten-free use a 1:1 baking blend.
- Sugar: swap 1:1 with organic cane sugar; for less refined, use 1 1/4 cups coconut sugar (slightly darker, more caramel notes).
- Buttermilk thickness: if very thick kefir is used, thin with 1–2 tbsp milk or water.
- Glaze: dairy-free use vegan butter and plant milk; powdered sugar can be made by blending granulated sugar with a little cornstarch.
You Must Know
Doneness • If the batter looks dull maroon or brown before baking, add 1/2–1 teaspoon more red coloring until it’s a vibrant ruby; natural cocoa can mute color and it will dull slightly after 28–32 minutes in the oven.
Troubleshoot • If layers dome or crack, rotate pans at 15 minutes and lightly rap each pan once on the rack; evens heat and releases steam so centers spring back uniformly and a toothpick shows moist crumbs, not wet streaks.
Troubleshoot • If crumb is gummy or sinks, check leavening freshness and batter temperature; use room-temp ingredients and make sure baking soda is within 6 months—cakes should pull 1/4 inch from the pan edges and feel set in the middle around 205–210°F.
Scale • For a 9×13-inch cake, use the full recipe and extend time to 32–38 minutes; for cupcakes, fill liners 2/3 full to yield about 24 and bake 16–20 minutes—tops should be matte with light spring-back.
Flavor Boost • For deeper tang and cocoa notes, swap 1 teaspoon vanilla in the batter for 1 teaspoon espresso or coffee extract and add 1/4 teaspoon almond extract; glaze can take 1–2 teaspoons bourbon—let alcohol bloom 10 minutes before pouring.
Serving Tips
- Slice with a warm, thin knife for clean cuts; wipe between slices.
- Serve with fresh berries and a dollop of lightly sweetened whipped cream.
- Add a scoop of vanilla bean ice cream for a classic pairing.
- Drizzle extra vanilla glaze on plates; garnish with chocolate shavings.
- Pour coffee or cold milk alongside to balance sweetness.
Storage & Make-Ahead
Refrigerate covered up to 4 days.
Bring slices to room temperature before serving for best texture.
Cake layers can be baked a day ahead, wrapped, and chilled.
Glaze just before serving.
The whole glazed cake or individual slices freeze well, double-wrapped, for up to 2 months.
Thaw overnight in the fridge.
Reheating
Reheat slices gently.
Microwave 10–15 seconds at 50% power.
Or wrap in foil and warm in a 300°F oven 8–10 minutes.
For stovetop, steam briefly in a covered pan.
Juneteenth Dessert Symbolism
Warm a slice if you like, then let its scarlet crumb remind you why red desserts shine on Juneteenth tables—honoring resilience, remembrance, and joy.
I bake this red velvet to celebrate hard-won freedom and the sweetness that followed struggle.
The color nods to perseverance; cocoa whispers of depth; the vanilla glaze offers a gentle blessing, glossy as hope. As you take a bite, I want you to taste story, ceremony, and a future that keeps opening.
1) Ruby crumbs against white plates, like lanterns in twilight, carrying memory from kitchen to porch.
2) Glossy glaze dripping in slow ribbons, echoing songs that stretch beyond the doorway.
3) Cocoa warmth rising with steam, soft as a grandmother’s hush.
4) Shared slices, palms brushing, laughter ringing bright—proof that community is tender and strong.
Final Thoughts
Ready to bake? Give this Red Velvet Cake with Vanilla Glaze a try and make it your own—tweak the food coloring, adjust the glaze thickness, or add sprinkles for a personal touch.
We’d love to hear how yours turns out!
Frequently Asked Questions
Can I Bake This as Cupcakes Instead of Layers?
Yes—you can bake cupcakes. I’d fill liners two-thirds, bake at 350°F for 16–20 minutes, and glaze warm domes. You’ll smell cocoa, see ruby crowns, and bite tender crumbs under a sweet, glossy vanilla veil.
How Do I Convert to a Sheet Cake?
Bake it in a 9×13 pan at 350°F for 32–38 minutes. I’ll pour silky vanilla glaze over the warm, tender crumb, letting it cascade in glossy ribbons, then rest until set—sliceable, fragrant, and irresistibly plush.
What Altitude Adjustments Are Recommended for High-Altitude Baking?
I reduce sugar 1–2 tablespoons, increase flour 1–2 tablespoons, add 1–2 teaspoons extra buttermilk, bump oven to 365°F, shorten bake slightly, and increase leavening by 1/8 teaspoon. Your crumb stays tender, colors vivid, aromas whispering mountain air.
Is There a Gluten-Free Flour Blend That Works Well?
Yes—use a 1:1 cup-for-cup gluten-free blend with xanthan gum. I whisk it gently, add an extra tablespoon of milk, and let the batter rest, yielding tender, ruby crumbs and a silky, fragrant finish.
How Can I Reduce the Red Food Coloring Naturally?
Use beet powder or reduced beet juice; I balance with extra natural cocoa and a splash of lemon to brighten. I taste, adjust color gradually, letting the batter blush softly like dusk, aromatic, tender, and inviting.
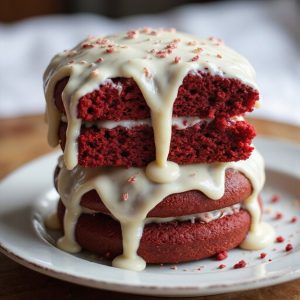
Red Velvet Cake with Vanilla Glaze
Equipment
- 2 9-inch round cake pan
- 1 large mixing bowl
- 1 medium mixing bowl
- 1 Small bowl
- 1 hand mixer or stand mixer
- 1 Whisk
- 1 Rubber spatula
- 1 Measuring cups set
- 1 Measuring spoons set
- 1 Cooling rack
- 1 parchment paper sheet
- 1 wire sieve
Ingredients
- 2 1/2 cups all-purpose flour sifted
- 1 1/2 cups granulated sugar
- 1 teaspoon baking soda
- 1 teaspoon fine salt
- 2 tablespoons unsweetened cocoa powder natural
- 1 cup buttermilk room temperature
- 1 1/2 cups vegetable oil
- 2 large eggs room temperature
- 2 tablespoons red liquid food coloring or as needed
- 2 teaspoons vanilla extract divided
- 1 teaspoon distilled white vinegar
- 1/2 cup unsalted butter melted, for glaze
- 1 1/2 cups powdered sugar sifted, for glaze
- 2–3 tablespoons milk for glaze
- 1 pinch fine salt for glaze
Instructions
- Preheat the oven to 350°F (175°C) and line two 9-inch round cake pans with parchment and lightly grease the sides.
- In a large bowl whisk together flour, sugar, baking soda, salt, and cocoa powder until evenly combined.
- In a medium bowl whisk together buttermilk, oil, eggs, red food coloring, 1 teaspoon vanilla, and vinegar until smooth.
- Pour the wet ingredients into the dry ingredients and mix with a mixer on low just until a smooth batter forms, scraping the bowl as needed.
- Divide the batter evenly between the prepared pans and tap each pan gently to release air bubbles.
- Bake for 28–32 minutes until the centers spring back lightly and a toothpick inserted comes out with a few moist crumbs.
- Cool the cakes in the pans on a rack for 10 minutes, then turn out onto the rack, peel off parchment, and let cool completely.
- For the glaze whisk melted butter, powdered sugar, remaining 1 teaspoon vanilla, milk, and a pinch of salt until smooth and pourable.
- Place the first cake layer on a serving plate, spoon some glaze over the top, add the second layer, and pour the remaining glaze to drip over the sides.
- Let the glazed cake rest for at least 30–45 minutes to set before slicing.
Notes

Cynthia Weatherford is a seasoned chef and culinary enthusiast who serves as the Recipe creator of Somonday. With decades of experience in the kitchen and a passion for exploring diverse cuisines, Cynthia brings a blend of creativity and technique to every dish. Known for transforming simple ingredients into show-stopping meals, Cynthia believes that cooking is an art form anyone can master. Dedicated to inspiring home cooks, Cynthia shares approachable recipes, pro tips, and culinary wisdom to make every meal memorable.