
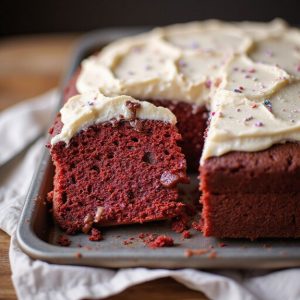
Picture a ruby-red sheet of cake, its tender crumb soaking up ribbons of warm chocolate fudge and sweet cream, the surface gleaming before it’s tucked under a billowy, tangy cream cheese frosting.
Imagine the first forkful: velvety texture, cocoa-kissed aroma, and a cool, creamy finish that feels like a hug after a long day.
This is the kind of dessert that turns an ordinary moment into a celebration—reliable, nostalgic, and beautifully dramatic without being fussy.
When my calendar was stacked and I still wanted something special for my daughter’s study group, this poke cake saved the evening—easy to assemble, chill, and slice, with every square perfectly moist.
It’s tailor-made for busy weeknights when you need dessert on autopilot, for Sunday suppers when you want a showstopper, and for potlucks where you’d rather not fuss with layers.
Simple staples, big payoff, and make-ahead friendly.
Ready? Let’s cook!
Why You’ll Love It
- Delivers classic red velvet flavor with luscious chocolate-fudge soak
- Stays incredibly moist from sweetened condensed milk infusion
- Satisfies with tangy, creamy cream cheese frosting
- Simple, one-pan bake perfect for gatherings
- Slices cleanly after chilling for picture-perfect servings
Ingredients
- 2 cups all-purpose flour — measure by spoon-and-level (choose unbleached for best crumb)
- 1.5 cups granulated sugar — standard white cane sugar (free-flowing, no lumps)
- 1 teaspoon baking soda — fresh, not expired (ensures proper lift)
- 1 teaspoon fine salt — fine-grain blends evenly (avoid coarse crystals)
- 1 tablespoon unsweetened cocoa powder — natural style (not Dutch-process)
- 2 large eggs, room temperature — about 50 g each without shell (truly room temp)
- 1 cup buttermilk, room temperature — full-fat preferred (tang and tenderness)
- 1 cup vegetable oil — neutral flavor like canola (stay neutral)
- 2 teaspoons vanilla extract — pure, not imitation (warm aroma)
- 1 teaspoon white vinegar — classic red velvet tang (distilled)
- 2 tablespoons red liquid food coloring — gel also works; adjust for hue (vivid color)
- 1 cup sweetened condensed milk — not evaporated milk (thick and sweet)
- 1 cup hot fudge sauce, warmed — pourable but not hot (smooth flow)
- 8 ounces cream cheese, softened — full-fat block style (no whipped tubs)
- 0.5 cup unsalted butter, softened — 1 stick (room temp for easy creaming)
- 2 cups powdered sugar, sifted — 10x confectioners’ (clump-free)
- 1 teaspoon vanilla extract — for frosting (pure)
- 2 tablespoons heavy cream, cold — adjust for spreadability (rich finish)
- 2 tablespoons sprinkles, optional — jimmies or nonpareils (colorful garnish)
Step-by-Step Method
Preheat & Prep the Pan
Preheat oven to 350°F. Grease a 9×13-inch pan lightly. Set a wire rack nearby for cooling. Gather all tools and ingredients to streamline the process. Make sure eggs and buttermilk are at room temperature.
Warm hot fudge until pourable later. Sift powdered sugar for smooth frosting. Keep a skewer or fork ready for poking.
Whisk the Dry Ingredients
Combine flour, granulated sugar, baking soda, fine salt, and cocoa powder in a mixing bowl. Whisk thoroughly to break up lumps and evenly distribute leavening and cocoa. Create a uniform mixture to prevent tunneling.
Set aside. Properly mixed dry ingredients lead to even rise and a fine crumb in the final cake.
Blend the Wet Ingredients
In a separate bowl, whisk eggs, buttermilk, vegetable oil, vanilla extract, white vinegar, and red food coloring. Mix until smooth and evenly tinted. Make sure no streaks of color remain. The vinegar reacts with baking soda for lift.
Room-temperature dairy emulsifies better, yielding a tender, moist cake crumb.
Combine Wet & Dry Batter
Pour wet ingredients into the dry mixture. Whisk just until no dry streaks remain. Avoid overmixing to prevent a tough texture. Scrape the bowl with a spatula to incorporate any flour pockets. The batter should be smooth and thick, with a consistent red color. Proceed promptly to baking.
Fill the Pan & Bake
Pour the batter into the prepared pan. Smooth the top with a spatula for even baking.
Place in the oven and bake for 28 to 32 minutes. Test with a toothpick inserted in the center; it should come out clean. Rotate the pan once if needed for even browning. Don’t overbake.
Cool Briefly & Poke Holes
Transfer the pan to the wire rack and cool for 10 minutes. While still warm, poke holes all over the cake about 1 inch apart using a skewer or fork.
Wipe the skewer as it gathers crumbs for cleaner channels. Avoid poking too deep to maintain structure. Work evenly over the surface.
Mix & Pour the Soak
Stir together sweetened condensed milk and warmed hot fudge until smooth and pourable. If too thick, loosen with 1 to 2 tablespoons warm milk.
Slowly pour the mixture over the cake, allowing it to seep into the holes. Spread evenly with a heatproof spatula. Let it absorb thoroughly for maximum moisture.
Chill to Set the Cake
Cool the cake to room temperature. Cover the pan and chill for at least 1 hour to set the soak.
This resting time firms the crumb and ensures cleaner slices. Avoid frosting while warm to prevent melting. Prepare frosting during this chill to save time and keep workflow efficient.
Beat Cream Cheese & Butter
In a clean bowl, beat softened cream cheese and unsalted butter until smooth and fluffy. Use medium speed for aeration without overheating. Scrape the bowl as needed to eliminate lumps.
Properly creamed base creates a silky frosting. Make sure both ingredients are fully softened for the best texture.
Finish the Frosting
Add sifted powdered sugar and vanilla extract. Beat until creamy and cohesive. Stream in cold heavy cream to reach a spreadable consistency.
Adjust with more sugar for firmness or a splash of cream for softness. Avoid overbeating to prevent a loose frosting. Keep frosting slightly cool for clean spreading.
Frost, Garnish & Serve
Spread the cream cheese frosting evenly over the chilled cake with an offset spatula. Create swoops or smooth it flat. Add sprinkles if desired for color and texture.
Slice with a warm, clean knife for neat edges. Serve slightly chilled or let slices come to room temperature for best flavor. Store refrigerated.
Ingredient Swaps
- No buttermilk? Use 1 cup milk + 1 tbsp white vinegar or lemon juice (rest 5 minutes), or 1 cup plain yogurt/kefir thinned with 1–2 tbsp milk.
- Replace vegetable oil with melted neutral oil or melted butter; for dairy-free, use neutral oil and swap buttermilk with unsweetened soy milk + vinegar.
- No red liquid coloring: use gel color (about 1/2–2/3 the amount) or beet powder (1–2 tbsp; color will be softer).
- Cocoa: Dutch-process or natural both work; if omitting, cake will be less “red velvet” but still tasty.
- Sweetened condensed milk soak: for lighter/less sweet, use 3/4 cup condensed milk + 1/4 cup milk; dairy-free, use coconut sweetened condensed milk and dairy-free chocolate syrup.
- Cream cheese frosting: use Neufchâtel for lighter, mascarpone for richer, or dairy-free cream cheese and vegan butter with plant milk.
- Regional/budget: swap hot fudge with inexpensive chocolate syrup or melted chocolate + a bit of cream; use store-bought cream cheese frosting if short on time.
You Must Know
Doneness • If the cake edges look set but the center jiggles slightly, tap the pan and listen; a soft thud means underdone—extend time in 3–4 minute increments until a toothpick has moist crumbs, not wet batter, and the top springs back lightly.
Troubleshoot • If the soak pools on top instead of disappearing, warm the fudge-milk blend to 110–120°F and enlarge a few holes with the skewer; the warmer, thinner sauce wicks in better and prevents a gummy top.
Scale • For an 8-inch square (about 64% of a 9×13), use 2/3 of every ingredient and start checking doneness around 22–24 minutes; for two 9-inch rounds, split the full batter equally and reduce time to 20–24 minutes.
Flavor Boost • For deeper cocoa notes without bitterness, bloom the cocoa in 2 tablespoons hot coffee from the buttermilk portion; look for a darker mahogany batter and a subtly roasty finish.
Make-Ahead • To streamline serving, bake and poke-soak the cake up to 24 hours in advance, chill covered, then frost within 2 hours of serving; allow slices to sit 15–20 minutes at room temp for the creamiest texture.
Serving Tips
- Top each slice with fresh berries and a drizzle of warm fudge.
- Serve chilled with a scoop of vanilla or cream cheese ice cream.
- Add a dollop of lightly sweetened whipped cream and chocolate shavings.
- Plate with a raspberry coulis swipe for color and tart contrast.
- Sprinkle crushed pecans or toasted coconut for texture before serving.
Storage & Make-Ahead
Refrigerate covered up to 4 days; the cream cheese frosting and soak keep it moist.
For make-ahead, bake, poke, and soak a day early; frost day of serving.
The fully frosted cake also holds well overnight.
Freezing isn’t ideal, but unfrosted, soaked cake can freeze 1 month; thaw, then frost.
Reheating
For gentle reheating, warm individual slices: microwave 10–15 seconds at 50% power.
In oven, cover pan with foil; heat at 275°F for 8–10 minutes.
Stovetop: covered skillet, lowest heat, briefly.
Juneteenth Potluck Favorite
Often the first dish I volunteer, this Red Velvet Poke Cake shines at a Juneteenth potluck with its bold crimson crumb, ribbons of chocolate fudge, and tangy cream cheese frosting.
I bring it chilled, slice it clean, and watch plates come back for seconds. The color celebrates, the texture comforts, and the flavors linger—sweet, cocoa-rich, and slightly tangy.
- I bake in a 9×13 so it serves a crowd without fuss.
- I poke while warm, then flood with condensed milk and hot fudge.
- I chill it an hour for neat slices and a velvety bite.
- I swirl cream cheese frosting thick, then add jubilant sprinkles.
- I pack an offset spatula, extra plates, and napkins—this cake disappears fast.
Save room; you’ll want another square.
Final Thoughts
Ready to plunge in? Give this Red Velvet Poke Cake a try, and feel free to tweak the soak or frosting to make it your own—then let me know your favorite spin!
Frequently Asked Questions
Can I Bake This as Cupcakes Instead of a 9×13 Cake?
Yes—you can bake cupcakes. I’d fill liners two-thirds, bake 16–20 minutes, then poke warm centers, spoon in the fudge-condensed milk, chill, and swirl frosting. Expect tender, scarlet crumbs, glossy chocolate pockets, and creamy peaks in every bite.
How Do I Make It Gluten-Free Without Sacrificing Texture?
Use a 1:1 fine-crumb gluten-free flour blend with xanthan gum, add 2 tablespoons cornstarch, and whisk in 1 teaspoon espresso powder. I promise you’ll get tender, springy crumbs, lush frosting, and a chocolaty, velvety bite.
What’s the Best Way to Transport This Cake Safely?
Chill it well, keep it in the pan, and frost cold. I’d cover tightly, set it in a snug cake carrier, wedge towels around it, and drive gently—like cradling a snow globe—avoiding heat, bumps, and direct sun.
Can I Freeze Slices With Frosting and Soak Already Added?
Yes—you can freeze frosted, soaked slices. I wrap each piece snugly in plastic, add foil, then freeze. Thaw overnight in the fridge; the crumb stays plush, the fudgey ribbons mellow, and the frosting turns silk-smooth.
How Do I Prevent Red Food Coloring Stains on Hands and Tools?
Wear gloves, oil measuring spoons, and line your counter; I pour over parchment, wipe spills fast, and rinse tools immediately with warm soapy water. I use a stainless whisk and avoid porous wood—stains slide off slick surfaces.
Red Velvet Poke Cake
Equipment
- 1 9×13 inch baking pan
- 1 Mixing bowl
- 1 Whisk
- 1 Measuring cups set
- 1 Measuring spoons set
- 1 Wooden skewer or fork
- 1 Heatproof spatula
- 1 Wire rack
- 1 Small saucepan optional, for warming sauce
- 1 offset spatula
Ingredients
- 2 cup all-purpose flour
- 1 1/2 cup granulated sugar
- 1 teaspoon baking soda
- 1 teaspoon fine salt
- 1 tablespoon unsweetened cocoa powder
- 2 large eggs room temperature
- 1 cup buttermilk room temperature
- 1 cup vegetable oil
- 2 teaspoon vanilla extract
- 1 teaspoon white vinegar
- 2 tablespoon red liquid food coloring
- 1 cup sweetened condensed milk
- 1 cup hot fudge sauce warmed
- 8 ounce cream cheese softened
- 1/2 cup unsalted butter softened
- 2 cup powdered sugar sifted
- 1 teaspoon vanilla extract
- 2 tablespoon heavy cream cold
- 2 tablespoon sprinkles optional
Instructions
- Preheat the oven to 350°F and lightly grease a 9×13-inch baking pan.
- In a mixing bowl whisk together flour, sugar, baking soda, salt, and cocoa powder.
- In another bowl whisk eggs, buttermilk, oil, vanilla, vinegar, and red food coloring until smooth.
- Pour the wet ingredients into the dry and whisk just until combined and no dry streaks remain.
- Pour the batter into the prepared pan and smooth the top with a spatula.
- Bake for 28 to 32 minutes or until a toothpick inserted in the center comes out clean.
- Place the pan on a wire rack and let the cake cool for 10 minutes.
- Using a wooden skewer or fork poke holes all over the warm cake about 1 inch apart.
- Stir together sweetened condensed milk and warmed hot fudge until pourable.
- Slowly pour the mixture over the cake, letting it seep into the holes, and spread evenly.
- Let the cake cool to room temperature then cover and chill for at least 1 hour.
- Beat cream cheese and butter until smooth and fluffy.
- Add powdered sugar and vanilla and beat until creamy, then add heavy cream to reach a spreadable consistency.
- Spread the cream cheese frosting evenly over the chilled cake.
- Garnish with sprinkles if desired, slice, and serve.
Notes

Cynthia Weatherford is a seasoned chef and culinary enthusiast who serves as the Recipe creator of Somonday. With decades of experience in the kitchen and a passion for exploring diverse cuisines, Cynthia brings a blend of creativity and technique to every dish. Known for transforming simple ingredients into show-stopping meals, Cynthia believes that cooking is an art form anyone can master. Dedicated to inspiring home cooks, Cynthia shares approachable recipes, pro tips, and culinary wisdom to make every meal memorable.


