
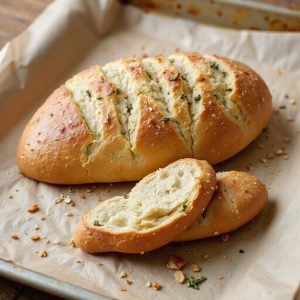
There’s something about the moment a golden loaf of rosemary garlic bread comes out of the oven—the crust crackling, tiny beads of butter shimmering on top, and the air thick with the scent of warm olive oil, toasted garlic, and piney herbs.
This is cozy comfort food at its best, the kind that turns a simple bowl of soup or a hearty stew into a complete, satisfying meal, and it’s ready in less time than you’d expect for homemade bread.
It’s ideal for busy weeknights, family dinners, beginner bakers, and anyone who craves a comforting carb to round out a meal.
I once pulled together this loaf for an impromptu Sunday supper when friends dropped by; it turned a “What do we even serve?” panic into an easy, shared feast.
It also shines for last‑minute gatherings and cold evenings.
Ready to bring this bread to life?
Why You’ll Love It
- Delivers bold, fragrant flavor from fresh rosemary and real garlic
- Elevates simple meals, perfect alongside soups, salads, and pasta
- Uses basic pantry ingredients with minimal hands-on prep time
- Bakes with a crisp crust and soft, tender interior
- Makes incredible leftovers for croutons, toast, or sandwiches
Ingredients
- 240 ml warm water — about 40–43°C for proper yeast activation
- 7 g active dry yeast — make certain it’s within expiry for a strong rise
- 5 g granulated sugar — helps wake up the yeast
- 30 ml extra-virgin olive oil — good fruity flavor improves the crumb
- 360 g all-purpose flour — standard protein level gives a tender loaf
- 6 g fine sea salt — seasons the dough evenly
- 3 cloves garlic, minced — fresh cloves for best aroma
- 10 g fresh rosemary leaves, finely chopped — use bright, green sprigs
- 15 ml extra-virgin olive oil, for brushing — adds color and flavor to crust
- 2 g flaky sea salt, for topping (optional) — sprinkle lightly for crunch
Step-by-Step Method
Bloom the yeast
Combine the warm water, yeast, and sugar in a small bowl. Stir gently to dissolve.
Let the mixture sit for 5–10 minutes, until a creamy foam appears on the surface. This step wakes up the yeast and confirms it’s active.
If there’s no foam, discard and start again with fresh yeast.
Mix the dry ingredients
Add the all-purpose flour and fine sea salt to a large mixing bowl. Whisk them together until the salt is evenly distributed.
This helps guarantee even seasoning throughout the dough. Keep the bowl nearby so it’s ready when your yeast mixture is fully foamy and activated.
Form the dough
Pour the foamy yeast mixture and olive oil into the flour mixture. Stir with a wooden spoon until a shaggy, rough dough forms and no large dry patches remain.
Scrape the sides of the bowl as you mix. The dough will look messy but should hold together in one mass.
Knead until smooth
Turn the dough onto a lightly floured work surface. Knead for 8–10 minutes, pushing, folding, and rotating the dough.
Add only small sprinkles of flour as needed to prevent sticking. Continue until the dough becomes smooth, elastic, and slightly springy when gently pressed with a fingertip.
Incorporate garlic and rosemary
Sprinkle the minced garlic and chopped fresh rosemary evenly over the dough. Gently knead just until both are well distributed.
Avoid overworking at this stage so the additions stay distinct. The dough should smell fragrant.
Shape it into a smooth ball, tucking any loose bits inside.
Let the dough rise
Lightly oil a clean bowl and place the dough ball inside, turning once to coat with oil. Cover the bowl with a clean kitchen towel.
Set it in a warm, draft-free spot. Let the dough rise for about 1 hour, or until it has doubled in size and feels airy when gently pressed.
Prepare the baking sheet
Line a baking sheet with parchment paper. Smooth the paper so it lies flat and reaches the edges.
This prevents sticking and makes cleanup easy. Keep the prepared sheet nearby so you can transfer the dough quickly once it has finished its first rise and been shaped.
Shape the loaf
Punch down the risen dough gently to release excess air. Transfer it to the lined baking sheet.
Shape it into a loaf or oval, smoothing the surface and tucking the edges underneath for tension. This helps it rise upward in the oven.
Leave enough space around it for expansion.
Proof the shaped dough
Cover the shaped loaf loosely with the kitchen towel, making sure it doesn’t press on the dough. Let it rise again at room temperature for about 30 minutes.
The loaf should puff noticeably and feel lighter. This second rise improves the bread’s texture and gives a better crumb.
Preheat the oven
While the dough completes its second rise, preheat your oven to 220°C. Allow enough time for the oven to heat fully and stabilize.
Proper preheating guarantees the bread gets strong initial oven spring and browns evenly. Position a rack in the center of the oven for best results.
Brush, season, and score
Just before baking, brush the top of the loaf with the remaining olive oil using a pastry brush, or your fingertips if needed. Sprinkle with flaky sea salt if desired.
Use a sharp knife to cut 2–3 shallow diagonal slashes across the top. These scores guide controlled expansion.
Bake and cool the bread
Place the baking sheet in the preheated oven. Bake for 22–25 minutes, until the loaf is golden brown and sounds hollow when tapped on the bottom.
Transfer the bread to a wire rack immediately. Let it cool for at least 15 minutes before slicing, allowing the crumb to set properly.
Ingredient Swaps
- Use up to 50% whole wheat or bread flour instead of all-purpose for a heartier or chewier loaf; add 1–2 tablespoons extra water if the dough feels stiff.
- Swap fresh rosemary with 1–1.5 teaspoons dried rosemary, or use thyme, oregano, or an Italian herb blend if rosemary isn’t available.
- Replace fresh garlic with 1 teaspoon garlic powder or 2 teaspoons garlic-infused oil (helpful for those sensitive to whole garlic).
- For vegan diets, the recipe is already vegan as written; for lower cost, any neutral vegetable oil can replace extra-virgin olive oil.
You Must Know
– Doneness – If you’re unsure the loaf is fully cooked, tap the bottom: it should sound hollow and the crust should be a deep golden brown, not pale; an instant‑read thermometer in the center should read about 93–96°C.
This prevents a gummy interior.
– Troubleshoot – If, after 10 minutes of kneading, the dough still tears easily and feels sticky, add flour 1 tablespoon at a time and keep working it until it stretches into a thin “windowpane” without breaking.
This guarantees enough gluten for a good rise.
- Avoid – Avoid letting the shaped loaf sit much longer than 45 minutes on the second rise in a warm kitchen; if it spreads out, looks very puffy, and jiggles a lot, it’s likely over‑proofed and may collapse in the oven.
- Flavor Boost – For stronger rosemary and garlic notes, fold in an extra 5 g rosemary and 1 clove garlic during the last minute of kneading, and brush the hot loaf (within 2 minutes of coming out of the oven) with a bit more olive oil.
Heat blooms the aromatics.
– Scale – To double the recipe, multiply all ingredients by 2 but keep the yeast at 10 g instead of 14 g; use two smaller loaves and check for doneness starting at 18 minutes.
Less yeast with more dough avoids overly yeasty flavor and uneven texture.
Serving Tips
- Serve warm slices with olive oil and balsamic for dipping.
- Pair alongside pasta, minestrone, or roasted chicken for a hearty meal.
- Use for bruschetta topped with tomatoes, basil, and mozzarella.
- Make garlic bread grilled cheese with provolone or mozzarella.
- Cube into croutons for Caesar or mixed green salads.
Storage & Make-Ahead
Rosemary garlic bread keeps in the fridge, well-wrapped, for 3–4 days; rewarm slices in a low oven or toaster to refresh.
For make-ahead, bake completely, cool, then freeze whole or sliced, tightly wrapped, for up to 2 months.
Thaw at room temperature, then crisp in the oven.
Reheating
Reheat slices gently: in a 175°C oven wrapped in foil until warm.
Briefly microwave covered with a damp towel.
Or warm in a covered skillet over low heat to avoid drying.
Rosemary Bread in Italian Feasts
Across an Italian feast table, I always picture a warm loaf of rosemary garlic bread at the center, its crust crackling softly as someone tears off the first piece.
The perfume of olive oil, rosemary, and toasted garlic curls through the air, weaving between platters of pasta and slow-simmered sauces.
I love how this bread quietly anchors everything, inviting hands to reach, share, and linger.
Here’s how I imagine weaving it into your feast:
- Serve it in thick, hand-torn chunks beside a ruby-red marinara.
- Use it to soak up buttery pan juices from roasted chicken or fish.
- Toast slices for crostini topped with tomatoes, olives, or creamy ricotta.
- Offer it warm in a basket, wrapped in a soft towel.
Final Thoughts
Give this rosemary garlic bread a try and enjoy how simple ingredients turn into something bakery-worthy right in your own kitchen.
Feel free to tweak the herbs, add a bit of cheese, or play with flour blends to make it your own.
Frequently Asked Questions
Can I Make This Rosemary Garlic Bread Completely by Hand Without a Mixer?
Yes, you can. I’d mix everything in a large bowl, then knead until the dough turns silky under my palms, warm and aromatic, rosemary and garlic releasing their scent as the loaf slowly comes alive.
Is This Recipe Suitable for Beginner Bakers With No Yeast-Bread Experience?
Yes, it’s perfect for you. I’ll guide you through warm water, foamy yeast, and soft dough under your palms. As it bakes, the garlicky rosemary scent will wrap your kitchen in gentle, glowing comfort.
Can I Freeze the Unbaked Dough for Later Use?
Yes, you can. I’d freeze the dough right after the first rise, snug in oiled plastic. When you’re ready, thaw slowly in the fridge, feel it soften beneath your fingers, then shape, proof, and bake.
How Can I Adapt This Recipe for High-Altitude Baking Conditions?
You can, and I’d tweak it gently: I’d reduce yeast slightly, add a tablespoon more water if dry, shorten rise times, and bake a few minutes less, watching for golden crust and hollow sound.
Is There a Gluten-Free Version of This Rosemary Garlic Bread?
Yes, you can. I’d swap in a 1:1 gluten‑free flour blend, add 1 teaspoon xanthan gum, and mix a wetter dough. Expect a tender, fragrant loaf with crackling crust and warm, herbal steam.
Rosemary Garlic Bread
Equipment
- 1 large mixing bowl
- 1 Small bowl
- 1 Wooden spoon
- 1 measuring cup set
- 1 measuring spoon set
- 1 Cutting board
- 1 sharp knife
- 1 Baking sheet
- 1 sheet parchment paper
- 1 clean kitchen towel
- 1 pastry brush (optional
Ingredients
- 240 milliliter warm water about 40–43°C
- 7 gram active dry yeast
- 5 gram granulated sugar
- 30 milliliter extra-virgin olive oil
- 360 gram all-purpose flour
- 6 gram fine sea salt
- 3 clove garlic minced
- 10 gram fresh rosemary leaves finely chopped
- 15 milliliter extra-virgin olive oil for brushing
- 2 gram flaky sea salt for topping optional
Instructions
- In a small bowl combine warm water, yeast, and sugar, stir gently, and let sit for 5–10 minutes until foamy.
- In a large mixing bowl whisk together flour and fine sea salt.
- Add the olive oil and foamy yeast mixture to the flour and stir with a wooden spoon until a shaggy dough forms.
- Turn the dough out onto a lightly floured surface and knead for 8–10 minutes until smooth and elastic.
- Gently knead in the minced garlic and chopped rosemary until evenly distributed.
- Shape the dough into a ball and place it in a lightly oiled bowl, turning once to coat.
- Cover the bowl with a clean kitchen towel and let the dough rise in a warm place for about 1 hour or until doubled in size.
- Line a baking sheet with parchment paper.
- Punch down the risen dough to release air and transfer it to the prepared baking sheet.
- Shape the dough into a loaf or oval and gently tuck the edges underneath.
- Cover the shaped dough loosely with the towel and let it rise again for 30 minutes.
- While the dough is rising, preheat the oven to 220°C.
- Just before baking, brush the top of the loaf with olive oil and sprinkle with flaky sea salt if using.
- Use a sharp knife to score 2–3 shallow diagonal slashes across the top of the loaf.
- Bake the bread for 22–25 minutes or until golden brown and it sounds hollow when tapped on the bottom.
- Transfer the bread to a wire rack and let it cool for at least 15 minutes before slicing.
Notes

Cynthia Weatherford is a seasoned chef and culinary enthusiast who serves as the Recipe creator of Somonday. With decades of experience in the kitchen and a passion for exploring diverse cuisines, Cynthia brings a blend of creativity and technique to every dish. Known for transforming simple ingredients into show-stopping meals, Cynthia believes that cooking is an art form anyone can master. Dedicated to inspiring home cooks, Cynthia shares approachable recipes, pro tips, and culinary wisdom to make every meal memorable.


