
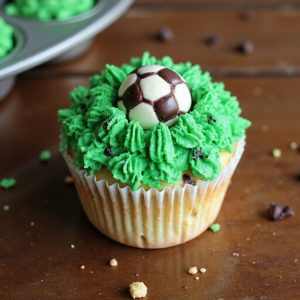
Picture a tray of cupcakes frosted in lush green “grass,” dotted with tiny fondant soccer balls and jersey-colored sprinkles, all smelling faintly of vanilla and cocoa.
These soccer cupcakes are a cozy, cheerful dessert that come together surprisingly fast—perfect when you need something festive without spending all day in the kitchen.
They’re ideal for busy parents racing to team practice, beginners who like simple decorating, and sweet-tooth fans who love dessert with a fun twist.
I still remember the evening my niece’s game went into overtime and we dashed home with only an hour before her team party.
A quick batch of these cupcakes, topped with easy buttercream grass and store-bought candy balls, turned mild panic into pure excitement. They shine at birthday parties, post-game celebrations, sports-themed gatherings, or last-minute school events.
Ready to bring this spirited, game-day dessert to life?
Why You’ll Love It
- Delivers a fun, game-day treat kids and adults adore
- Doubles as festive décor for soccer parties and team celebrations
- Uses simple pantry ingredients and basic baking equipment
- Makes decorating easy with beginner-friendly grass and soccer-ball details
- Adapts easily for other sports themes or team colors
Ingredients
- 1 1/2 cups all-purpose flour — scoop and level for accurate measuring.
- 1 cup granulated sugar — standard white sugar works best here.
- 1 1/2 teaspoons baking powder — check it’s fresh for a good rise.
- 1/4 teaspoon fine salt — fine grain blends more evenly into batter.
- 1/2 cup unsalted butter, melted and cooled — cooling prevents scrambling the eggs.
- 2 large eggs, room temperature — room temp helps the batter mix smoothly.
- 1/2 cup whole milk, room temperature — full fat keeps cupcakes tender and moist.
- 1 teaspoon vanilla extract — pure vanilla gives better flavor than imitation.
- 1/2 cup semi-sweet chocolate chips (optional) — mini chips distribute more evenly.
- 1 cup unsalted butter, softened — very soft butter whips into fluffy frosting.
- 3 cups powdered sugar, sifted — sifting prevents lumps in the frosting.
- 2 tablespoons heavy cream or milk — add more drops as needed for spreadable texture.
- 1 teaspoon vanilla extract — flavors the frosting and rounds out sweetness.
- 1 pinch fine salt — balances the sweetness of the buttercream.
- 6 drops green gel food coloring — gel tints strongly without thinning frosting.
- 12 small chocolate malt balls or round candies — choose evenly sized ones for “soccer balls.”
- 1 tablespoon melted dark chocolate (optional) — use for drawing simple pentagon patterns.
Step-by-Step Method
Preheat and Prepare Pan
Heat the oven to 350°F (175°C). Line a standard 12-cup muffin pan with paper liners. Set out your ingredients so the butter, eggs, and milk can come to room temperature.
Gather bowls, whisk, spatula, and mixer so everything is ready before you start mixing the batter.
Combine Dry Ingredients
Whisk the flour, baking powder, and salt together in a medium bowl. Break up any lumps so the mixture is light and even.
Set this bowl aside. Properly combining dry ingredients guarantees the baking powder and salt distribute evenly, helping your cupcakes rise and bake uniformly.
Mix Butter and Sugar
Whisk the melted, cooled butter with the granulated sugar in a large bowl. Beat until the mixture looks smooth and slightly thickened.
This step helps dissolve the sugar and creates a base that blends easily with the eggs and dry ingredients later, giving a tender cupcake texture.
Add Eggs and Vanilla
Crack in the eggs and pour in the vanilla extract. Whisk until the mixture is fully combined, glossy, and slightly lighter in color.
Make sure no streaks of egg remain. This creates a stable, emulsified mixture that will hold the flour and milk well without overmixing later.
Alternate Dry Ingredients and Milk
Add half the dry mixture to the wet ingredients and gently mix. Pour in half the milk and stir just until combined.
Repeat with remaining dry ingredients and milk. Mix carefully and stop as soon as no streaks of flour remain. This prevents overworking the batter and keeps cupcakes soft.
Fold In Chocolate Chips
Sprinkle in the chocolate chips, if using. Use a rubber spatula to fold them gently through the batter.
Lift from the bottom and turn the bowl as you go. Stop once the chips are evenly distributed. Overmixing at this stage can make the cupcakes dense and tough.
Fill Liners and Bake
Divide the batter evenly among the 12 liners, filling each about two-thirds full. Place the pan in the preheated oven.
Bake for 16 to 18 minutes. Check doneness by inserting a toothpick into a cupcake center; it should come out clean or with a few moist crumbs.
Cool Cupcakes Completely
Set the pan on a wire cooling rack and let the cupcakes rest in the pan for 5 minutes. Carefully remove each cupcake and place directly on the rack.
Cool completely for about 25 minutes. Fully cooled cupcakes prevent the frosting from melting or sliding off during decorating.
Cream the Butter for Frosting
Beat the softened butter in a large bowl with an electric or hand mixer on medium speed. Whip for about 3 minutes until the butter looks very creamy, pale, and fluffy.
Properly creamed butter is essential for smooth, light frosting that pipes beautifully onto your cupcakes.
Add Sugar and Adjust Consistency
Gradually add the sifted powdered sugar on low speed to avoid a sugar cloud. Once incorporated, increase to medium and beat until fluffy.
Add vanilla, a pinch of salt, and 2 tablespoons cream or milk. Beat until smooth and spreadable, adjusting with a few drops more cream if needed.
Tint Frosting and Prepare Bag
Add green gel food coloring to the frosting a few drops at a time. Beat or stir until you achieve a vibrant grass-green shade.
Fit a piping bag with a small grass tip and fill it with frosting. Practice a few squeezes on a plate to get comfortable with pressure and motion.
Base Coat the Cupcakes
Use a small offset spatula to spread a thin, even layer of green frosting over each cooled cupcake. This base coat helps the piped grass stick better and ensures any gaps are less noticeable.
Smooth the tops gently without tearing the cupcakes, creating a neat surface for piping.
Pipe Grass Texture
Hold the piping bag straight over the cupcake. Squeeze briefly, then release and pull up to create little tufts of grass.
Cover the entire surface with short, quick squeezes so it looks dense and full. Rotate the cupcake as you work, filling any bare spots for a realistic turf effect.
Decorate Candy Soccer Balls
If desired, pipe or draw small pentagon patterns on chocolate malt balls or round candies using melted dark chocolate. Let them set until firm.
The simple pattern turns plain candies into recognizable mini soccer balls and adds a fun, themed detail to the finished cupcakes.
Top and Chill Cupcakes
Press one candy soccer ball gently into the frosting on each cupcake, slightly off-center if you like a playful look. Chill the cupcakes for about 10 minutes to help set the frosting and decorations.
Serve soon after or transport carefully, keeping them cool to maintain the grass detail.
Ingredient Swaps
- Use gluten-free all-purpose flour blend (1:1) for a celiac-friendly version; check that baking powder and chocolate chips are certified gluten-free.
- Swap butter with a neutral oil in the cupcakes and a dairy-free margarine plus plant milk in the frosting to make them dairy-free; use dairy-free chocolate chips and candies.
- For a lighter or lower-cost option, replace some or all butter in the cupcakes with vegetable oil and use regular milk instead of heavy cream in the frosting.
You Must Know
– Flavor Boost – To make the vanilla base taste more like a bakery-style cake, replace 2 tablespoons of the milk with sour cream or plain yogurt and add a tiny pinch more salt (up to 1/2 teaspoon total fine salt); your batter will be slightly thicker and the baked cupcakes will taste richer and more “vanilla-forward.”
Serving Tips
- Arrange cupcakes on a rectangular tray to resemble a mini soccer field.
- Add green sprinkles on the tray for “turf” between cupcakes.
- Serve with small flags or team-colored toothpick toppers for extra spirit.
- Pair with sports-themed napkins and plates to complete the game-day look.
- Offer alongside fruit skewers and popcorn for a fun, family-friendly dessert spread.
Storage & Make-Ahead
Store unfrosted cupcakes in an airtight container in the fridge for up to 4 days.
Frosted cupcakes keep 2–3 days.
For best texture, decorate the day of serving.
Cupcakes freeze (undecorated) up to 2 months.
Thaw in the fridge overnight, then bring to room temperature before frosting.
Reheating
Reheat cupcakes gently to maintain moisture.
Use a microwave at 50% power for 8–10 seconds, or warm in a 300°F oven for 5–8 minutes.
Avoid stovetop reheating.
Soccer Parties in Culture
Sometimes a soccer party feels less like a gathering and more like a small stadium come to life in your living room—jerseys rustling, commentators shouting from the TV, and the sharp scent of fresh snacks drifting from the kitchen.
I love how the whole world seems to shrink to that glowing screen, yet somehow expand to include every friend who walks through the door.
When I set out Soccer Field Cupcakes, they don’t just sit on the table; they join the spectacle.
The green “turf” echoes the pitch on TV, little chocolate “balls” frozen mid-play.
Kids lean in first, but adults follow, grinning.
In those bites, I feel street matches, World Cup chants, neighborhood rivalries—all translated into sugar and noise.
Final Thoughts
Give these soccer field cupcakes a try for your next game day, birthday, or team celebration—they’re guaranteed to be a crowd-pleaser.
Feel free to tweak the flavors, colors, or decorations to match your favorite team or player and make them your own!
Frequently Asked Questions
Can I Make These Cupcakes Gluten-Free Without Sacrificing Texture?
Yes, you can. I’d swap the flour for a good 1:1 gluten-free blend, add an extra egg yolk, and let the batter rest 10 minutes—your cupcakes will still taste tender, moist, and wonderfully indulgent.
How Can Kids Safely Help Decorate the Soccer Field Cupcakes?
Kids can safely help by sprinkling “grass,” gently pressing candy balls on top, and practicing piping with thick frosting bags I’ve tied tightly. I keep knives, hot trays, and melted chocolate as my grown‑ups‑only zone.
What’s the Best Way to Transport Cupcakes to an Outdoor Soccer Event?
I’d tuck each frosted cupcake into a lidded cupcake carrier, nestle it flat in your car, then shade it with an ice pack beneath—no direct sun, gentle breeze, frosting standing tall like proud green grass.
How Far in Advance Can I Decorate the “Grass” Without It Wilting?
You can pipe the “grass” 1 day ahead; I’ve pushed 2 with cool temps. Keep cupcakes chilled, then let them slowly lose their chill before serving so the frosting stays perky, vivid, and delightfully turf‑like.
Can I Adapt This Design for Other Sports-Themed Cupcakes?
You absolutely can. I’d keep the green “field” base, then switch colors and toppers—brown and white for footballs, orange hoops and nets for basketball, red stitching for baseballs—so each cupcake feels like its own mini stadium.
Soccer Field Cupcakes
Equipment
- 1 Standard 12-cup muffin pan
- 12 paper cupcake liners
- 2 medium mixing bowls
- 1 large mixing bowl
- 1 Whisk
- 1 Rubber spatula
- 1 electric mixer or hand mixer
- 1 wire cooling rack
- 1 piping bag
- 1 small grass piping tip
- 1 small offset spatula
- 1 Measuring cups set
- 1 Measuring spoons set
- 1 toothpick
Ingredients
- 1 1/2 cup all-purpose flour
- 1 cup granulated sugar
- 1 1/2 teaspoon baking powder
- 1/4 teaspoon fine salt
- 1/2 cup unsalted butter melted and cooled
- 2 large eggs room temperature
- 1/2 cup whole milk room temperature
- 1 teaspoon vanilla extract
- 1/2 cup semi-sweet chocolate chips optional
- 1 cup unsalted butter softened
- 3 cup powdered sugar sifted
- 2 tablespoon heavy cream or milk
- 1 teaspoon vanilla extract
- 1 pinch fine salt
- 6 drops green gel food coloring
- 12 small chocolate malt balls or round candies for soccer balls
- 1 tablespoon melted dark chocolate for ball details optional
Instructions
- Preheat the oven to 350°F (175°C) and line the muffin pan with 12 paper liners.
- In a medium bowl whisk together the flour, baking powder, and salt until well combined.
- In a large bowl whisk the melted butter and granulated sugar until smooth and slightly thickened.
- Add the eggs and vanilla to the butter mixture and whisk until fully combined and glossy.
- Add the dry ingredients to the wet ingredients in two additions alternating with the milk and mix gently until just combined.
- Fold in the chocolate chips if using, being careful not to overmix the batter.
- Divide the batter evenly among the 12 liners filling each about two-thirds full.
- Bake the cupcakes for 16 to 18 minutes or until a toothpick inserted in the center comes out clean.
- Transfer the pan to a wire rack and let the cupcakes cool in the pan for 5 minutes.
- Remove the cupcakes from the pan and let them cool completely on the wire rack for about 25 minutes.
- While the cupcakes cool beat the softened butter with an electric mixer on medium speed until very creamy and pale, about 3 minutes.
- Gradually add the powdered sugar to the butter on low speed until incorporated then increase speed to medium and beat until fluffy.
- Add the vanilla, salt, and 2 tablespoons of cream then beat until the frosting is smooth and spreadable, adjusting with a few drops more cream if needed.
- Tint the frosting with green gel food coloring mixing until you achieve a vibrant grass-green shade.
- Fit the piping bag with the grass tip and fill it with the green frosting.
- Using a small offset spatula spread a thin layer of green frosting on top of each cooled cupcake to create a base.
- Pipe short quick squeezes all over the surface of each cupcake to create a dense grass effect.
- If decorating the candies draw simple pentagon patterns on each chocolate malt ball with melted dark chocolate and let set.
- Place one decorated candy soccer ball in the center or slightly off-center on each cupcake, pressing gently into the frosting grass.
- Chill the cupcakes for 10 minutes to help set the frosting before serving or transporting.
Notes

Cynthia Weatherford is a seasoned chef and culinary enthusiast who serves as the Recipe creator of Somonday. With decades of experience in the kitchen and a passion for exploring diverse cuisines, Cynthia brings a blend of creativity and technique to every dish. Known for transforming simple ingredients into show-stopping meals, Cynthia believes that cooking is an art form anyone can master. Dedicated to inspiring home cooks, Cynthia shares approachable recipes, pro tips, and culinary wisdom to make every meal memorable.


