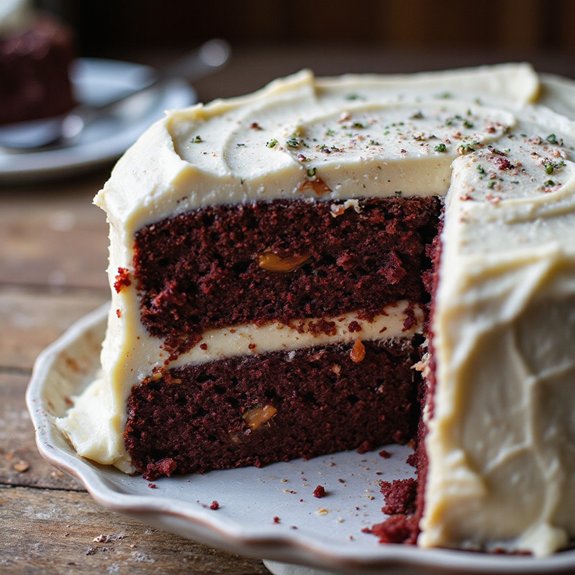
Picture a slice that gleams ruby-red with cocoa warmth, marbled by fudgy, ebony ripples, the tender crumb sighing under your fork while a cool cloud of tangy cream cheese frosting perfumes the air.
Imagine the first bite: silky, velvety cake meeting soft brownie swirls, a cozy duet of chocolate and vanilla that feels like a hug on a plate.
This cake matters to me because it turns ordinary moments into celebrations—color, texture, and aroma working together to say you’re home.
It’s a showstopper that still fits real life: birthdays without fuss, busy weeknights when you need make-ahead magic, or Sunday suppers where a stunning slice ends the meal with quiet applause.
Once, this recipe rescued a rainy afternoon and a last-minute guest list—two baked layers later, we’d smiles, stories, and not a crumb left. Ready? Let’s cook!
Why You’ll Love It
- Delivers bold flavor: fudgy brownie ribbons meet tangy red velvet
- Impresses visually with striking marbled ripples and vibrant crimson hue
- Stays ultra-moist thanks to buttermilk and oil-rich batter
- Whips up easily with simple pantry-friendly ingredients
- Frosts luxuriously with silky, balanced cream cheese icing
Ingredients
- 113 g unsalted butter, melted and slightly cooled — for brownie ripple; use good European-style butter
- 200 g granulated sugar — for brownie ripple; choose fine baker’s sugar
- 2 large eggs, room temperature — for brownie ripple; free-range if possible
- 1 tsp vanilla extract — for brownie ripple; pure extract, not imitation
- 35 g unsweetened cocoa powder — for brownie ripple; natural cocoa, not Dutch-process
- 1/4 tsp kosher salt — for brownie ripple; Diamond Crystal preferred
- 65 g all-purpose flour — for brownie ripple; weigh for accuracy
- 85 g semi-sweet chocolate chips (optional) — for brownie ripple; 50–60% cacao chips
- 312 g all-purpose flour, sifted — for red velvet; unbleached works best
- 300 g granulated sugar — for red velvet; superfine dissolves easier
- 1 tsp baking soda — for red velvet; make certain it’s fresh
- 1 tsp fine salt — for red velvet; non-iodized for clean flavor
- 2 large eggs, room temperature — for red velvet; bring to temp for better emulsion
- 295 ml buttermilk, room temperature — for red velvet; full-fat if available
- 240 ml neutral oil — for red velvet; use canola or grapeseed
- 2 tsp vanilla extract — for red velvet; real vanilla for depth
- 1 tbsp red gel food color — for red velvet; gel to avoid thinning
- 2 tsp white vinegar — for red velvet; plain distilled
- 2 tbsp unsweetened cocoa powder — for red velvet; natural cocoa aligns with vinegar
- 226 g cream cheese, softened — for frosting; block style, not spreadable
- 57 g unsalted butter, softened — for frosting; room temp for easy creaming
- 240 g powdered sugar, sifted — for frosting; adjust to taste
- 1 tsp vanilla extract — for frosting; pure extract preferred
- 1 pinch salt — for frosting; balances sweetness
Step-by-Step Method
Preheat & Prep Pans
Heat oven to 350°F (175°C). Grease two 9-inch round pans. Line each with a parchment round, then grease and flour the parchment. Set a wire rack nearby for cooling. Gather tools and ingredients. Make certain eggs, buttermilk, and dairy are at room temperature. This promotes even mixing and a tender crumb. Melt butter for the brownie ripple and let it cool slightly.
Mix the Brownie Base
Whisk melted butter, sugar, eggs, and vanilla until glossy and slightly thick. Sift in cocoa and salt. Whisk until smooth with no dry pockets. Fold in flour just until combined.
Add chocolate chips if using. Keep this batter slightly thicker than the cake batter so it holds distinct swirls and doesn’t sink during baking.
Combine Red Velvet Dry
In a large bowl, whisk sifted flour, granulated sugar, baking soda, fine salt, and cocoa powder. Break up any lumps. Even distribution of leavening makes for level rising. Keep this bowl large enough to accommodate the final batter. Set aside while you prepare the wet mixture. This separation prevents overworking the gluten later.
Whisk Red Velvet Wet
In a second bowl, whisk eggs, buttermilk, neutral oil, vanilla, white vinegar, and red gel food color until uniform. Aim for a consistent, vibrant color. If using liquid color, reduce buttermilk slightly to avoid thinning. The vinegar activates baking soda for lift. Make sure no streaks of egg remain for an even crumb.
Bring Red Velvet Batter Together
Pour the wet mixture into the dry ingredients. Whisk just until a smooth batter forms. Stop as soon as the flour disappears to avoid toughness. Scrape the bowl with a spatula to incorporate edges and bottom. The batter should be pourable but not thin. Let it sit one minute to release big air bubbles.
Layer the First Batter
Divide half of the red velvet batter evenly between the two prepared pans. Spread with an offset spatula to reach the edges. Tap pans gently to level. Create a uniform thickness for even baking. Keep the surface smooth so the brownie batter ripples distribute cleanly without sinking or bunching.
Dollop & Swirl the Ripple
Spoon brownie batter in generous dollops over each pan’s red velvet layer. Space evenly. Use a knife or skewer to gently swirl, creating ribbons. Avoid over-mixing to prevent muddy color. Aim for distinct marbling with visible lines. Leave some areas unswirled for contrast. Work quickly so batters don’t settle.
Top & Marble the Surface
Divide remaining red velvet batter over the swirled layers. Spread lightly to cover without disturbing the ripple. Give a few delicate surface swirls for a marbled top. Don’t overwork. Tap pans once to release air. Make certain edges are filled to prevent doming and maintain even layers during baking.
Bake to Tender Doneness
Place pans on the center rack. Bake 35 to 40 minutes. Begin checking at 32 minutes. Rotate pans if browning unevenly. Insert a toothpick near the center; look for a few moist crumbs, not wet batter. Remove when done. Overbaking dries the crumb and dulls the brownie ripple’s fudgy texture.
Cool & Release Layers
Cool cakes in pans on a wire rack for 15 minutes. Run a knife around edges. Invert carefully, peel off parchment, and return layers to the rack. Cool completely. Level domes with a serrated knife if needed. Wrap and chill briefly for easier handling. Cold layers crumb less during frosting.
Beat the Frosting
Beat softened cream cheese and butter until fluffy and smooth. Gradually add sifted powdered sugar. Mix in vanilla and a pinch of salt. Adjust sweetness to taste. Whip until spreadable and silky, not runny. If too soft, chill briefly. For brightness, add a small squeeze of lemon and beat to combine.
Assemble & Crumb Coat
Place the first layer on a stand. Spread an even layer of frosting edge to edge. Set the second layer on top, aligning edges. Apply a thin crumb coat over top and sides to seal in crumbs. Chill 20 minutes to set. This step makes for a clean final finish and preserves those striking ripple cross-sections.
Finish Smooth & Serve
Apply a generous final coat, smoothing sides and top with an offset spatula. Chill briefly to firm if needed. Warm a knife under hot water, wipe dry, and slice for clean, defined ripples. Serve at room temperature for best texture. Store covered in the fridge, then bring slices to room temp before enjoying.
Ingredient Swaps
- No buttermilk: use 1 1/4 cups milk + 1 tbsp lemon juice or vinegar; rest 5 minutes.
- Gluten-free: swap all-purpose flour with a 1:1 gluten-free baking blend; add 1 tbsp milk if batter seems thick.
- Dairy-free: replace butter with neutral oil or dairy-free butter; use vegan cream cheese and dairy-free butter for frosting; dairy-free milk + vinegar for buttermilk.
- Eggs-free: replace 2 eggs in red velvet with 1/2 cup unsweetened applesauce or 2 flax eggs (2 tbsp ground flax + 6 tbsp water).
- For brownie ripple, use 1 flax egg.
- Cocoa alternatives: Dutch-process works; reduce baking soda to 3/4 tsp in red velvet if using it.
- Food color: use beet powder (2–3 tsp) or natural red gel; note slightly earthier flavor and softer hue.
- Sugar swaps: use light brown sugar for deeper flavor in brownie ripple; powdered sugar in frosting can be reduced or replaced partly with neufchâtel for less sweetness.
- Oil/budget: any neutral oil (canola, sunflower) works; skip chocolate chips or use chopped dark chocolate.
- Vinegar: white vinegar can be swapped with apple cider vinegar.
You Must Know
Doneness • If the ripple seems to vanish into the crumb, pull earlier: remove when the center springs back and a toothpick shows gooey streaks of brownie but only moist crumbs of cake; target internal temp 205–210°F to keep the brownie ribbons fudgy.
Troubleshoot • When the brownie ripple starts sinking to the bottom, fold in 1–2 teaspoons extra flour to the brownie portion so it stays slightly thicker than the red velvet; look for a lava-like ribbon that slowly mounds, not pours.
Flavor Boost • For deeper cocoa notes without extra sweetness, swap 1 tablespoon of the red gel color’s liquid with 1 tablespoon cooled espresso or strong coffee; you’ll get a darker mahogany hue and a bittersweet edge you can smell in the baked layers.
Scale • For a 3-layer 6-inch cake, use 75% of each batter and frosting; bake 3 pans about 22–26 minutes until edges pull 1/4 inch from the sides and centers show tiny, slow-closing bubbles.
Make-Ahead • To keep frosting silky on day 2, chill the crumb-coated cake well-wrapped up to 48 hours, then finish coat just before serving; let sit 20–30 minutes at room temp until the frosting feels spreadable and the layers no longer feel cold to the touch.
Serving Tips
- Serve chilled slices with a dollop of lightly sweetened whipped cream.
- Pair with hot coffee or cold milk; add fresh raspberries for contrast.
- Plate with a drizzle of warm chocolate sauce and a sprinkle of cocoa.
- Add a scoop of vanilla bean ice cream and crushed toasted pecans.
- Garnish with thin strawberry slices and a light dusting of powdered sugar.
Storage & Make-Ahead
Refrigerate the frosted cake, covered, for up to 4 days.
Slices stay moist if wrapped individually.
Unfrosted layers can be made ahead: wrap tightly and chill up to 3 days.
For longer storage, freeze unfrosted layers or well-wrapped slices up to 2 months.
Thaw at room temperature before frosting or serving.
Reheating
For gentle reheating, warm slices covered.
Microwave at 50% power 20–30 seconds.
Oven at 300°F wrapped in foil 8–10 minutes.
Or stovetop steam in lidded pan 3–5 minutes.
Juneteenth Bake-Sale Favorite
Sometimes the moment I lift the frosted layers onto a stand, I can already see this Soft Brownie Ripple Red Velvet Cake stealing the Juneteenth bake-sale table. The hue glows crimson like porch lanterns at dusk, and the cream cheese frosting looks like cool linen.
When I slice, ripples of brownie ribbon through the tender crumb, releasing warm cocoa and vanilla that drift like a sweet hymn.
I price it by the slice—twelve neat wedges—and tuck napkins beside the stand. Kids point at the marbled top; aunties nod at the buttermilk tang; someone always asks about that fudgy swirl.
I share the secret: gently dollop, barely swirl, then bake until moist crumbs cling. Plates clatter, laughter rises, and the tray empties first.
Final Thoughts
Ready to bake? Give this Soft Brownie Ripple Red Velvet Cake a try and don’t be afraid to tweak the swirl or frosting sweetness to make it yours—then share how it turned out!
Frequently Asked Questions
Can I Convert This Into Cupcakes? What Adjustments Are Needed?
Yes—you can. I’ll fill liners 2/3 full, ripple brownie batter lightly, bake at 350°F for 18–22 minutes, and cool completely. I’ll halve frosting, swirl generously, and savor tender crumbs, velvety cocoa, and plush tang.
How Do I Scale the Recipe for a Sheet Cake?
Use 1.5x for a 9×13 pan; bake 30–38 minutes. I’ll double for a half-sheet; bake 25–35. Keep brownie swirl thicker, don’t overmix. I’ll watch for moist crumbs, fragrant cocoa, and edges gently pulling away.
What Altitude Adjustments Should I Make for Baking?
At 3,000–7,000 feet, I reduce sugar 1–2 tablespoons, increase flour 1–2 tablespoons, add 1–2 teaspoons liquid, and lower leavening slightly. I bake a bit hotter, watch earlier—aromas bloom, edges whisper done, crumbs tenderly cling.
Are There Gluten-Free Adaptations That Maintain the Ripple?
Yes—use a 1:1 gluten‑free all‑purpose blend with xanthan, add 1 tablespoon cornstarch, and keep brownie batter thicker. I’ll swirl gently, ribbons holding like dusk on cream, tender crumb, chocolatey pockets, lush frosting sighing.
How Can I Decorate Without Cream Cheese Frosting?
Use whipped ganache, chocolate glaze, or vanilla ermine frosting. I’ll crown it with cocoa-dusted swirls, glossy ripples, and ruby crumbs. Add fresh berries, a warm drizzle, and curls of chocolate—soft sheen, tender bite, candlelit bakery vibes.
Soft Brownie Ripple Red Velvet Cake
Equipment
- 1 Mixing bowl
- 1 Mixing bowl
- 1 Saucepan
- 1 9-inch round cake pan
- 1 9-inch round cake pan
- 1 parchment paper round
- 1 parchment paper round
- 1 Whisk
- 1 hand mixer or stand mixer
- 1 Rubber spatula
- 1 set Measuring cups
- 1 set Measuring spoons
- 1 Wire rack
- 1 toothpick
- 1 knife or skewer
Ingredients
- 1/2 cup unsalted butter melted and slightly cooled
- 1 cup granulated sugar
- 2 large eggs room temperature
- 1 teaspoon vanilla extract
- 1/3 cup unsweetened cocoa powder
- 1/4 teaspoon kosher salt
- 1/2 cup all-purpose flour
- 1/2 cup semi-sweet chocolate chips optional
- 2 1/2 cups all-purpose flour sifted
- 1 1/2 cups granulated sugar
- 1 teaspoon baking soda
- 1 teaspoon fine salt
- 2 large eggs room temperature
- 1 1/4 cups buttermilk room temperature
- 1 cup neutral oil
- 2 teaspoons vanilla extract
- 1 tablespoon red gel food color
- 2 teaspoons white vinegar
- 2 tablespoons unsweetened cocoa powder
- 8 ounces cream cheese softened
- 1/4 cup unsalted butter softened
- 2 cups powdered sugar sifted
- 1 teaspoon vanilla extract
- 1 pinch salt
Instructions
- Heat oven to 350°F (175°C), butter two 9-inch pans, line with parchment, and butter and flour the parchment.
- Make the brownie ripple by whisking melted butter, sugar, eggs, and vanilla until glossy.
- Sift cocoa and salt into the brownie bowl, whisk smooth, then fold in flour and chocolate chips.
- For the red velvet batter, whisk flour, sugar, baking soda, salt, and cocoa in a large bowl.
- In another bowl, whisk eggs, buttermilk, oil, vanilla, vinegar, and red gel color until fully combined.
- Add wet red velvet mixture to dry ingredients and whisk just until a smooth batter forms.
- Divide half of the red velvet batter between the two pans, smoothing into even layers.
- Dollop spoonfuls of brownie batter over each layer, then gently swirl with a knife to create ripples without overmixing.
- Top with remaining red velvet batter and lightly swirl the surface for a marbled top.
- Bake for 35 to 40 minutes until a toothpick inserted near the center comes out with a few moist crumbs.
- Cool cakes in pans on a wire rack for 15 minutes, then invert, remove parchment, and cool completely.
- Make cream cheese frosting by beating cream cheese and butter until fluffy, then gradually mix in powdered sugar, vanilla, and salt until smooth.
- Level cake tops if needed, place first layer on a stand, spread frosting, and set second layer on top.
- Frost the top and sides with a thin crumb coat, chill 20 minutes, then finish with a smooth final coat.
- Slice with a warm knife for clean rippled cross-sections and serve.
Notes

Cynthia Weatherford is a seasoned chef and culinary enthusiast who serves as the Recipe creator of Somonday. With decades of experience in the kitchen and a passion for exploring diverse cuisines, Cynthia brings a blend of creativity and technique to every dish. Known for transforming simple ingredients into show-stopping meals, Cynthia believes that cooking is an art form anyone can master. Dedicated to inspiring home cooks, Cynthia shares approachable recipes, pro tips, and culinary wisdom to make every meal memorable.


