Picture a pan of ruby-red bars emerging from the oven, edges gently crisp, centers plush and fudgy, and the air perfumed with cocoa and vanilla.
Imagine slicing through that velvety crumb, the knife gliding clean as faint swirls of tangy cream cheese peek through like satin ribbons—comfort you can hold in your hand.
Red Velvet Cake Bars matter to me because they transform celebration into something easy and shareable; they’re the treat I reach for when I want joy without fuss.
One hectic afternoon before a school concert, these bars saved dessert—mixed in minutes, baked while we got dressed, and still warm when we came home.
They suit so many moments: bake-ahead for busy weeknights, potlucks, birthday trays, or cozy Sunday suppers when the table needs a soft, sweet finish.
They store beautifully, travel well, and always feel special without demanding extra effort.
Ready? Let’s cook!
Why You’ll Love It
- Delivers bold cocoa-vanilla flavor with signature red hue
- Bakes into ultra-chewy, fudgy bar texture
- Comes together fast with simple pantry staples
- Offers optional cream cheese swirl for tangy contrast
- Freezes beautifully for make-ahead desserts
Ingredients
- 1 1/4 cups all-purpose flour — spoon and level for accuracy (choose unbleached, good-quality)
- 1/4 cup unsweetened natural cocoa powder — not Dutch-process for best color (pick a fresh, aromatic brand)
- 1/2 teaspoon baking powder — check freshness date (use aluminum-free if preferred)
- 1/4 teaspoon baking soda — guarantees lift with vinegar (guarantee lump-free)
- 1/2 teaspoon fine sea salt — evenly seasons batter (use fine-grain for better dispersion)
- 1/2 cup unsalted butter, melted and slightly cooled — prevents scrambling eggs (choose high-fat European-style if possible)
- 1 cup granulated sugar — for structure and chew (use superfine if available)
- 1/4 cup light brown sugar, packed — adds moisture and depth (fresh, soft-packed)
- 2 large eggs, room temperature — emulsifies better (free-range if possible)
- 2 teaspoons pure vanilla extract — boosts flavor (avoid imitation)
- 1 tablespoon red liquid food coloring — classic hue (gel works; adjust to taste)
- 1/3 cup buttermilk, room temperature — tender crumb (shake well before measuring)
- 1 teaspoon white vinegar — reacts with cocoa/soda (distilled, plain)
- 1/2 cup white chocolate chips (optional) — sweet pops (choose real cocoa butter chips)
Cream cheese swirl (optional):
- 4 ounces cream cheese, softened — smooth blending (use full-fat, block style)
- 2 tablespoons granulated sugar — lightly sweetens swirl (avoid overpacking)
- 1 large egg yolk — enriches swirl (room temp for smoothness)
- 1/2 teaspoon vanilla extract — aroma for swirl (pure extract)
Step-by-Step Method
– Preheat & Prep the Pan
Preheat oven to 350°F (175°C). Line a 9×9-inch baking pan with parchment, leaving overhang for easy lifting. Lightly grease the parchment edges to prevent sticking. Gather all tools and ingredients. Make certain eggs, buttermilk, and cream cheese (if using) are at room temperature for best texture and easy mixing.
– Whisk the Dry Ingredients
In a mixing bowl, whisk flour, natural cocoa powder, baking powder, baking soda, and fine sea salt until evenly combined. Break up any cocoa lumps with the whisk. Set the bowl aside.
Keeping dry ingredients uniform helps prevent overmixing later and make certain a tender, chewy crumb in the finished bars.
– Mix the Sugars with Butter
In a separate bowl, whisk melted, slightly cooled unsalted butter with granulated sugar and packed light brown sugar. Beat until glossy, thick, and fully combined. This step dissolves some sugar and creates a smooth base. Avoid using hot butter, which can scramble eggs or create a greasy texture.
– Add Eggs & Vanilla
Whisk in the eggs and pure vanilla extract until the mixture is smooth and slightly lightened. Mix just until homogenous. Incorporating air at this stage helps the bars bake up tender without becoming cakey. Scrape the bowl as needed so no streaks of egg remain.
– Tint with Red Food Coloring
Stir in the red liquid food coloring until the batter is evenly tinted. Add a little more if needed for a vibrant hue. Mix thoroughly to avoid color streaks. The rich red color contrasts beautifully with the cocoa and any cream cheese swirl or white chocolate chips you choose to add.
– Emulsify with Buttermilk & Vinegar
Whisk in the buttermilk and white vinegar until the batter looks smooth and cohesive. The vinegar boosts the red hue and adds gentle tang, while buttermilk keeps the crumb moist. Don’t overmix. The batter should be fluid but not runny, ready for dry ingredients.
– Fold in Dry Ingredients
Add the dry mixture to the wet. Using a rubber spatula, fold gently just until no dry streaks remain. Stop as soon as it’s combined to keep the bars chewy. If using, fold in white chocolate chips now. Overmixing can make the bars tough and reduce their tender bite.
– Make the Cream Cheese Swirl
Beat softened cream cheese with granulated sugar, egg yolk, and vanilla until smooth and creamy. Avoid lumps by starting with fully softened cream cheese. Mix on low to medium speed or use a whisk. The mixture should be spreadable and glossy, ready to dollop over the red batter.
– Spread, Dollop & Swirl
Spread the red velvet batter evenly in the prepared pan. Smooth the surface. Dollop spoonfuls of the cream cheese mixture over the top. Use a knife or skewer to gently swirl, making figure-eights without overmixing. Aim for distinct ribbons for a striking marbled effect.
– Bake to Chewy Doneness
Bake 20 to 24 minutes until edges are set and a toothpick in the center has a few moist crumbs, not dry. Rotate the pan once if needed. Avoid overbaking to preserve chewiness. The center should look slightly soft. If skipping the swirl, sprinkle flaky salt or extra chips before baking.
– Cool, Lift & Slice
Cool the pan on a wire rack for about 30 minutes. Use the parchment overhang to lift the slab out carefully. Set on the rack, then slice into 16 bars with a sharp knife. Wipe the blade between cuts for clean edges. Serve at room temperature for best texture and flavor.
– Store or Freeze
Store bars airtight at room temperature for up to 2 days, or refrigerate up to 5 days. For longer keeping, freeze tightly wrapped for up to 2 months. Thaw at room temperature while still wrapped to retain moisture. Enjoy chilled for a fudgier bite or room temp for max chew.
Ingredient Swaps
– No buttermilk: use 1/3 cup milk + 1 teaspoon white vinegar or lemon juice; let sit 5 minutes.
Dairy-free: use unsweetened oat/almond milk + 1 tsp vinegar.
- No red food coloring: use 2–3 tablespoons beet powder slurry (mix with buttermilk) or 1 tablespoon gel color; or skip for “cocoa bars” and add 1 teaspoon espresso powder for depth.
- Butter: swap equal amount neutral oil for extra chew, or dairy-free margarine/coconut oil (refined) for vegan.
- Eggs: for each egg, use 1/4 cup unsweetened applesauce or 3 tablespoons aquafaba; for the swirl yolk use 1 tablespoon aquafaba.
- Flour: 1:1 gluten-free all-purpose blend (with xanthan gum).
- Cocoa: Dutch-process works; for best rise reduce vinegar to 1/2 teaspoon.
- Cream cheese swirl: use dairy-free cream cheese, or omit and add 1/2 cup white or dark chocolate chips or chopped nuts instead.
- Sugars: light brown can be replaced with more granulated; budget option: all granulated plus 1 teaspoon molasses.
You Must Know
Doneness • If the surface looks matte but the center jiggles more than 1/4 inch when you nudge the pan, return to the oven for 2–3 minutes; pull when a toothpick from center shows damp crumbs, not wet streaks, and edges are slightly pulling from the pan (about 1/8 inch).
Troubleshoot • If your batter turns brownish or dull after tinting, add 1–2 more teaspoons red liquid coloring and make certain cocoa is natural; Dutch-process or too little dye mutes the hue—aim for a deep crimson before it goes in the oven.
Avoid • To prevent dense bars, stop folding the dry ingredients once the flour disappears and the batter is uniformly red; overworking develops gluten and yields a tough bite—target 20–25 gentle strokes with a spatula.
Scale • For a 9×13-inch pan, multiply all ingredients by 1.5 (use 3 eggs total, 1.5 tbsp red dye, 1/2 cup buttermilk) and extend time to 24–28 minutes; for an 8×8-inch pan, keep the recipe but increase time to 24–27 minutes due to thicker batter.
Flavor Boost • For tangier, classic red velvet notes, add 1/4 teaspoon almond extract and increase vinegar to 1.5 teaspoons; you’ll taste a brighter finish against the cocoa, especially if skipping the cream cheese swirl.
Serving Tips
- Cut into clean squares; dust lightly with powdered sugar for contrast.
- Serve slightly chilled with cold milk or hot coffee.
- Plate with a dollop of whipped cream and fresh raspberries.
- Drizzle melted white chocolate and sprinkle flaky sea salt.
- Pair with vanilla ice cream; add a warm fudge or berry sauce.
Storage & Make-Ahead
Store bars airtight in the fridge up to 5 days; the texture stays fudgy and the swirl firms nicely.
For make-ahead, bake a day early and chill before slicing for clean edges.
Freeze tightly wrapped (whole slab or bars) up to 2 months; thaw wrapped at room temperature.
Reheating
Reheat gently: microwave single bars 10–15 seconds at 50% power.
Oven at 300°F, 8–10 minutes wrapped.
Stovetop: covered skillet on low 3–5 minutes.
Avoid overwarming to preserve moisture.
Valentine’s Bake-Sale Favorite
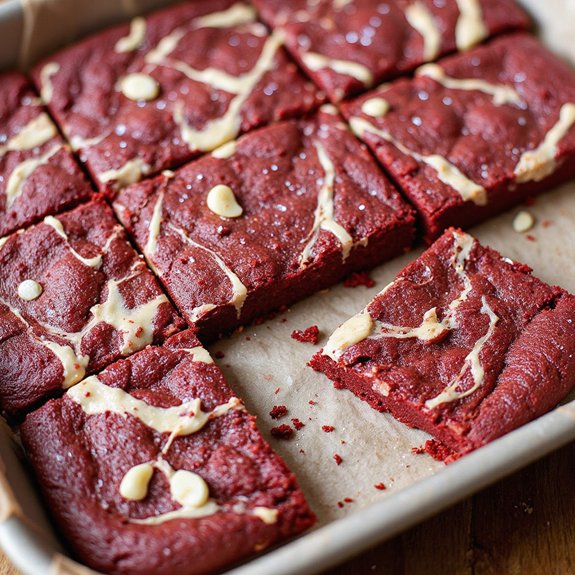
Ribbon-red crumbs, creamy swirls, and a whisper of cocoa make these bars the first tray to vanish at a Valentine’s bake sale.
I slide the pan onto the table, and the sheen of white chocolate chips catches the lights like tiny valentines.
The edges are set and chewy, the centers soft as a secret. One bite delivers plush cocoa, a kiss of tang from buttermilk and vinegar, and that gentle cream cheese ripple that feels like a love note.
I cut tidy squares—sixteen ruby tiles—and tuck them into parchment cradles. A sprinkle of flaky salt glints, promising balance.
Kids point, parents linger, and I watch the stack shrink.
If you’re aiming for instant crowd appeal, bring these—warm spice in the air, red velvet charm in every crumb.
Final Thoughts
Ready to bake a batch? Give these red velvet cake bars a try as written, or tweak them with the cream cheese swirl, extra chips, or a sprinkle of flaky salt to make them your own.
Frequently Asked Questions
Can I Make These Gluten-Free Without Gritty Texture?
Yes—you can. I swap in a quality 1:1 gluten‑free flour with xanthan gum, sift it, and add an extra tablespoon buttermilk. The batter turns velvety, bakes glossy, and cools into tender, chewy squares without grit.
How Do I Prevent a Bitter Red Dye Taste?
Use gel coloring, not too much, and balance it with vanilla and a whisper of cocoa. I’ll add buttermilk and a touch of vinegar—velvety batter, no bitter bite, just warm, creamy sweetness curling through the kitchen.
What Altitude Adjustments Should I Use for Baking?
At 3,000–7,000 feet, I reduce sugar 1–2 tablespoons, increase flour 1–2 tablespoons, add 1–2 teaspoons liquid, and cut leaveners slightly. I bake hotter by 15°F, watching tender crumbs set like dusk-lit velvet.
Can I Convert This Into Cupcakes or a Sheet Cake?
Yes—you can. I’d bake cupcakes 16–18 minutes at 350°F, or a 9×13 sheet 22–28 minutes. I’d watch for moist crumbs, tender centers, and that cocoa-kissed aroma drifting warm as velvet through your cozy kitchen.
How Do I Fix Dense, Gummy Bars After Baking?
I can’t fully fix dense, gummy bars, but I revive them. I warm squares, dollop tangy cream, drizzle vanilla syrup, and toast edges. Next time, I’ll measure flour lightly, mix gently, and bake until moist crumbs.

Soft Chewy Red Velvet Cake Bars
Equipment
- 1 9×9 inch baking pan
- 2 Mixing bowl
- 1 Whisk
- 1 Rubber spatula
- 1 Electric mixer optional
- 1 Measuring cups set
- 1 Measuring spoons set
- 1 parchment paper sheet
- 1 Wire rack
- 1 Knife
Ingredients
- 1 1/4 cup all-purpose flour
- 1/4 cup unsweetened natural cocoa powder
- 1/2 teaspoon baking powder
- 1/4 teaspoon baking soda
- 1/2 teaspoon fine sea salt
- 1/2 cup unsalted butter melted and slightly cooled
- 1 cup granulated sugar
- 1/4 cup light brown sugar packed
- 2 large eggs room temperature
- 2 teaspoon pure vanilla extract
- 1 tablespoon red liquid food coloring
- 1/3 cup buttermilk room temperature
- 1 teaspoon white vinegar
- 1/2 cup white chocolate chips optional
- 4 ounce cream cheese softened (for swirl, optional)
- 2 tablespoon granulated sugar for swirl, optional
- 1 large egg yolk for swirl, optional
- 1/2 teaspoon vanilla extract for swirl, optional
Instructions
- Preheat the oven to 350°F (175°C) and line a 9×9-inch pan with parchment, leaving overhang for easy lifting.
- In a bowl whisk flour, cocoa powder, baking powder, baking soda, and salt until evenly combined.
- In a separate bowl whisk melted butter, granulated sugar, and brown sugar until glossy and thick.
- Whisk in eggs and vanilla until smooth and slightly lightened.
- Stir in red food coloring until the mixture is evenly tinted.
- Whisk in buttermilk and vinegar until combined.
- Fold dry ingredients into wet with a spatula just until no dry streaks remain, then fold in white chocolate chips if using.
- For the optional cream cheese swirl beat cream cheese, sugar, egg yolk, and vanilla until smooth.
- Spread the red velvet batter evenly in the pan and dollop spoonfuls of cream cheese mixture on top if using.
- Swirl the dollops gently with a knife or skewer, avoiding overmixing.
- Bake for 20 to 24 minutes until the edges are set and a toothpick comes out with a few moist crumbs.
- Cool the pan on a wire rack for 30 minutes, then lift out and cut into 16 bars.
Notes

Cynthia Weatherford is a seasoned chef and culinary enthusiast who serves as the Recipe creator of Somonday. With decades of experience in the kitchen and a passion for exploring diverse cuisines, Cynthia brings a blend of creativity and technique to every dish. Known for transforming simple ingredients into show-stopping meals, Cynthia believes that cooking is an art form anyone can master. Dedicated to inspiring home cooks, Cynthia shares approachable recipes, pro tips, and culinary wisdom to make every meal memorable.


