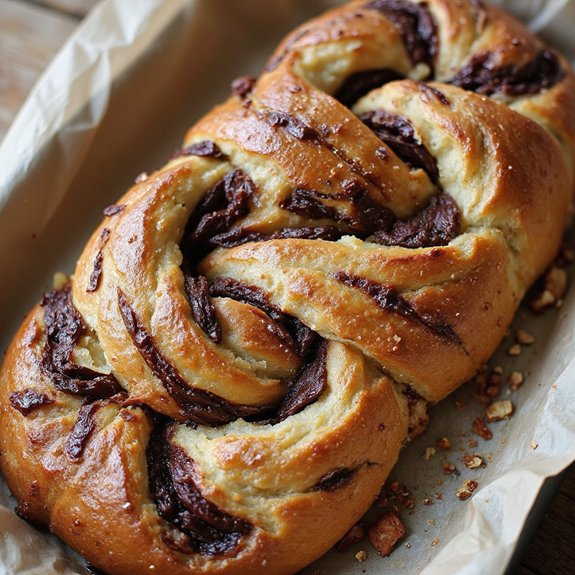
There’s something about pulling a glossy, twisted loaf from the oven—the crust a deep golden brown, ribbons of melted chocolate peeking through—that feels like pure magic.
This sourdough babka is a cozy, slow-risen dessert bread, more weekend pleasure than weeknight rush, but the hands-on time is surprisingly manageable.
It’s perfect for sweet-tooth fans, ambitious beginners, and anyone who loves a baking project that rewards patience with unforgettable flavor.
I still remember a rainy Saturday when friends dropped by unannounced. I’d mixed this dough the night before “just in case,” and that simple decision turned an ordinary afternoon into a warm, cinnamon-and-cocoa-scented gathering.
Thick slices disappeared alongside mugs of coffee, and nobody minded the weather after that.
This babka shines for lazy Sunday brunches, holiday breakfasts, or as a make-ahead showstopper for gatherings and gifting. Ready to bring this loaf to life in your own kitchen?
Why You’ll Love It
- Delivers deep, complex flavor from a long, slow sourdough fermentation
- Bakes into an ultra-soft, rich crumb with beautiful chocolate swirls
- Makes ahead easily with an overnight chill for flexible timing
- Impresses guests with bakery-style looks using simple shaping techniques
- Freezes beautifully, so you can enjoy slices whenever you like
Ingredients
- 120 g active sourdough starter — 100% hydration and recently fed
- 240 ml whole milk, warm — about 30–32°C / 86–90°F for gentle yeast activity
- 100 g granulated sugar — standard white sugar for balanced sweetness
- 2 large eggs — at room temperature for smoother dough mixing
- 1 large egg yolk — adds extra richness and tenderness
- 7 g fine sea salt — enhances flavor and gluten structure
- 500 g all-purpose flour — standard protein level for soft yet structured crumb
- 115 g unsalted butter, very soft — room-temperature for easy incorporation
- Neutral oil or butter — for lightly greasing the bowl and pan
Chocolate Filling
- 120 g dark chocolate, finely chopped — 60–70% cacao melts and tastes best
- 25 g unsweetened cocoa powder — deepens chocolate flavor and color
- 75 g powdered sugar — dissolves easily into a smooth filling
- 40 g unsalted butter, melted — helps create a spreadable paste
- 2 g fine sea salt — sharpens and balances the chocolate sweetness
Syrup
- 60 ml water — base for the simple syrup
- 60 g granulated sugar — creates a glossy, moist finish
- 5 ml vanilla extract — adds aroma to the syrup glaze
Step-by-Step Method
Mix the Wet Ingredients
Whisk the warm milk, active sourdough starter, sugar, eggs, and egg yolk in the stand mixer bowl. Combine until the mixture is smooth and uniform, with no streaks of egg.
Aim for a temperature that feels warm but not hot. This guarantees the starter stays active and blends evenly with the dairy and sugar.
Form the Initial Dough
Add the flour and salt to the wet mixture. Mix on low speed or by hand until no dry flour remains. Scrape the bowl as needed. Stop once a shaggy, cohesive dough forms.
Don’t worry about smoothness yet. The dough should look rough but evenly hydrated, ready for kneading.
Develop Gluten by Kneading
Knead the dough with the dough hook on medium-low speed for 5–7 minutes. Watch for the dough to become more elastic and cohesive.
It should start pulling away from the bowl sides but still feel a bit sticky. This initial knead builds the gluten network before adding rich ingredients.
Incorporate the Soft Butter
Add the very soft butter in 3–4 additions, mixing well after each. Let each portion disappear into the dough before adding the next. Continue mixing until the butter is fully absorbed.
The dough will look greasy at first, then transform into a smooth, glossy, slightly tacky mass.
Knead Until Silky and Stretchy
Continue kneading for another 5–8 minutes. Test the dough by gently stretching a small piece. It should form a thin, translucent windowpane without tearing easily.
The dough should feel soft, elastic, and supple. This strength is vital for holding the chocolate swirls during shaping and baking.
Bulk Ferment Until Slightly Puffy
Shape the dough into a smooth ball and place it in a lightly oiled bowl. Cover with plastic wrap or a clean towel. Let it rest at room temperature for 3–4 hours.
Look for a slight increase in volume and a puffy, airy feel rather than a full doubling. This builds flavor and structure.
Cold-Proof the Dough Overnight
Transfer the covered bowl to the refrigerator. Chill for at least 8 hours or overnight. This slow, cold fermentation deepens flavor and firms the dough, making it easier to roll and shape.
Leave it undisturbed during this time. The dough will rise a bit more and become nicely chilled.
Prepare the Chocolate Filling
About 30 minutes before shaping, combine chopped dark chocolate, cocoa powder, powdered sugar, melted butter, and salt in a heatproof bowl. Mix lightly.
Set the bowl over a saucepan of barely simmering water. Stir until the chocolate melts and the mixture becomes smooth, glossy, and thick.
Cool the Filling to Spreadable Consistency
Remove the chocolate mixture from the heat and let it cool. Stir occasionally as it thickens to a spreadable paste.
Aim for a texture similar to soft nut butter. It should hold its shape on a spoon, not run. Proper consistency prevents the filling from leaking out during rolling and baking.
Prepare and Line the Loaf Pan
Grease the 9×5-inch loaf pan with neutral oil or butter. Line it with a strip of parchment paper that overhangs the long sides. Press the paper into the corners so it lies flat.
This prevents sticking and makes it easy to lift the baked babka out of the pan in one piece.
Temper the Chilled Dough
Remove the dough from the refrigerator. Let it sit at room temperature for 10–15 minutes to soften slightly.
It should still feel cool but pliable, not rock hard. This brief tempering makes rolling easier and prevents cracking. Keep your work surface and tools ready for shaping.
Roll the Dough into a Rectangle
Lightly flour your work surface and rolling pin. Roll the dough into a rectangle about 30×40 cm (12×16 inches), with the long side facing you.
Keep the thickness even and edges as neat as possible. Lift and move the dough occasionally to prevent sticking, dusting with flour only as needed.
Spread the Chocolate Filling Evenly
Spread the cooled chocolate filling over the dough using an offset spatula or spoon. Leave a 1.5–2 cm (½–¾ inch) clean border on all sides. Keep the layer even and not overly thick.
Avoid tearing the dough. A uniform filling layer creates distinct, beautiful swirls in the finished babka.
Roll the Dough into a Tight Log
Starting from the long edge closest to you, roll the dough tightly into a log. Use your fingers to guide and tuck as you roll. Keep the log even in thickness along its length.
When you reach the far edge, pinch the seam well to seal. Place the log seam-side down on the board.
Trim and Neaten the Ends
Use a sharp knife or bench scraper to trim 1–2 cm (about ½ inch) from each end of the log. Cut straight across.
This removes uneven, filling-sparse edges and exposes clean swirls. Set trimmings aside to bake separately if desired. Keep the main log intact for the next step.
Slice the Log Lengthwise
With the log seam-side down, use a sharp knife to slice it lengthwise down the center. Cut carefully to expose the inner layers.
You’ll now have two long strands, each with visible chocolate spirals. Handle them gently to avoid stretching or losing too much filling.
Twist the Strands into a Braid
Turn the two strands so the cut sides face up. Cross one strand over the other near the top, then continue twisting them together down the length, always keeping the cut surfaces facing upward.
Work gently but firmly. This braiding creates the characteristic babka look and layered crumb.
Transfer the Loaf to the Pan
Lift the twisted braid carefully and place it into the prepared loaf pan. Tuck the ends under if needed so it fits snugly.
Adjust the twist slightly to fill the pan evenly. Don’t compress too hard. The dough should sit comfortably, ready to expand upward during the final proof.
Proof Until Puffy and Risen
Cover the pan loosely with plastic wrap or a clean kitchen towel. Let the babka proof at warm room temperature for 3–5 hours.
Watch for it to become noticeably puffy and rise close to the top of the pan. Judge by appearance rather than time. The dough should look airy and light.
Preheat the Oven for Baking
About 30 minutes before you expect the babka to finish proofing, preheat your oven to 180°C (350°F). Position a rack in the center. Ensure the oven is fully heated before baking.
This steady, even heat helps the enriched dough rise properly, set its structure, and brown attractively.
Bake the Babka Until Golden
Place the proofed babka on the center rack. Bake for 35–40 minutes. Check the color after about 25 minutes and tent loosely with foil if it browns too quickly.
The babka is done when it’s deeply golden and a skewer inserted in the center comes out without raw, gummy dough attached.
Prepare the Vanilla Syrup
While the babka bakes, combine the water and sugar in a small saucepan. Bring to a gentle simmer, stirring until the sugar fully dissolves.
Remove from the heat and stir in the vanilla extract. Keep the syrup warm. It should be clear and slightly thickened, ready to soak into the hot loaf.
Brush the Hot Loaf with Syrup
As soon as the babka comes out of the oven, place the pan on a heatproof surface. Use a pastry brush to generously coat the hot loaf with the warm syrup.
Let it soak in, then brush again until glossy. The syrup adds moisture, shine, and sweetness, helping keep the babka tender.
Cool the Babka Before Slicing
Let the babka cool in the pan for 15–20 minutes. Use the parchment overhang to lift it carefully onto a cooling rack. Allow it to cool completely before slicing.
This resting time sets the crumb and swirls, preventing them from squashing. Once cool, slice into thick pieces and serve.
Ingredient Swaps
- Milk: Use any full-fat plant milk (soy, oat, or almond) for a dairy-free version; water with 1–2 tbsp oil also works in a pinch.
- Butter: Swap with vegan butter or refined coconut oil (expect slightly denser, more tender crumb).
- Eggs: Replace each egg with 60 g unsweetened applesauce or thick yogurt; texture will be a bit less rich and fluffy.
- Flour: Standard bread flour can replace all-purpose for a chewier crumb; use up to 30% whole wheat or spelt and increase milk slightly if dough feels stiff.
- Chocolate: Any dark or semisweet bar or chips work; for a simpler filling, use chocolate-hazelnut spread and skip the cocoa/powdered sugar/butter.
You Must Know
– Doneness • If the babka looks baked but you’re unsure inside
Use a thermometer in the center: 92–95°C / 198–203°F means the crumb is set. If it’s paler in the middle or under 90°C / 194°F, give it another 5–10 minutes to avoid a gummy swirl line.
– Avoid • If the dough feels too sticky to handle when rolling
Chill it an extra 30–45 minutes and use just a light dusting of flour. This keeps the dough supple (not dry) so you still get that soft, shreddable crumb without compact, bready layers.
– Troubleshoot • If the babka barely rises in the pan before the oven
Extend the proof by 1–3 hours in a warm spot (~24–27°C / 75–80°F) until it’s at least 50–75% higher and jiggles slightly when the pan is shaken. Under-proofing is the main cause of dense, tight spirals.
– Scale • For a smaller or larger loaf
For a shorter pan (8×4-inch), use 75% of every ingredient; for a big pullman or two small loaves, double everything (1000 g flour total, etc.) but keep times similar and judge by volume and jiggle, not just the clock.
– Flavor Boost • To deepen chocolate and sourdough complexity
Let the shaped loaf chill covered in the fridge for an extra 4–8 hours before the final warm proof. This slow fermentation + cocoa gives a more pronounced tang and darker, brownie-like chocolate flavor.
Serving Tips
- Serve slightly warm with a dollop of lightly sweetened whipped cream.
- Pair slices with strong coffee, espresso, or unsweetened black tea.
- Plate with fresh berries or sliced oranges to cut through the richness.
- Turn day-old slices into French toast for an indulgent brunch.
- Add a scoop of vanilla or coffee ice cream for a plated dessert.
Storage & Make-Ahead
Sourdough babka keeps well, tightly wrapped, at room temperature 1–2 days or in the fridge up to 5 days.
For make-ahead, you can refrigerate the shaped loaf overnight before final proofing.
Babka also freezes beautifully, whole or sliced, well-wrapped for up to 2 months; thaw at room temperature.
Reheating
Reheat slices gently: in a 150°C (300°F) oven for 8–10 minutes.
Or briefly in the microwave on low power.
For stovetop, warm in a covered skillet over low heat.
Shabbat and Holiday Traditions
Once you’ve warmed a slice and the chocolate smells rich and toasty, it’s easy to imagine this sourdough babka on a Shabbat or holiday table.
I picture you placing the loaf beside glowing candles, the crust catching little flecks of light, the syrupy sheen promising soft, tender crumbs inside.
In my home, a babka like this feels both humble and celebratory.
I slice it thick, so everyone gets generous ribbons of chocolate and that slight tang from the sourdough.
It’s the piece people reach for after Kiddush, when conversation loosens and the room fills with the clink of glasses and low laughter.
However you observe, this babka can quietly weave itself into your own rituals.
Final Thoughts
Ready to give this sourdough babka a try? Have fun baking, and don’t hesitate to tweak the filling or flavors to make it your own—cinnamon, nuts, or even fruit spreads would all be delicious twists.
Frequently Asked Questions
Can I Convert This Sourdough Babka to a Same-Day Yeasted Version?
Yes, you can. I’d swap the starter for 7–9 g instant yeast, keep the milk and flour the same, then proof twice the same day until billowy and fragrant, still brushing on that glossy syrup.
How Do I Adapt This Recipe for a Gluten-Free Sourdough Starter?
You can swap in a 100%‑hydration gluten‑free starter, then replace flour with a strong GF bread blend plus 1–2 teaspoons psyllium husk. I’d expect softer dough, longer proof, tender, delicately fragrant slices.
What’s the Best Way to Ship Sourdough Babka Without It Drying Out?
I wrap it tightly in plastic while still slightly warm, then foil, then a snug box with padding. I ship it priority, avoid weekends, and suggest you refresh slices briefly in a low oven.
Can I Turn This Sourdough Babka Dough Into Individual Rolls or Buns?
Yes, you can. I’d roll the dough slightly thicker, spread the filling, then slice into spirals, nestle them in a greased pan, proof until pillowy, and bake until fragrant, glossy, and golden.
How Do I Scale This Recipe for Commercial or Bakery Production?
I’d scale with baker’s percentages: convert each ingredient to a percentage of flour, then multiply for your batch size, adjusting hydration and fermentation by dough temperature so every loaf still smells, feels, and tastes just right.

Sourdough Babka
Equipment
- 1 stand mixer with dough hook (or large mixing bowl)
- 1 medium mixing bowl
- 1 Small saucepan
- 1 Small bowl
- 1 Cutting board
- 1 Rolling Pin
- 1 9×5-inch loaf pan
- 1 pastry brush
- 1 sharp knife or bench scraper
- 1 plastic wrap or clean kitchen towel
- 1 Cooling rack
Ingredients
- 120 gram active sourdough starter 100% hydration
- 240 milliliter whole milk about 30–32°C / 86–90°F; warm
- 100 gram granulated sugar
- 2 large eggs room temperature
- 1 large egg yolk room temperature
- 7 gram fine sea salt
- 500 gram all-purpose flour plus extra for dusting
- 115 gram unsalted butter very soft
- 120 gram dark chocolate finely chopped
- 25 gram cocoa powder unsweetened
- 75 gram powdered sugar
- 40 gram unsalted butter for filling; melted
- 2 gram fine sea salt for filling
- 60 milliliter water for syrup
- 60 gram granulated sugar for syrup
- 5 milliliter vanilla extract for syrup
- 1 Neutral oil or butter for greasing pan
Instructions
- In the bowl of a stand mixer, whisk together the warm milk, sourdough starter, sugar, eggs, and egg yolk until well combined.
- Add the flour and salt to the wet mixture and mix on low speed or by hand until a rough dough forms and no dry flour remains.
- Knead with the dough hook on medium-low speed for about 5–7 minutes until the dough starts to feel elastic.
- Add the soft butter to the dough in 3–4 additions, mixing well after each until fully incorporated and the dough is smooth and slightly tacky.
- Continue kneading for another 5–8 minutes until the dough is very smooth, stretchy, and can be pulled into a thin windowpane without tearing.
- Shape the dough into a ball, place it in a lightly oiled bowl, cover, and let it rest at room temperature for 3–4 hours until slightly puffy.
- Transfer the covered dough to the refrigerator and cold-proof it for at least 8 hours or overnight to develop flavor and firm up for easier shaping.
- About 30 minutes before shaping, prepare the chocolate filling by combining chopped chocolate, cocoa powder, powdered sugar, melted butter, and salt in a heatproof bowl.
- Set the bowl with the filling mixture over a small saucepan of barely simmering water and stir until the chocolate is melted and the mixture is smooth and spreadable, then let it cool to a thick but spreadable consistency.
- Grease the loaf pan and line it with a strip of parchment paper that overhangs the long sides for easy removal.
- Remove the chilled dough from the refrigerator and let it sit at room temperature for 10–15 minutes to soften slightly.
- Lightly flour your work surface and roll the dough into a rectangle about 30×40 cm (12×16 inches), with the long side facing you.
- Spread the cooled chocolate filling evenly over the surface of the dough, leaving a 1.5–2 cm (½–¾ inch) border on all sides.
- Starting from the long edge closest to you, tightly roll the dough into a log, pinching the seam to seal.
- Place the log seam-side down and use a sharp knife to trim 1–2 cm (½ inch) from each end to neaten.
- Slice the log lengthwise down the center to expose the swirled layers, creating two long strands.
- With the cut sides facing up, gently twist the two strands together, crossing one over the other to form a braid while keeping the cut sides exposed.
- Carefully lift the twisted loaf into the prepared pan, tucking the ends under if needed to fit.
- Cover the pan loosely with plastic wrap or a kitchen towel and let the babka proof at warm room temperature for 3–5 hours, or until noticeably puffy and risen close to the top of the pan.
- About 30 minutes before baking, preheat the oven to 180°C (350°F).
- Once proofed, place the babka on the center rack and bake for 35–40 minutes, or until deeply golden brown and a skewer inserted in the center comes out with no raw dough.
- While the babka bakes, make the syrup by combining water and sugar in a small saucepan and simmering until the sugar dissolves, then remove from heat and stir in vanilla extract.
- As soon as the babka comes out of the oven, brush the hot loaf generously with the warm syrup until it is well coated and glossy.
- Allow the babka to cool in the pan for 15–20 minutes, then use the parchment overhang to lift it onto a cooling rack to cool completely before slicing.
Notes

Cynthia Weatherford is a seasoned chef and culinary enthusiast who serves as the Recipe creator of Somonday. With decades of experience in the kitchen and a passion for exploring diverse cuisines, Cynthia brings a blend of creativity and technique to every dish. Known for transforming simple ingredients into show-stopping meals, Cynthia believes that cooking is an art form anyone can master. Dedicated to inspiring home cooks, Cynthia shares approachable recipes, pro tips, and culinary wisdom to make every meal memorable.