
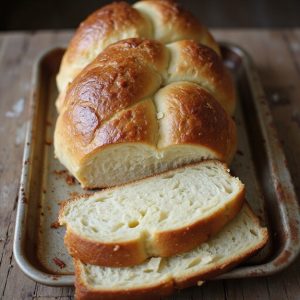
There’s something about pulling a golden loaf of sourdough brioche from the oven—the deep amber crust, the buttery sheen, the swirl of tangy, sweet aroma that fills the kitchen.
This is a cozy, enriched bread, perfect for breakfast toast, indulgent French toast, or luxe sandwiches. It’s not “instant,” but it’s surprisingly manageable: an unhurried, mostly hands-off dough that rewards a bit of planning with bakery-level results.
Sourdough brioche is ideal for comfort seekers, weekend bakers, and anyone ready to take one small step beyond basic bread.
I still remember a rainy Sunday when a rough week faded the moment we tore into warm slices, steam curling up as butter melted into every tender crumb. It turned a simple family supper into something quietly special.
Whether you’re hosting brunch, stocking the freezer, or treating yourself on a slow afternoon, this loaf delivers. Ready to bring this bread to life?
Why You’ll Love It
- Delivers incredible rich, buttery flavor with a subtle sourdough tang
- Creates an ultra-soft, feathery crumb that stays tender for days
- Makes ahead easily with an overnight chill for better flavor and flexibility
- Transforms into amazing French toast, bread pudding, or decadent sandwiches
- Impresses guests while using simple, familiar ingredients and basic equipment
Ingredients
- 150 g active sourdough starter, 100% hydration — use recently fed and bubbly for best rise
- 120 ml whole milk, lukewarm — gently warmed to just above room temperature
- 3 large eggs, room temperature — cold eggs can slow fermentation
- 60 g granulated sugar — adds sweetness and helps browning
- 350 g bread flour — higher protein gives better structure
- 50 g all-purpose flour — softens texture for a tender crumb
- 7 g fine sea salt — enhances flavor and balances sweetness
- 170 g unsalted butter, soft and cubed — room-temperature for easy incorporation
- 1 large egg, beaten (for egg wash) — gives a shiny, golden crust
- 15 ml water (for egg wash) — thins egg for easier brushing
Step-by-Step Method
Mix the starter, milk, eggs, and sugar
Whisk the sourdough starter, lukewarm milk, eggs, and sugar in the stand mixer bowl until smooth. Make certain the milk is just warm, not hot, so it doesn’t damage the starter. Mix until no streaks of egg remain.
A well-mixed liquid base helps the flour hydrate evenly and supports strong gluten development later.
Combine flours and salt into a shaggy dough
Add the bread flour, all-purpose flour, and salt to the wet mixture. Stir with a spatula or spoon until a rough, shaggy dough forms and no dry flour patches remain.
Don’t worry about smoothness yet. This initial mix simply brings everything together and starts gluten formation before mechanical kneading.
Knead the dough until it comes together
Attach the bowl to the mixer and fit the dough hook. Knead on low speed for 5–7 minutes.
Watch for the dough to start pulling away from the sides while still clinging lightly to the bottom. Scrape down the bowl if needed.
At this stage the dough should feel elastic but not yet fully smooth.
Incorporate the softened butter gradually
Keep the mixer on low and begin adding the soft, cubed butter a few pieces at a time. Let each addition fully disappear into the dough before adding more.
Be patient, as the dough may look greasy or separated at first. Continue until all butter is incorporated and the dough looks cohesive again.
Develop a smooth, elastic dough
Increase the mixer speed to medium-low. Knead for 8–12 minutes, until the dough becomes very smooth, stretchy, and elastic.
It should pull cleanly from the bowl sides and only slightly stick to the bottom. Test by stretching a small piece; it should form a thin windowpane without tearing easily, showing proper gluten development.
Bulk ferment at room temperature
Lightly grease a medium bowl. Transfer the dough into it, smoothing the top. Cover with plastic wrap or a reusable cover.
Let it rest at room temperature for 2–3 hours. Look for a slight puff and softer feel, not necessarily a full double in size.
This stage kickstarts fermentation and flavor before chilling.
Cold-proof the dough overnight
Keep the bowl covered and move it to the refrigerator. Chill the dough for 8–12 hours, or overnight. The cold temperature slows fermentation, allowing deeper flavor development.
It also firms the butter, making the rich dough easier to handle and shape. Don’t skip this rest; it markedly improves texture and workability.
Turn out and divide the chilled dough
Lightly flour your work surface. Gently tip the chilled dough from the bowl, trying not to degas it completely. Use a dough scraper to help release it.
Weigh and divide into 3 or 4 equal pieces, depending on whether you prefer a braid or simple pull-apart style. Keep the pieces lightly floured to prevent sticking.
Shape into tight balls, then into logs
Take each dough portion and gently shape it into a tight ball by tucking the edges underneath. Then roll each ball into a smooth log, slightly shorter than your loaf pan.
Apply gentle, even pressure to avoid tearing. Aim for uniform thickness so the logs proof and bake at the same rate, giving an even crumb.
Arrange in the loaf pan and proof
Grease a 9×5 inch (23×13 cm) loaf pan. Place the logs side by side in the pan, or braid them first and then nestle the braid inside.
Cover loosely with plastic wrap or a reusable cover. Proof at warm room temperature for 3–5 hours, until the dough is very puffy and nearly reaches the top of the pan.
Preheat the oven and make egg wash
Near the end of proofing, preheat your oven to 180°C / 350°F with a rack in the center. In a small bowl, beat one egg with the water until completely blended.
This egg wash will give the brioche a shiny, deeply golden crust. Keep it nearby with a pastry brush, ready for use just before baking.
Brush with egg wash and bake
Gently uncover the loaf. Lightly brush the top with a thin, even layer of egg wash, avoiding heavy pooling in creases.
Take care not to press down and deflate the dough. Transfer the pan to the oven.
Bake for 25–30 minutes, until deeply golden and it sounds hollow when tapped or reads 88–93°C / 190–200°F inside.
Tent if needed and cool completely
If the top browns too quickly, tent the loaf loosely with foil for the final 10 minutes. Once baked, remove the pan from the oven and cool on a rack for 10 minutes.
Carefully turn the brioche out onto the wire rack. Let it cool completely before slicing, so the tender crumb sets and doesn’t squash.
Ingredient Swaps
- Flour: You can use all bread flour (400 g) for a chewier loaf, or all-purpose flour for a softer, less structured crumb; whole wheat flour can replace up to 20–25% of the total flour, but add 1–2 tbsp extra milk if the dough feels stiff.
- Dairy: Substitute whole milk with 2% milk, evaporated milk (diluted 1:1 with water), or unsweetened soy/oat milk; for dairy-free, use a rich plant milk and replace butter with a vegan block butter (not margarine spread).
- Butter: For budget or availability, use salted butter and reduce added salt to 4–5 g; clarified butter or ghee works but will give a slightly different flavor.
- Sugar: Cane, beet, or caster sugar are interchangeable by weight; for a deeper flavor, replace up to half with light brown sugar or coconut sugar.
- Eggs: For egg-light brioche, you can reduce to 2 eggs and add 20–30 ml extra milk; egg-free versions require a different formula, but for the egg wash you can use milk, cream, or a mix of plant milk and maple syrup.
You Must Know
– Make-Ahead – For fresh bread at breakfast, shape and pan the chilled dough in the evening, cover well, refrigerate 8–12 hours, then bring to a warm room and let it puff to near the pan rim (1–2 hours) before the oven; this slows the rise safely while still giving a light, feathery texture.
Serving Tips
- Serve thick slices lightly toasted with salted butter and berry jam.
- Use for decadent French toast topped with fresh fruit and maple syrup.
- Pair with soft-ripened cheeses and honey for a simple dessert board.
- Make rich breakfast sandwiches with scrambled eggs, cheese, and crispy bacon.
- Cube leftovers into an indulgent brioche bread pudding or strata.
Storage & Make-Ahead
Store cooled brioche in an airtight container at room temperature for 2–3 days or in the fridge up to 5 days.
For make-ahead, keep shaped dough refrigerated up to 24 hours before baking.
This brioche freezes very well, tightly wrapped, for up to 2 months.
Reheating
Reheat slices gently: briefly microwave covered with a damp towel.
Warm in a 150°C/300°F oven wrapped in foil, or toast in a covered skillet on low, avoiding drying or browning excessively.
Brioche in French Celebrations
From village fêtes to quiet Sunday tables, brioche threads its way through French celebrations as the bread that feels like a treat and a ritual at once.
I always picture a golden loaf at the center of the table, its shiny crust catching candlelight, the crumb pulling into feathery strands between sticky fingers.
At Easter, I’ve watched families slice thick pieces, steam curling up and mingling with the smell of coffee and orange marmalade.
At Christmas, there’s often a richer, fruit‑studded brioche, passed from hand to hand while wrapping paper rustles.
Even simple milestones—a child’s birthday breakfast, a long‑awaited visit—seem softer when someone tears into warm brioche, butter melting into its airy pockets, sugar clinging lightly to their fingertips.
Final Thoughts
Give this sourdough brioche a try and see how much flavor that slow, overnight rise adds to your loaf.
Once you’ve made it once, have fun tweaking it—add chocolate chips, citrus zest, or spices to make it your own.
Frequently Asked Questions
Can I Make Sourdough Brioche Without a Stand Mixer?
Yes, you can. I’d mix with a sturdy spoon, then knead by hand, slowly working in the butter. Expect a soft, glossy dough that clings to your fingers and a silky, fragrant loaf.
How Do I Fix Brioche Dough That’s Too Sticky or Too Stiff?
If it’s sticky, I dust in tiny flour clouds and knead until it feels like soft, cool satin. If it’s stiff, I drizzle lukewarm milk, knead gently, and wait for that silky, stretchy sigh.
Is It Possible to Freeze the Unbaked Brioche Dough for Later?
Yes, you can freeze it. I chill the shaped loaf after its cold proof, wrap it snugly, then freeze. When you’re ready, thaw in the fridge overnight, let it puff warmly, then bake till bronzed.
Can I Make This Brioche Recipe Dairy-Free or Lactose-Free?
Yes, you can. I’d swap in rich oat or soy milk, then use vegan butter with similar fat content; you’ll still get a cloud-soft crumb, golden crust, and that warm, sweet, bakery-window aroma.
How Do Altitude or Very Humid Climates Affect Sourdough Brioche Baking?
Altitude makes your loaf rise faster and dry out; humidity makes it slack and slow. I’d shave yeast, knead gently, add flour by feel, and bake sooner, watching the dough like stormy, butter-scented weather.
Sourdough Brioche Bread
Equipment
- 1 stand mixer with dough hook
- 2 medium mixing bowls
- 1 Small bowl
- 1 Dough scraper
- 1 plastic wrap roll or 1 reusable cover
- 1 loaf pan (9×5 inch / 23×13 cm)
- 1 pastry brush
- 1 wire cooling rack
- 1 kitchen scale (optional but recommended)
Ingredients
- 150 gram active sourdough starter 100% hydration
- 120 milliliter whole milk lukewarm
- 3 large eggs room temperature
- 60 gram granulated sugar
- 350 gram bread flour
- 50 gram all-purpose flour
- 7 gram fine sea salt
- 170 gram unsalted butter soft and cubed
- 1 large egg for egg wash; beaten
- 15 milliliter water for egg wash
Instructions
- In the bowl of a stand mixer, whisk together the sourdough starter, lukewarm milk, eggs, and sugar until well combined.
- Add the bread flour, all-purpose flour, and salt to the wet mixture and stir until a shaggy dough forms.
- Attach the bowl to the stand mixer with the dough hook and knead on low speed for 5–7 minutes until the dough starts to come together and pull away from the sides.
- With the mixer running on low, add the soft cubed butter a few pieces at a time, allowing each addition to incorporate before adding more.
- Increase the speed to medium-low and knead for 8–12 minutes until the dough is very smooth, elastic, and pulls cleanly from the sides of the bowl but is still slightly tacky.
- Transfer the dough to a lightly greased bowl, cover, and let it rest at room temperature for 2–3 hours until slightly puffy but not necessarily doubled.
- Place the covered bowl in the refrigerator and cold-proof the dough for 8–12 hours or overnight to develop flavor and make shaping easier.
- The next day, lightly flour your work surface and gently turn the chilled dough out of the bowl.
- Divide the dough into 3 or 4 equal pieces, depending on your preferred braid or pull-apart style.
- Shape each piece into a tight ball, then roll each ball into a smooth log slightly shorter than your loaf pan.
- Arrange the logs side by side in a greased loaf pan, or braid them first and then place the braid into the pan.
- Cover the pan loosely and let the dough proof at warm room temperature for 3–5 hours, or until risen close to the top of the pan and very puffy.
- Near the end of proofing, preheat your oven to 180°C / 350°F with a rack in the center position.
- In a small bowl, beat one egg with water to make the egg wash.
- Gently brush the top of the risen loaf with a thin, even layer of egg wash, taking care not to deflate the dough.
- Bake the brioche for 25–30 minutes, or until deeply golden brown and it sounds hollow when tapped on the bottom or reads 88–93°C / 190–200°F internally.
- If the top browns too quickly, tent the loaf loosely with foil for the last 10 minutes of baking.
- Remove the brioche from the oven, cool in the pan for 10 minutes, then carefully turn it out onto a wire rack.
- Allow the brioche to cool completely before slicing to avoid squashing the tender crumb.
Notes

Cynthia Weatherford is a seasoned chef and culinary enthusiast who serves as the Recipe creator of Somonday. With decades of experience in the kitchen and a passion for exploring diverse cuisines, Cynthia brings a blend of creativity and technique to every dish. Known for transforming simple ingredients into show-stopping meals, Cynthia believes that cooking is an art form anyone can master. Dedicated to inspiring home cooks, Cynthia shares approachable recipes, pro tips, and culinary wisdom to make every meal memorable.


