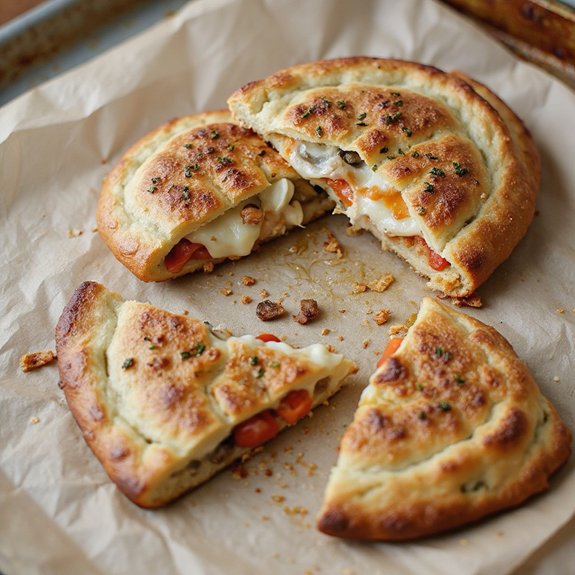
There’s something about tearing into a golden, blistered calzone and hearing that gentle crackle before the steam escapes.
Picture a dough that bakes up with a crisp-chewy crust, a tender, airy interior, and that unmistakable sourdough aroma—nutty, tangy, and warm.
This sourdough calzone dough is perfect for cozy, hands-on meals: think customizable “pizza pockets” ready for the table in about an hour once your dough is prepared.
It’s ideal for families, beginners comfortable with basic dough, and anyone who loves make-ahead meal prep.
I still remember a stormy Sunday when friends dropped by unannounced. I stretched this dough, stuffed it with fridge odds and ends, and slid tray after tray into the oven.
Everyone ripped, dipped, and talked for hours—no fuss, just simple comfort. These calzones shine for casual gatherings, kid-friendly dinners, game nights, or relaxed Friday evenings in. Ready to bring this dough to life?
Why You’ll Love It
- Builds incredible sourdough tang with long, slow cold fermentation.
- Delivers a chewy, airy crust that stays tender after baking.
- Handles beautifully—easy to stretch, fill, and seal without tearing.
- Uses simple pantry ingredients and active sourdough starter you already maintain.
- Works ahead-friendly: dough ferments overnight for effortless next-day calzones.
Ingredients
- 150 g active sourdough starter (100% hydration) — use lively, recently fed starter
- 325 g water, room temperature — adjust slightly if dough feels too stiff or sticky
- 500 g bread flour — higher protein helps structure and chew
- 10 g fine sea salt — enhances flavor and gluten strength
- 20 g olive oil, plus extra for greasing — adds tenderness and richness
- 10 g honey or sugar — lightly boosts browning and fermentation
Step-by-Step Method
Mix the Wet Ingredients
Whisk the active sourdough starter, water, olive oil, and honey in a large mixing bowl. Stir until the starter dissolves and the liquids look mostly uniform.
This helps distribute the yeast and bacteria evenly. Make sure the water is at room temperature so fermentation starts smoothly without shocking the starter.
Combine into a Shaggy Dough
Add the bread flour and salt directly to the bowl. Mix with your hand or a dough scraper until no dry flour remains.
Scrape the sides and bottom to incorporate everything. Stop once you have a rough, shaggy mass. Don’t knead yet; overworking now makes the dough harder to stretch later.
Rest the Dough (Autolyse)
Cover the bowl with a clean kitchen towel or plastic wrap. Let the dough rest for 30 minutes at room temperature.
Use this time to let the flour fully hydrate. This simple rest improves gluten development and dough extensibility, making later stretch-and-folds easier and more effective without additional effort.
Stretch & Fold the Dough
Uncover the bowl and begin gentle stretch-and-folds. Grab one edge of the dough, stretch it up, and fold it over the center.
Rotate the bowl and repeat several times, about 1–2 minutes total. Aim for smoother, more elastic dough. Avoid tearing. Cover again once it feels tighter and more cohesive.
Bulk Ferment with Periodic Folds
Leave the dough to bulk ferment at room temperature for 4–6 hours. During the first 2 hours, perform 2–3 additional stretch-and-fold sessions every 45–60 minutes.
Keep each session brief. Watch for increasing airiness and small bubbles. This phase builds structure and flavor while the sourdough culture multiplies.
Transfer to an Oiled Bowl
Lightly oil a medium mixing bowl. Gently loosen the dough from the sides of the original bowl with a scraper.
Turn it into the oiled bowl, seam side down. The oil prevents sticking and makes later handling easier. Cover the bowl tightly to limit drying and protect the dough surface during cold fermentation.
Cold Ferment in the Fridge
Place the covered bowl in the refrigerator for 4–8 hours or overnight. Let the dough chill slowly.
The cold temperature slows fermentation while deepening flavor. This step also firms the dough, making it less sticky and easier to shape. Keep the bowl level to avoid stretching the dough unevenly.
Warm the Dough Briefly
Remove the dough from the fridge and set it at room temperature for 30–45 minutes. Let some of the chill dissipate so the dough becomes more pliable.
Avoid letting it warm too long and overproof. You want dough that still feels cool but flexible enough to divide, shape, and stretch without tearing.
Divide into Equal Portions
Lightly flour your work surface. Turn the dough out gently to keep gas bubbles intact.
Use a dough scraper to divide it into four equal pieces by weight. Weigh each portion with a digital scale for accuracy. Try to make clean cuts rather than tearing so each piece maintains good structure.
Shape Smooth Dough Balls
Take each portion and gently tuck the edges underneath to form a tight ball. Use your hands to create surface tension by rotating and dragging the ball lightly against the counter.
Avoid degassing too much. Aim for a smooth, taut top. Repeat with all portions, then arrange them with space between to prevent sticking.
Rest the Dough Balls
Cover the dough balls loosely with a clean kitchen towel. Let them rest for 20–30 minutes at room temperature.
Allow the gluten to relax so the dough will stretch easily. This rest prevents springing back while rolling or hand-stretching. Keep them covered to avoid forming a dry skin on the surface.
Preheat Oven and Trays
Set your oven to 240°C (465°F). Place the baking sheets inside to preheat fully.
Give them at least 20 minutes to heat through. Hot trays and a hot oven create strong initial oven spring. Prepare two sheets of parchment paper while waiting so you can transfer the shaped calzones quickly and cleanly.
Roll or Stretch the Discs
Working with one dough ball at a time, lightly flour the surface and your rolling pin. Roll or gently hand-stretch the dough into a circle about 20 cm (8 inches) in diameter.
Keep the center slightly thicker than the edges to support the filling. Avoid overhandling to preserve airiness and prevent tearing.
Add Fillings and Leave a Border
Transfer the rolled dough onto a piece of parchment paper. Place your chosen fillings on one half of the circle.
Leave a 2 cm (¾ inch) clean border around the edge. Spread fillings evenly without piling too high. Moderate the filling quantity so the dough can seal properly and puff nicely while baking.
Fold and Seal the Calzone
Fold the bare half of the dough over the filling to form a half-moon. Press the edges together firmly with your fingers.
Make sure there are no gaps where filling can leak. Smooth out any trapped air pockets near the seam. Strengthen the seal with a second light press all around the edge if needed.
Crimp the Edges Securely
Crimp the sealed edge to lock everything in. Fold the edge over itself in small sections and press, or pinch along the seam with your fingers.
Work your way from one end to the other. Aim for a consistent, tight edge. Proper crimping prevents cheese and sauce from bubbling out during baking.
Brush and Vent the Tops
Brush the tops of each calzone lightly with olive oil using a pastry brush. Coat evenly for good color and a crisp surface.
If desired, cut a small steam vent on top with a sharp knife. Make a short slit, not too wide. This helps release steam and reduces the chance of bursting seams.
Transfer to Hot Baking Sheets
Slide each calzone, still on its parchment, onto the preheated baking sheets. Use the parchment as a sling to avoid deforming the dough.
Work quickly so the oven doesn’t lose much heat. Space the calzones apart so hot air can circulate. Close the oven promptly to maintain consistent baking temperature.
Bake Until Deeply Golden
Bake the calzones for 15–20 minutes. Watch for puffed, well-risen dough with deeply golden brown tops and crisp edges.
Rotate the trays halfway through if your oven heats unevenly. Look for slight blistering and firm bottoms. Adjust a minute or two if needed based on your oven’s performance.
Rest Briefly Before Serving
Remove the calzones from the oven and leave them on the trays for 5–10 minutes. Let the interiors set and cool slightly.
This rest helps melted cheese thicken and prevents burns from hot steam. Transfer to a cutting board or plates. Serve warm, slicing if desired, to reveal the bubbly, filled centers.
Ingredient Swaps
- Use up to 50% whole wheat or spelt flour (add 10–20 g extra water if the dough feels stiff).
- Replace honey with sugar or maple syrup; or omit entirely for a less sweet, slightly less tender dough.
- For dairy-free calzones, choose olive-oil-based fillings and dairy-free cheeses; for vegan dough, guarantee your starter is fed with only flour and water and use sugar/maple instead of honey.
You Must Know
– Scale • To serve a crowd or just two people: multiply or divide all ingredient weights by the same factor (e.g., ×1.5 for 6 calzones, ÷2 for 2 calzones). Each dough ball should end up around 245–255 g; staying near that weight keeps the 20 cm (8-inch) size and filling ratio consistent.
Serving Tips
- Serve with warm marinara or arrabbiata sauce on the side for dipping.
- Pair with a simple arugula salad dressed with lemon, olive oil, and Parmesan.
- Offer a trio of dips: pesto, garlic-herb butter, and roasted red pepper sauce.
- Slice calzones into wedges for sharing platters or party-style appetizers.
- Finish with a light grating of Pecorino Romano and a sprinkle of fresh basil.
Storage & Make-Ahead
Store shaped, unbaked calzones in the fridge up to 24 hours, well covered to prevent drying.
Baked calzones keep 3 days chilled; reheat at 180°C (355°F).
The dough balls also refrigerate 24 hours.
Calzones and dough both freeze well for about 2 months; thaw overnight in the fridge before baking or reheating.
Reheating
Reheat calzones gently: in a 175°C (350°F) oven wrapped in foil until warm.
In a covered skillet over low heat.
Or briefly in the microwave, then crisp in a dry pan.
Street‑Festival Calzone Traditions
Nothing captures the hum of a street festival quite like watching calzones puff and blister over open heat, their edges sealed tight around molten pockets of cheese and sauce.
When I wander those crowded lanes, I always look for the vendors who still work with slow‑fermented doughs, their hands moving by feel, not timers. The tang of sourdough drifts through smoke, mingling with roasted peppers and charred tomato.
- sizzling griddles and wood‑fired drums turning dough into speckled half‑moons
- paper cones slicked with oil, cradling calzones too hot to bite yet impossible to resist
- fillings that mirror the neighborhood—spicy sausage here, wild greens and ricotta there
- elders pressing edge crimps while children wait, wide‑eyed, for the first tear of steam
Final Thoughts
Give this sourdough calzone dough a try and see how much flavor natural fermentation brings to a simple favorite.
Once you’ve made it once, have fun tweaking the fillings, crust thickness, and bake time until it’s perfect for you.
Frequently Asked Questions
Can I Cook Sourdough Calzones in an Air Fryer Instead of the Oven?
Yes, you can. I’d air fry at 190°C (375°F), preheated, for about 10–14 minutes, turning once. You’ll hear the crust crackle, smell toasted wheat and cheese, and bite into a tender, steamy, golden pocket.
How Do Altitude Changes Affect Sourdough Calzone Dough Fermentation and Baking Time?
Altitude makes your dough rise faster and bake quicker, so I’d shorten ferments, watch for airy bubbles, then lower oven temperature slightly; you’ll hear thinner crust crackle and smell toasty aromas a few minutes sooner.
What Fillings Pair Best With the Tang of Sourdough Calzone Dough?
I love pairing that gentle tang with creamy mozzarella, garlicky ricotta, roasted mushrooms, and ribbons of prosciutto; add slow-cooked tomatoes, basil, and a whisper of chili oil, and you’ll taste warm, fragrant, firelit-kitchen comfort.
Are There Gluten-Free Adaptations for This Sourdough Calzone Dough Recipe?
Yes, you can adapt it gluten‑free. I’d invite you to swap in a strong gluten‑free bread blend, add psyllium husk for chew, then let the dough rest longer until it feels softly pillowy beneath your fingertips.
How Can I Scale This Recipe for a Large Party or Event?
You can scale it by multiplying every ingredient by your guest count, then mixing in several big bowls. I’d stagger batches, letting dough rest in cozy, floured trays, rising like soft pillows before baking.

Sourdough Calzone Dough
Equipment
- 1 large mixing bowl
- 1 medium mixing bowl
- 1 digital kitchen scale
- 1 measuring jug
- 1 Dough scraper
- 1 clean kitchen towel or plastic wrap
- 1 Rolling Pin
- 2 baking sheets
- 2 sheets parchment paper
- 1 pastry brush
Ingredients
- 150 gram active sourdough starter 100% hydration
- 325 gram water room temperature
- 500 gram bread flour
- 10 gram fine sea salt
- 20 gram olive oil plus extra for greasing
- 10 gram honey or sugar
Instructions
- In a large mixing bowl whisk together the active sourdough starter, water, olive oil, and honey until mostly dissolved.
- Add the bread flour and salt to the bowl and mix with your hand or a dough scraper until no dry flour remains and a shaggy dough forms.
- Cover the bowl with a clean kitchen towel and let the dough rest for 30 minutes at room temperature for autolyse.
- After resting, perform a series of stretch-and-folds for about 1–2 minutes until the dough feels smoother and more elastic.
- Cover the bowl again and let the dough bulk ferment at room temperature for 4–6 hours, performing 2–3 additional stretch-and-folds every 45–60 minutes during the first 2 hours.
- When the dough has risen by about 50% and looks airy with small bubbles, lightly oil a medium mixing bowl and transfer the dough into it.
- Cover tightly and refrigerate the dough for 4–8 hours or overnight for improved flavor and easier handling.
- Remove the dough from the fridge and let it sit at room temperature for 30–45 minutes to take off the chill.
- Turn the dough out onto a lightly floured surface and divide it into 4 equal portions using a dough scraper.
- Shape each portion into a tight ball by tucking the edges underneath and letting surface tension build on top.
- Cover the dough balls with a towel and let them rest for 20–30 minutes to relax the gluten.
- Preheat the oven to 240°C (465°F) and place the baking sheets inside to heat up.
- Working with one dough ball at a time, lightly flour the surface and roll or stretch it into a circle about 20 cm (8 inches) in diameter.
- Place the rolled dough on a piece of parchment paper and add your desired fillings to one half, leaving a 2 cm (¾ inch) border.
- Fold the dough over the filling to form a half-moon shape and press the edges firmly to seal.
- Crimp the sealed edge by folding it over itself or pinching with your fingers to prevent leaks.
- Brush the top of each calzone lightly with olive oil and, if desired, cut one small steam vent on top with a sharp knife.
- Carefully slide the calzones on their parchment sheets onto the preheated baking sheets in the oven.
- Bake for 15–20 minutes until the calzones are puffed, deeply golden brown, and crisp on the edges.
- Remove from the oven and let the calzones rest for 5–10 minutes before serving to allow the interior to set and cool slightly.
Notes

Cynthia Weatherford is a seasoned chef and culinary enthusiast who serves as the Recipe creator of Somonday. With decades of experience in the kitchen and a passion for exploring diverse cuisines, Cynthia brings a blend of creativity and technique to every dish. Known for transforming simple ingredients into show-stopping meals, Cynthia believes that cooking is an art form anyone can master. Dedicated to inspiring home cooks, Cynthia shares approachable recipes, pro tips, and culinary wisdom to make every meal memorable.


