There’s something about the scent of chocolate and bananas that can turn an ordinary day into pure comfort.
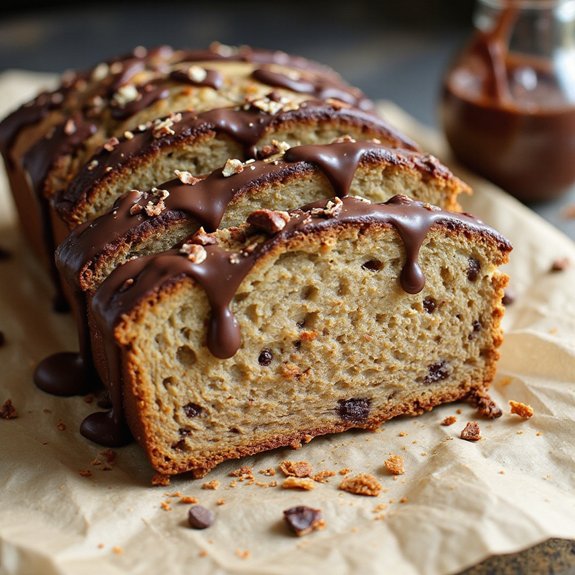
Picture a burnished loaf emerging from the oven, its cracked top glossy with melted chocolate, the kitchen filling with a warm, nutty aroma and a gentle tang from sourdough starter.
This sourdough chocolate banana bread is a cozy dessert or snack that feels indulgent yet simple, and it comes together quickly enough for weeknights or lazy Sunday afternoons.
It’s perfect for sweet-tooth fans, sourdough enthusiasts, beginners with extra starter, and anyone who loves a make-ahead treat for breakfasts, lunchboxes, or after-dinner cravings.
I first leaned on this recipe after a long week, when three spotty bananas and a neglected jar of starter stared back at me from the counter.
An hour later, we’d thick, tender slices and a quieter, happier house.
Ready to bring this dish to life?
Why You’ll Love It
- Delivers deep chocolate-banana flavor with a subtle tangy sourdough twist
- Uses up extra sourdough starter and overripe bananas—no waste
- Stays incredibly moist for days, even better-tasting on day two
- Mixes in one bowl with basic pantry ingredients and equipment
- Freezes beautifully for make-ahead breakfasts, snacks, or desserts
Ingredients
- 3 medium bananas very ripe, mashed — use very spotty bananas for best sweetness
- 120 g sourdough starter discard or unfed — bring to room temperature so it blends smoothly
- 100 g granulated sugar — balances cocoa’s bitterness
- 80 g brown sugar packed — adds moisture and caramel depth
- 2 large eggs room temperature — helps the batter emulsify evenly
- 80 ml vegetable oil neutral — keeps the crumb extra tender
- 60 ml milk room temperature — avoids shocking the batter
- 1 tsp vanilla extract — rounds out the chocolate and banana flavors
- 190 g all-purpose flour — measure accurately for proper structure
- 30 g unsweetened cocoa powder — use good-quality cocoa for rich flavor
- 1 tsp baking soda — works with banana acidity for lift
- 1 tsp baking powder — adds extra rise for a lighter loaf
- 0.5 tsp fine sea salt — sharpens overall flavor
- 120 g chocolate chips semi-sweet — fold in gently at the end
- 30 g chocolate chips extra for topping (optional) — sprinkle over batter before baking
Step-by-Step Method
Prep the Pan & Heat the Oven
Preheat the oven to 350°F (175°C). Line a 9×5-inch loaf pan with parchment paper, allowing some overhang for easy lifting.
Lightly grease any exposed sides of the pan. Set the pan aside.
Preparing the pan first guarantees the batter can go straight into the oven once mixed, preventing overproofing from the sourdough starter.
Mash the Bananas Thoroughly
Peel the very ripe bananas and place them in a mixing bowl. Mash them with a fork until mostly smooth, leaving only small lumps for texture.
Ensure there are no large chunks, which can create soggy pockets.
Properly mashed bananas distribute flavor evenly and help give the loaf a moist, tender crumb.
Combine Wet Ingredients Completely
Add the sourdough starter, granulated sugar, brown sugar, eggs, vegetable oil, milk, and vanilla extract to the mashed bananas.
Whisk until the mixture is smooth and uniform, with no visible streaks of egg or starter.
Make certain everything is at room temperature so the batter combines easily. A well-mixed wet base helps the loaf rise evenly during baking.
Whisk the Dry Ingredients Separately
In a second bowl, add the all-purpose flour, cocoa powder, baking soda, baking powder, and fine sea salt.
Whisk until the mixture looks uniform and the cocoa is fully blended.
Break up any small lumps of cocoa or flour.
Mixing dry ingredients separately ensures the leavening agents are evenly distributed and prevents uneven pockets of rise.
Fold Wet and Dry Mixtures Gently
Pour the dry ingredients into the bowl with the wet mixture.
Use a rubber spatula to fold the batter gently, scraping the sides and bottom of the bowl.
Stop as soon as no dry streaks of flour remain. Avoid vigorous mixing or beating at this stage.
Overmixing can develop gluten and make the bread dense and tough.
Stir in the Chocolate Chips Evenly
Add 120 g of semi-sweet chocolate chips to the batter. Fold them in gently with the spatula until they’re evenly distributed throughout.
Make sure you reach the bottom of the bowl so no pockets of chips collect in one area.
Evenly dispersed chocolate creates consistent flavor and texture in every slice of the finished loaf.
Fill the Pan and Top with Extra Chips
Pour the batter into the prepared loaf pan. Smooth the surface with a spatula so it bakes evenly.
Sprinkle the remaining 30 g of chocolate chips over the top, if using. Gently press them in so they adhere to the batter.
This topping adds an attractive finish and extra bursts of melty chocolate on the surface.
Bake Until Just Set and Test Doneness
Place the pan on the center rack of the preheated oven. Bake for 50–60 minutes. Start checking around 48–50 minutes.
Insert a toothpick into the center; it should come out with a few moist crumbs but no wet batter.
Tent the loaf with foil if the top browns too quickly. Avoid overbaking to keep the bread moist.
Cool in the Pan Briefly
Remove the pan from the oven and place it on a cooling rack. Let the bread cool in the pan for about 15 minutes.
This resting time helps the loaf set and makes it easier to handle.
Cooling slightly in the pan also reduces the risk of the bread breaking apart when you lift it out using the parchment overhang.
Transfer, Cool Fully, and Slice
Use the parchment paper to carefully lift the loaf from the pan and place it directly on the cooling rack.
Let it cool for at least 5 more minutes before slicing, longer if possible.
Cutting too soon can cause crumbling. Once cooled to your liking, slice into about 10 pieces.
Store leftovers wrapped at room temperature or freeze individual slices.
Ingredient Swaps
- Use melted butter or coconut oil instead of vegetable oil; swap milk with any unsweetened non‑dairy milk for a dairy-free version.
- Replace eggs with 2 “flax eggs” (2 tbsp ground flax + 6 tbsp water, rested 5–10 minutes) for an egg-free loaf.
- Use all brown sugar for extra moisture and caramel flavor, or all white sugar if that’s what you have.
- Sub whole wheat flour for up to 50% of the all-purpose flour for a heartier loaf (add 1–2 tsp extra milk if the batter seems thick).
- Swap chocolate chips with chopped chocolate, nuts, or a mix; if you’re low on cocoa powder, reduce it to 15 g and add 15 g more flour.
You Must Know
– Flavor Boost – When your bananas are only lightly speckled (not very ripe), bump the brown sugar by 20 g and add ¼ tsp extra vanilla; this compensates for the lower natural sweetness and aroma, keeping flavor balanced.
Serving Tips
- Serve slightly warm with a scoop of vanilla ice cream or whipped cream.
- Top slices with peanut butter or almond butter for a richer snack.
- Dust lightly with powdered sugar and add fresh berries for a brunch-worthy plate.
- Pair with hot coffee or cold brew for an afternoon treat.
- Warm and crumble over yogurt for a dessert-style breakfast parfait.
Storage & Make-Ahead
Store the cooled loaf tightly wrapped or in an airtight container in the fridge for up to 5 days.
This recipe is great for making ahead: the flavor improves overnight.
It also freezes well—wrap slices individually and freeze up to 3 months for quick grab-and-go snacks.
Reheating
Reheat slices gently: microwave 10–15 seconds wrapped in a damp paper towel.
Or warm in a 300°F (150°C) oven for 8–10 minutes, wrapped in foil.
Stovetop: covered skillet, low heat.
In Cafés and Bakeries
When I picture sourdough chocolate banana bread in a café or bakery, I see thick, tender slices stacked under a glass dome, their crackly chocolate-studded tops catching the light and a deep cocoa-banana aroma drifting toward the line.
I always look for a loaf with a high, rounded crown and visible chocolate chips, because that usually means a moist, well-risen crumb.
If you’re ordering a slice, don’t hesitate to ask how they serve it. I like mine gently warmed so the chocolate softens and the sourdough tang blooms, with a small pat of salted butter or a latte alongside.
And if you bake this at home, you’ll recognize it instantly on any bakery shelf—your own benchmark for what “worth it” looks and tastes like.
Final Thoughts
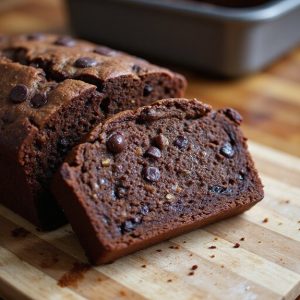
Give this sourdough chocolate banana bread a try and enjoy how rich, moist, and chocolatey it turns out.
Have fun tweaking it with your favorite add-ins—like nuts, different chocolate chips, or a sprinkle of flaky salt on top—to make it your own.
Frequently Asked Questions
Can I Make This Sourdough Banana Bread Gluten-Free Without Sacrificing Texture?
Yes, you can. I’d swap the flour for a 1:1 gluten‑free blend with xanthan, add an extra egg, and let the batter rest 15 minutes so the starches hydrate and the crumb stays tender.
How Do I Adjust Baking Time for Mini Loaves or Muffins?
I’d bake mini loaves 25–35 minutes and muffins 18–22 minutes at 350°F, checking early. I’d look for domed tops, fragrant chocolate-banana scent, and a toothpick with moist crumbs, not wet batter.
Can I Add Protein Powder Without Drying Out the Banana Bread?
Yes, you can, and I’d keep it gentle: replace 30–40 g of flour with protein powder, then add 1–2 tablespoons extra milk or mashed banana so the batter stays thick, glossy, and luxuriously moist.
How Do High Altitude Conditions Affect This Sourdough Banana Bread Recipe?
At high altitude, I’d lower baking soda and powder slightly, add a tablespoon more milk, and bake a bit hotter or shorter. You’ll keep that plush crumb, crackly top, and rich chocolate pockets perfectly tender.
Sourdough Chocolate Banana Bread
Equipment
- 2 Mixing bowls
- 1 Whisk
- 1 Rubber spatula
- 1 9×5-inch loaf pan
- 1 parchment paper sheet to line pan
- 1 Cooling rack
- 1 Measuring cups set
- 1 Measuring spoons set
Ingredients
- 3 medium bananas very ripe mashed
- 120 gram sourdough starter discard or unfed
- 100 gram granulated sugar
- 80 gram brown sugar packed
- 2 large eggs room temperature
- 80 milliliter vegetable oil neutral
- 60 milliliter milk room temperature
- 1 teaspoon vanilla extract
- 190 gram all-purpose flour
- 30 gram unsweetened cocoa powder
- 1 teaspoon baking soda
- 1 teaspoon baking powder
- 0.5 teaspoon fine sea salt
- 120 gram chocolate chips semi-sweet
- 30 gram chocolate chips extra for topping optional
Instructions
- Preheat the oven to 350°F (175°C) and line a 9×5-inch loaf pan with parchment paper.
- In a mixing bowl mash the ripe bananas with a fork until mostly smooth.
- Add sourdough starter, granulated sugar, brown sugar, eggs, vegetable oil, milk, and vanilla extract to the bananas and whisk until well combined.
- In a separate bowl whisk together the flour, cocoa powder, baking soda, baking powder, and salt.
- Add the dry ingredients to the wet ingredients and gently fold with a spatula until just combined and no dry streaks remain.
- Fold in 120 g of chocolate chips until evenly distributed through the batter.
- Pour the batter into the prepared loaf pan and smooth the top with a spatula.
- Sprinkle the extra 30 g chocolate chips evenly over the top of the batter if using.
- Bake for 50–60 minutes or until a toothpick inserted in the center comes out with just a few moist crumbs.
- Remove the pan from the oven and let the bread cool in the pan for 15 minutes.
- Carefully lift the bread out using the parchment and transfer it to a cooling rack to cool for at least 5 more minutes before slicing.
Notes

Cynthia Weatherford is a seasoned chef and culinary enthusiast who serves as the Recipe creator of Somonday. With decades of experience in the kitchen and a passion for exploring diverse cuisines, Cynthia brings a blend of creativity and technique to every dish. Known for transforming simple ingredients into show-stopping meals, Cynthia believes that cooking is an art form anyone can master. Dedicated to inspiring home cooks, Cynthia shares approachable recipes, pro tips, and culinary wisdom to make every meal memorable.