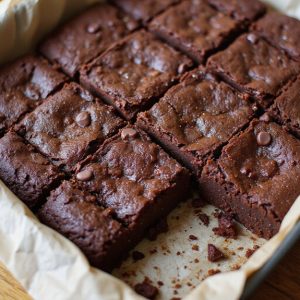
There’s something about a pan of warm brownies emerging from the oven, edges just set and centers still fudgy, that makes the whole kitchen feel softer.
These sourdough discard brownies are a cozy dessert with crackly tops, deep cocoa aroma, and ribbons of tangy richness from starter that might otherwise be wasted—and they’re ready in about 40 minutes.
They’re perfect for sweet‑tooth fans, thrifty bakers, and anyone just starting out with sourdough who’s overwhelmed by all that discard.
I still remember a rainy Tuesday when my jar of starter was overflowing, I was tired from work, and dessert needed to happen fast.
This recipe turned a “what do I do with all this?” moment into a tray of glossy, chocolatey comfort that disappeared before the night was over.
They shine for last‑minute cravings, easy entertaining, and casual Sunday suppers.
Ready to bring this dish to life?
Why You’ll Love It
- Delivers deep, rich chocolate flavor with a subtle tangy twist
- Reduces food waste by putting extra sourdough discard to delicious use
- Balances fudgy centers with perfectly chewy, crackly edges
- Uses simple pantry ingredients and one pan for easy cleanup
- Freezes beautifully, so you can bake once and enjoy for days
Ingredients
- 170 g unsalted butter, melted — good-quality butter deepens flavor
- 170 g dark chocolate, chopped — 60–70% cocoa melts and tastes best
- 150 g granulated sugar — standard white sugar keeps texture balanced
- 80 g brown sugar, packed — adds moisture and caramel notes
- 2 large eggs, room temperature — room temp helps batter emulsify
- 5 ml vanilla extract — real vanilla gives better aroma
- 120 g sourdough discard, 100% hydration — unfed, not overly sour, up to 1 week old
- 60 g all-purpose flour — regular unbleached flour works well
- 25 g unsweetened cocoa powder — use a good dark cocoa for richer taste
- 3 g fine sea salt — fine grain disperses evenly through batter
- 80 g semi-sweet chocolate chips — fold in for extra pockets of chocolate
Step-by-Step Method
Prep the pan and oven
Preheat your oven to 350°F (175°C). Line an 8×8-inch baking pan with parchment paper, leaving some overhang on two sides to create handles. Smooth the parchment into the corners.
This prevents sticking and makes it easy to lift the brownies out after cooling, giving cleaner cuts and better presentation.
Melt the butter and chocolate
Combine the chopped dark chocolate and butter in a small heatproof bowl. Microwave in 20–30 second bursts, stirring between each until completely smooth and glossy.
Don’t overheat. Once melted, set the mixture aside to cool slightly. This helps prevent cooking the eggs when you mix everything together later.
Whisk the sugars and eggs
Add the granulated sugar, brown sugar, eggs, and vanilla to a medium mixing bowl. Whisk vigorously for 1–2 minutes. Aim for a thickened, slightly lightened mixture.
This step dissolves the sugars and incorporates some air, which helps create a fudgy yet slightly chewy brownie texture rather than a dense, heavy one.
Combine with melted chocolate
Pour the slightly cooled melted chocolate-butter mixture into the egg-sugar mixture. Whisk until the batter looks uniform, dark, and glossy with no streaks. Scrape the sides and bottom of the bowl as needed.
Making sure the mixture is well combined at this stage builds a smooth base for the sourdough and dry ingredients.
Incorporate the sourdough discard
Add the sourdough discard to the chocolate mixture. Whisk until the batter appears completely smooth and no pale streaks of discard remain. Make sure to break up any lumps.
This adds subtle tang and moisture without making the brownies taste like bread. A well-mixed batter makes for even texture throughout the finished brownies.
Sift and mix the dry ingredients
In a separate bowl, sift together the all-purpose flour, cocoa powder, and fine sea salt.
Sifting removes lumps and evenly distributes the cocoa and salt. This prevents pockets of dry ingredients. Lightly whisk the sifted mixture to combine.
Having the dry components ready simplifies folding them into the wet batter without overworking.
Fold in the dry mixture gently
Sprinkle the dry ingredients over the wet mixture. Use a rubber spatula to fold gently, scraping the bottom and sides of the bowl. Turn the batter over itself until no dry spots remain. Stop as soon as it looks uniform.
Avoid vigorous stirring, as overmixing can develop gluten and lead to tougher, cakier brownies.
Add the chocolate chips
Tip the chocolate chips into the batter. Use the spatula to fold them in just until evenly dispersed.
Make sure they’re spread throughout the batter so each brownie square gets some chocolate bits.
Don’t continue mixing more than necessary. Overmixing at this stage can still affect texture and make the brownies less tender.
Spread batter into the pan
Scrape the thick batter into the prepared pan, using the spatula to get every bit. Spread it into an even layer, pushing gently into the corners. Smooth the top so it bakes uniformly without high spots that cook faster.
An even surface helps ensure consistent doneness and attractive, level brownie squares.
Bake until just set
Place the pan in the preheated oven. Bake for 22–28 minutes, checking near the earlier time. Insert a toothpick into the center; it should come out with a few moist crumbs, not raw batter.
Remove the pan as soon as this stage is reached. Slight underbaking keeps the brownies fudgy rather than dry or cakey.
Cool the brownies in the pan
Set the pan on a wire cooling rack. Let the brownies cool in the pan for at least 30 minutes. This resting time allows the structure to set and the crumb to firm up.
Cutting too early causes crumbling and messy edges. Cooling also helps the flavors develop and the texture become properly chewy.
Lift, slice, and serve
Use the parchment overhang to lift the cooled brownie slab from the pan onto a cutting board.
Press the parchment flat so it doesn’t wrinkle under the brownies. Use a sharp knife to cut into 12 even squares, wiping the blade between cuts for clean edges.
Serve at room temperature, or chill briefly for neater slices.
Ingredient Swaps
- Butter: Swap with an equal amount of melted coconut oil or a neutral vegetable oil; for a dairy-free option, use vegan butter 1:1.
- Dark chocolate: Use any baking chocolate (semi-sweet, milk, or a mix); in a pinch, use 25 g cocoa powder + 25 g extra butter for every 56–60 g chocolate replaced.
- Sugars: Brown and white sugar can be interchanged; using all brown sugar makes chewier, slightly denser brownies, while all white sugar makes them a bit shinier and crisper on top.
- Flour: Substitute up to 1:1 with a gluten-free all-purpose blend; for a more wholesome option, replace up to half with whole wheat or spelt flour.
- Sourdough discard: Any wheat-based discard at 100% hydration works; for slightly thicker discard, reduce flour by 1–2 Tbsp, and for runny discard, add 1–2 Tbsp extra flour.
You Must Know
– Scale – For a 9×13-inch pan, use 1.5× the recipe (e.g., 255 g butter, 255 g dark chocolate, 180 g discard) and start checking doneness around 25 minutes; the larger volume needs more time, but the same “moist crumbs” test applies.
Serving Tips
- Serve slightly warm with a scoop of vanilla ice cream and a drizzle of chocolate sauce.
- Plate chilled squares with fresh berries and a dusting of powdered sugar.
- Pair with strong coffee or espresso to balance the brownies’ rich sweetness.
- Cut into bite-sized cubes, skewer with toothpicks, and serve on a dessert platter.
- Top each brownie with whipped cream and a sprinkle of flaky sea salt.
Storage & Make-Ahead
Brownies keep in the fridge, tightly wrapped, for up to 5 days and taste even fudgier the next day.
You can make them a day ahead for parties.
They also freeze very well: wrap individual squares and store up to 2 months.
Thaw at room temperature or briefly warm before serving.
Reheating
Reheat brownies gently to preserve moisture.
Microwave 10–15 seconds, warm in a 300°F (150°C) oven for 5–10 minutes, or briefly steam in a covered pan on the stovetop.
Bake Sale Nostalgia
Sometimes just the smell of these sourdough discard brownies in the oven pulls me straight back to school gym bake sales—the folding tables lined with handwritten signs, the waxy paper plates, and that warm, sugary air.
I remember plastic wrap fogged with steam, and the way chocolate smudged across my fingers as I tried to decide which treat to pick.
When I bake these for you now, I’m chasing that same feeling: the crackle of the brownie’s top as the knife slips through, the dense, fudgy center still slightly warm, the hint of tang from the discard that makes the chocolate taste deeper, almost grown‑up.
It feels like packing up a little square of childhood and pressing it into your hand.
Final Thoughts
Give these sourdough discard brownies a try and see just how rich, fudgy, and flavorful your “extra” starter can be.
Don’t be afraid to tweak the mix-ins or sweetness to make the recipe your own!
Frequently Asked Questions
Can I Make These Brownies Gluten-Free While Still Using Sourdough Discard?
Yes, you can, as long as your discard comes from a gluten-free starter. I’d swap the flour for a 1:1 gluten-free blend, bake gently, and enjoy the same fudgy, slightly tangy, chocolate-scented squares.
How Do Altitude or Climate Affect Baking Time and Brownie Texture?
Altitude and humidity nudge baking time and texture; higher elevations need longer baking and sometimes drier batter, while damp climates can soften edges. I’d watch for set, fragrant edges and moist, dense crumbs, not the clock.
Is It Safe for Kids to Eat Brownies Made With Fermented Sourdough Discard?
Yes, it’s safe when the brownies bake fully, since heat kills wild yeast and bacteria. I picture your kids’ chocolate-smeared smiles, warm crumbs on small fingers, and a gentle tang that simply deepens the cocoa richness.
Can I Convert This Recipe for a Large Sheet Pan or Half-Sheet Pan?
Yes, you can. I’d double the recipe for a 9×13 pan, triple it for a half-sheet. Watch for set edges, glossy center, and that fragrant, cocoa-rich steam curling up when they’re perfectly fudgy.
How Do I Adjust if Using High-Percentage Dark Chocolate (70% or More)?
Use 10–20% more sugar and add 1–2 tablespoons extra butter; if the batter feels thick, I’d splash in a tablespoon of milk. Taste the warm, glossy batter—it should feel lush, not sharply bitter.
Sourdough Discard Brownies
Equipment
- 1 8×8-inch baking pan
- 2 medium mixing bowls
- 1 small heatproof bowl (for melting chocolate/butter)
- 1 Whisk
- 1 Rubber spatula
- 1 measuring cup set
- 1 measuring spoon set
- 1 sheet of parchment paper
- 1 wire cooling rack
- 1 knife (for slicing brownies)
Ingredients
- 170 gram unsalted butter melted
- 170 gram dark chocolate chopped
- 150 gram granulated sugar
- 80 gram brown sugar packed
- 2 large eggs room temperature
- 5 milliliter vanilla extract
- 120 gram sourdough discard 100% hydration
- 60 gram all-purpose flour
- 25 gram unsweetened cocoa powder
- 3 gram fine sea salt
- 80 gram chocolate chips semi-sweet
Instructions
- Preheat the oven to 350°F (175°C) and line the 8×8-inch baking pan with parchment paper, leaving overhang for easy removal.
- In a small heatproof bowl, melt the butter and chopped dark chocolate together in the microwave in 20–30 second bursts, stirring until smooth, then set aside to cool slightly.
- In a medium mixing bowl, whisk together the granulated sugar, brown sugar, eggs, and vanilla extract until thickened and slightly lightened in color, about 1–2 minutes.
- Pour the melted chocolate mixture into the egg-sugar mixture and whisk until fully combined and glossy.
- Whisk in the sourdough discard until the batter is smooth and no streaks of discard remain.
- In a separate bowl, sift together the all-purpose flour, cocoa powder, and fine sea salt.
- Gently fold the dry ingredients into the wet mixture with a rubber spatula just until no dry spots remain, avoiding overmixing.
- Fold in the chocolate chips until evenly distributed throughout the batter.
- Scrape the batter into the prepared pan, smoothing the top into an even layer with the spatula.
- Bake for 22–28 minutes, or until the edges are set and a toothpick inserted in the center comes out with a few moist crumbs but not wet batter.
- Place the pan on a wire cooling rack and let the brownies cool in the pan for at least 30 minutes.
- Use the parchment overhang to lift the cooled brownies from the pan, transfer to a cutting board, and slice into 12 squares.
Notes

Cynthia Weatherford is a seasoned chef and culinary enthusiast who serves as the Recipe creator of Somonday. With decades of experience in the kitchen and a passion for exploring diverse cuisines, Cynthia brings a blend of creativity and technique to every dish. Known for transforming simple ingredients into show-stopping meals, Cynthia believes that cooking is an art form anyone can master. Dedicated to inspiring home cooks, Cynthia shares approachable recipes, pro tips, and culinary wisdom to make every meal memorable.