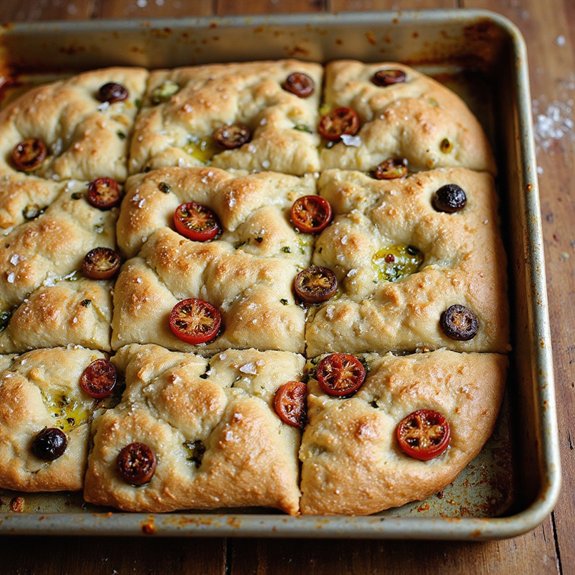
There’s something about pulling a tray of golden, olive‑oil–kissed focaccia from the oven that makes the whole kitchen feel warmer.
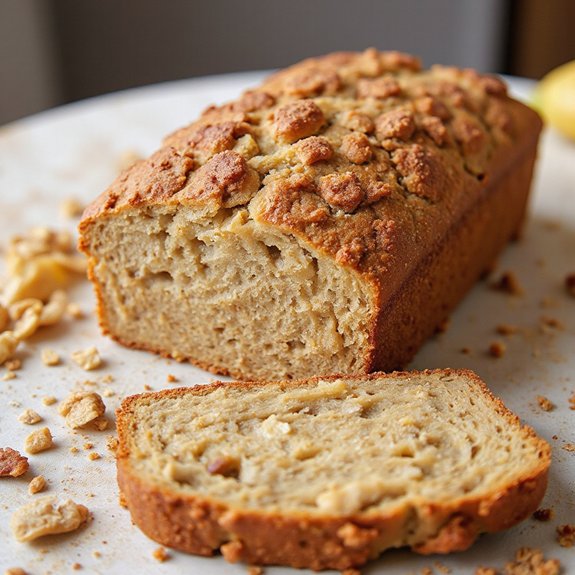
This sourdough focaccia is a cozy, shareable bread—light yet satisfyingly chewy, with a crisp, crackling crust and deep, tangy flavor.
It’s not “instant,” but for a yeast bread it’s wonderfully low-effort: most of the work happens while the dough quietly rises.
This recipe is perfect for beginners who want to explore sourdough without fuss, busy home cooks who love make-ahead magic, and anyone who lives for good bread at gatherings.
I remember one Sunday when friends dropped by unexpectedly; I’d this dough resting in the fridge, and within an hour the house smelled of roasted garlic, rosemary, and toasted wheat.
We tore off pieces, dipped them in olive oil, and called it dinner.
It shines at casual parties, easy lunches, or comforting Sunday suppers. Ready to bring this bread to life?
Why You’ll Love It
- Delivers big sourdough tang using discard you’d normally throw away
- Creates bakery-style focaccia with crisp edges and fluffy, open crumb
- Uses simple pantry staples and one easy pan, no special tools
- Fits your schedule with room-temperature or overnight fridge rise options
- Welcomes endless toppings: herbs, tomatoes, olives, or whatever’s on hand
Ingredients
- 240 g sourdough discard, unfed — use active, recently fed discard for best flavor
- 360 g bread flour — higher protein keeps focaccia chewy and airy
- 260 g water, room temperature — cool tap water is fine unless your kitchen is very hot
- 7 g fine sea salt — finer grains dissolve more evenly in the dough
- 4 g instant yeast — quick, reliable rise alongside the discard
- 30 g olive oil — a fruity extra-virgin oil adds rich flavor to the crumb
- Olive oil, extra for greasing pan — a generous layer gives a crisp, almost fried bottom
- 10 g olive oil, for topping — helps the surface brown and stay tender
- 5 g flaky sea salt, for topping — adds crunch and pops of salinity
- 5 g fresh rosemary, chopped (optional) — classic herbal aroma that pairs well with olive oil
- 10 g olives, sliced (optional) — choose briny, meaty olives for savory bites
- 30 g cherry tomatoes, halved (optional) — use firm, sweet tomatoes so they don’t waterlog the dough
Step-by-Step Method
Mix the starter and water
Whisk the sourdough discard and room‑temperature water in a mixing bowl until mostly smooth.
Break up any thick lumps with the whisk or a spoon.
Aim for a milky, cohesive mixture so the discard disperses evenly.
This helps the dough hydrate uniformly and makes it easier to mix in the flour and yeast.
Form a shaggy dough
Add the bread flour, fine sea salt, and instant yeast to the bowl.
Stir with a wooden spoon or spatula until no dry flour remains.
Scrape the sides and bottom so everything is incorporated.
The dough should look rough and shaggy at this stage, not smooth.
Don’t worry about kneading yet; just combine thoroughly.
Incorporate the olive oil
Pour in 30 g of olive oil and mix it into the dough.
Fold and press with the spoon until the oil disappears and the dough becomes cohesive and slightly sticky.
Make sure there are no slick oil pockets.
The dough should feel soft and elastic.
This added fat will help create a tender crumb and crisp, flavorful crust.
Rest the dough briefly
Cover the bowl with a clean kitchen towel or plastic wrap.
Leave it at room temperature for about 30 minutes.
This rest, called autolyse, lets the flour hydrate fully and gluten begin forming on its own.
The dough will relax and become easier to stretch, so you can build structure without heavy kneading later.
Stretch and fold the dough
After resting, perform stretch‑and‑folds.
With a damp or oiled hand, grab one edge of the dough, pull it up, then fold it over itself.
Rotate the bowl and repeat 4–6 times.
This gently strengthens the gluten network.
The dough should feel smoother and slightly tighter by the end of this short step.
Let the dough rise until puffy
Cover the bowl again and let the dough rise at room temperature for 1.5–2 hours.
Watch for it to become noticeably puffy and roughly double in volume.
Small bubbles may appear on the surface.
Avoid very warm spots that could overproof the dough.
This bulk rise develops flavor and light, airy texture.
Prepare the baking pan
Generously oil a 9×13‑inch baking pan with olive oil, coating the bottom and sides thoroughly.
Use your fingers or a pastry brush to spread an even layer.
Don’t skimp; the oil helps prevent sticking and creates a crisp, almost fried bottom crust.
Set the pan aside while the dough finishes rising.
Transfer the dough gently
Once risen, carefully scrape the dough from the bowl into the oiled pan.
Use a spatula or oiled hands to lift and tip it out without tearing or deflating it too much.
Let it settle naturally in the center.
Handle it softly so you keep the air bubbles you built during the first rise.
Stretch the dough to the edges
With lightly oiled fingertips, gently press and stretch the dough toward the pan edges.
Work slowly, easing it outward without forcing it.
If it springs back, pause for a few minutes to let the gluten relax, then continue.
Aim for an even thickness.
Avoid pressing out all the air for a light, open crumb.
Proof until very puffy
Cover the pan loosely with a towel or plastic wrap.
Let the dough rest for 30–45 minutes at room temperature.
It should become very puffy and jiggly when you gently shake the pan.
This final proof is key for airy focaccia.
Meanwhile, preheat your oven to 220°C (425°F) so it’s fully hot.
Make the flavored oil
In a small bowl, combine 10 g of olive oil with chopped fresh rosemary, if using.
Stir to distribute the herbs evenly.
This simple mixture will infuse the focaccia with aroma and flavor as it bakes.
Keep it nearby so you can drizzle it over the dough right after dimpling for best coverage.
Dimple the risen dough
When the dough is fully puffed, oil your fingertips well.
Press them straight down into the dough to create deep dimples all over the surface.
Go almost to the bottom without tearing through.
Work across the entire pan.
These dimples help hold the oil, toppings, and steam, creating classic focaccia texture.
Add oil and toppings
Drizzle the rosemary oil evenly over the dimpled dough, letting it pool in the indentations.
Scatter halved cherry tomatoes and sliced olives on top, if using, pressing them gently into the dimples so they stay put.
Finish by sprinkling flaky sea salt evenly across the surface for crunch and bright flavor.
Bake until golden and crisp
Place the pan on the center rack of the preheated oven.
Bake for 20–25 minutes, until the focaccia is deeply golden and crisp at the edges.
Rotate the pan halfway if your oven browns unevenly.
The bottom should be well colored.
Avoid underbaking, which can leave the interior dense or gummy.
Cool briefly before slicing
Remove the pan from the oven and let the focaccia cool for 10–15 minutes.
This short rest allows the crumb to set so slices stay light and not doughy.
Loosen the edges with a spatula if needed, then lift or cut pieces directly in the pan.
Serve warm or at room temperature.
Ingredient Swaps
- Use all-purpose flour instead of bread flour; reduce water by 10–20 g if the dough feels too loose.
- Replace instant yeast with 6 g active dry yeast (bloom in a bit of the recipe water first).
- For dairy-free/vegan, the recipe is already suitable—just make certain toppings (e.g., olives, pesto) are dairy-free.
- Swap rosemary for other hardy herbs (thyme, oregano, sage) and use any neutral oil if olive oil is too pricey or unavailable.
- Top with whatever’s local/seasonal: sliced onions, peppers, potatoes, or coarse local sea salt in place of flaky salt.
You Must Know
– Flavor Boost – To deepen flavor without extra sourness, chill the dough tightly covered in the fridge for 8–12 hours right after the first room-temperature rise; use it straight from the fridge, giving it 45–60 minutes in the pan to puff until very jiggly before dimpling and topping—this slow ferment builds complexity and a more aromatic crumb.
Serving Tips
- Serve warm squares with olive oil and balsamic for dipping.
- Pair with Italian antipasto: cured meats, cheeses, marinated vegetables.
- Use as sandwich bread, slicing horizontally and stuffing with grilled vegetables or cold cuts.
- Cut into thin strips for soup or salad dunkers.
- Top with fresh mozzarella and basil, then briefly broil for mini pizzas.
Storage & Make-Ahead
Store cooled focaccia in an airtight container in the fridge for up to 4 days.
Rewarm at 180°C/350°F to refresh.
The dough can be refrigerated after the first rise for up to 12 hours.
Baked focaccia also freezes well, tightly wrapped, for up to 2 months.
Reheating
Reheat slices gently in a low oven (160°C/325°F) on a tray until warm.
For quick reheating, use a brief, low‑power microwave burst, or warm in a covered skillet on low.
Focaccia in Italian Feasts
Even before you taste it, focaccia announces a feast: the pans come to the table glistening with olive oil, edges crackling, rosemary perfume drifting through the room like a promise.
In Italy, I’ve watched conversations pause as that scent arrives, everyone instinctively reaching for a piece.
- I tear off a corner and listen for that faint crunch before the steam escapes.
- I drag the airy crumb through peppery olive oil and taste sunlight and stone mills.
- I set slabs beside cured meats, cheeses, and marinated vegetables, and the colors suddenly make sense.
- I notice how hands that don’t share a language still meet over the same golden square.
That’s what focaccia does at a feast: it gathers, quietly, irresistibly.
Final Thoughts
Give this sourdough discard focaccia a try and see how easy (and delicious) homemade bread can be.
Once you’ve made it once, have fun tweaking the toppings and herbs to make it completely your own.
Frequently Asked Questions
Can I Make This Focaccia Entirely Without Commercial Yeast, Using Starter Only?
Yes, you can. Use bubbly, recently fed starter, increase it to about 30–35%, skip instant yeast, and lengthen rises dramatically. Watch the dough swell, smell tangy buttered toast, and bake when it’s trembling, airy, and alive.
How Do Altitude or Climate Affect Rising Times for This Focaccia?
They change everything: at high altitude or in dry heat, I’d shorten rises and watch the dough, not the clock; in humidity or chill, I’d lengthen them, waiting for that trembling, marshmallowy puff.
Is It Possible to Freeze the Unbaked Focaccia Dough Successfully?
Yes, you can freeze it. I chill the dough after the first rise, wrap it snugly, then freeze. When you’re ready, thaw slowly in the fridge, let it puff again, then dimple and bake.
What’s the Best Way to Adapt This Recipe for a Cast-Iron Skillet?
Use a 10–12″ skillet, slick it with lavish olive oil, and press the dough to the edges. I’d proof until tremblingly puffy, then bake slightly hotter, savoring that shattering bronze, almost-fried crust.
How Can I Convert These Gram Measurements to Cups Accurately?
You can’t convert grams to cups precisely; densities shift like sand. I’d keep the scale, but if you must, use a trusted online converter and note how the dough feels—silky, elastic, softly sticky.

Sourdough Discard Focaccia Bread
Equipment
- 2 Mixing bowls
- 1 Wooden spoon or spatula
- 1 Kitchen scale
- 1 Measuring spoons set
- 1 9×13 inch baking pan or similar
- 1 small bowl (for oil mixture)
- 1 clean kitchen towel or plastic wrap
- 1 pastry brush (optional
Ingredients
- 240 gram sourdough discard unfed
- 360 gram bread flour
- 260 gram water room temperature
- 7 gram fine sea salt
- 4 gram instant yeast
- 30 gram olive oil plus extra for greasing pan
- 10 gram olive oil for topping
- 5 gram flaky sea salt for topping
- 5 gram fresh rosemary optional; chopped
- 10 gram olives optional; sliced
- 30 gram cherry tomatoes optional; halved
Instructions
- In a mixing bowl, whisk together sourdough discard and water until mostly smooth.
- Add bread flour, fine sea salt, and instant yeast to the bowl and mix with a wooden spoon until a shaggy dough forms.
- Add 30 g olive oil and continue mixing until the oil is incorporated and the dough is cohesive and slightly sticky.
- Cover the bowl with a clean kitchen towel or plastic wrap and let the dough rest for 30 minutes at room temperature.
- After 30 minutes, perform a set of stretch-and-folds by pulling up one side of the dough and folding it over itself 4–6 times, turning the bowl as you go.
- Cover again and let the dough rise at room temperature for 1.5–2 hours, or until noticeably puffy and roughly doubled.
- Generously grease the baking pan with olive oil, making sure the bottom and sides are well coated.
- Gently transfer the risen dough to the prepared pan, being careful not to deflate it too much.
- With oiled fingertips, gently stretch and press the dough toward the edges of the pan, letting it relax for a few minutes if it springs back.
- Cover the pan lightly and let the dough rest for 30–45 minutes, until very puffy and jiggly.
- Preheat the oven to 220°C (425°F) during the final rise.
- In a small bowl, mix 10 g olive oil with the chopped rosemary if using.
- When the dough is ready, use oiled fingertips to press deep dimples all over the surface of the dough.
- Drizzle the rosemary olive oil mixture evenly over the dough.
- Scatter cherry tomatoes and olives over the top, gently pressing them into the dimples if using.
- Sprinkle flaky sea salt evenly over the surface.
- Place the pan in the preheated oven and bake for 20–25 minutes, until golden brown and crisp around the edges.
- Remove the focaccia from the oven and let it cool in the pan for at least 10–15 minutes before slicing.
Notes

Cynthia Weatherford is a seasoned chef and culinary enthusiast who serves as the Recipe creator of Somonday. With decades of experience in the kitchen and a passion for exploring diverse cuisines, Cynthia brings a blend of creativity and technique to every dish. Known for transforming simple ingredients into show-stopping meals, Cynthia believes that cooking is an art form anyone can master. Dedicated to inspiring home cooks, Cynthia shares approachable recipes, pro tips, and culinary wisdom to make every meal memorable.