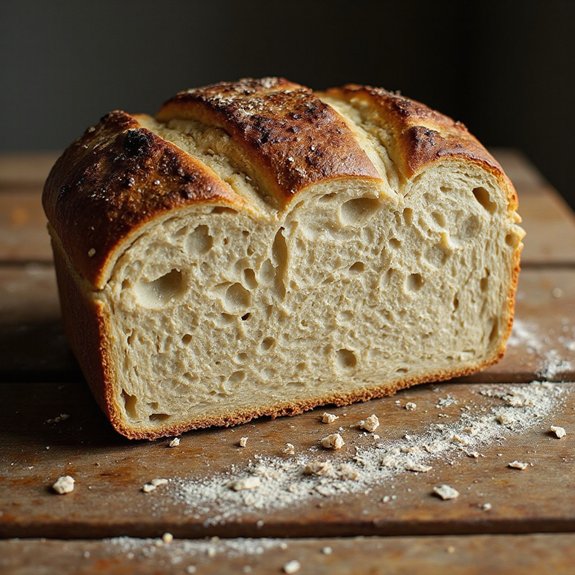
There’s something about tearing into a warm, golden loaf that fills the whole kitchen with comfort.
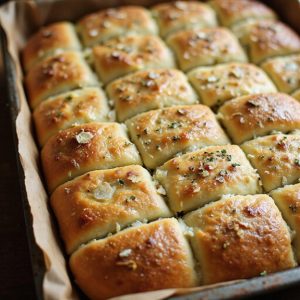
Picture a rustic round of sourdough, its crust brushed with butter and flecked with parsley, each pull-apart piece oozing with melted garlic butter and stretching ribbons of cheese.
This is cozy, shareable bread at its best—perfect as a comforting side for hearty soups and pastas, or as a star appetizer that’s ready in about an hour once your dough is prepped.
It’s ideal for comfort seekers, families, and anyone who loves to entertain without fuss.
On a rainy Sunday, this bread once turned a simple pot of tomato soup into a slow, lingering family dinner, the kind where everyone stays just a little longer at the table.
It shines for Sunday suppers, casual gatherings, and last-minute cravings when you need something irresistibly warm and welcoming. Ready to bring this dish to life?
Why You’ll Love It
- Delivers bold garlicky, herby, cheesy flavor in every fluffy bite
- Makes the coziest shareable centerpiece for dinners, parties, or game days
- Lets your active sourdough starter shine in a fun, impressive loaf
- Pulls apart easily, perfect for dipping into soups, sauces, and spreads
- Adapts effortlessly to different herbs, cheeses, and spice levels
Ingredients
- 240 g sourdough starter — 100% hydration, active and bubbly for best rise
- 240 ml warm milk — about 30°C / 86°F to keep the starter happy
- 50 g granulated sugar — gently boosts browning and fermentation
- 1 large egg — at room temperature so it mixes smoothly
- 75 g unsalted butter, melted — cool slightly so it doesn’t cook the egg
- 500 g bread flour — higher protein for a strong, fluffy structure
- 9 g fine sea salt — enhances flavor and gluten strength
- 60 g unsalted butter, melted — base for the garlic-herb coating
- 4 cloves garlic, finely minced — fresh for maximum aroma
- 10 g fresh parsley, finely chopped — adds bright herbal flavor
- 30 g grated Parmesan cheese — use real Parmigiano-Reggiano if possible
- 2 g dried oregano — rub between fingers to release oils
- 2 g dried thyme — pairs well with garlic and butter richness
- 2 g flaky sea salt — sprinkle on top for crunch and finish
Step-by-Step Method
Feed and Activate the Starter
Use a bubbly, recently fed starter for the best rise and flavor. Feed your starter 4–8 hours before mixing, depending on your room temperature.
Make certain it has at least doubled, smells pleasantly sour, and passes the float test in water.
Avoid using sluggish or collapsed starter, as it will slow fermentation markedly.
Mix the Wet Ingredients
Whisk the sourdough starter, warm milk, sugar, egg, and melted butter in a large bowl. Make certain the milk is warm, not hot, to avoid killing the starter.
Whisk until the mixture looks smooth and uniform with no streaks of egg. This step distributes the starter evenly, helping the dough ferment consistently.
Combine with Flour and Salt
Add the bread flour and fine sea salt directly to the wet mixture. Use a silicone spatula to stir until a rough, shaggy dough forms and no visible dry flour remains.
Scrape down the sides of the bowl as you mix. Don’t worry about smoothness yet; you’re just hydrating all the flour.
Knead Until Smooth and Elastic
Knead the dough by hand or with a stand mixer and dough hook on medium-low speed. Work for 8–10 minutes until the dough becomes smooth, stretchy, and only slightly tacky.
Avoid adding too much extra flour. Test by stretching a small piece; it should form a thin “windowpane” without tearing easily.
Let the Dough Rise Until Puffy
Shape the dough into a smooth ball and place it in a lightly oiled bowl. Cover with a kitchen towel or plastic wrap.
Let it rise at warm room temperature for 2–3 hours, or until puffy and nearly doubled. Check visually rather than strictly by the clock, as sourdough timing can vary.
Prepare the Garlic-Herb Butter
Melt the butter and let it cool slightly so it remains liquid but not scorching. Stir in the minced garlic, chopped parsley, grated Parmesan, dried oregano, and dried thyme.
Mix until everything is evenly dispersed. Set the bowl aside. Reserve this mixture for brushing the dough later, keeping it at room temperature.
Deflate and Turn Out the Dough
Gently press down on the risen dough to release excess gas without tearing it aggressively. Turn it out onto a lightly floured work surface.
Dust your hands and the top of the dough lightly with flour if needed. Keep additional flour minimal to maintain a soft, tender texture in the finished bread.
Roll into a Large Rectangle
Use a rolling pin to roll the dough into a rectangle about 30×40 cm (12×16 inches). Rotate the dough occasionally to maintain an even shape and prevent sticking.
Aim for an even thickness across the entire surface. Lightly dust with flour only if the dough begins to stick to the rolling pin or counter.
Brush with Garlic-Herb Butter
Brush the entire dough surface evenly with the garlic-herb butter mixture. Use a pastry brush to reach all edges and corners.
Reserve 1–2 tablespoons of the mixture in the bowl for topping before baking. Make certain garlic and herbs are well distributed so each pull-apart piece has flavor.
Cut Dough into Even Pieces
Use a bench scraper or sharp knife to cut the dough rectangle into strips about 5 cm (2 inches) wide. Then cut those strips crosswise into 5×5 cm (2×2 inch) squares or rectangles.
Aim for fairly even pieces so they bake uniformly. Gently separate them if they begin to stick together.
Stack and Arrange in the Pan
Grease a 9×5-inch loaf pan or 8–9 inch round pan thoroughly. Stack several dough squares loosely together without pressing them tightly.
Arrange the stacks upright, cut sides facing up, in the pan. Leave small gaps between stacks to allow room for expansion during proofing and baking.
Proof Until Light and Puffy
Cover the pan loosely with a kitchen towel or plastic wrap. Let the dough proof at warm room temperature for 60–90 minutes.
Watch for visible puffiness and dough rising close to the top of the pan. Adjust timing to your kitchen temperature; cooler rooms may need extra time.
Preheat the Oven Fully
Preheat your oven to 190°C (375°F) about 20 minutes before baking. Make certain the rack is positioned in the middle for even heat circulation.
Allow the oven to reach full temperature before placing the pan inside. Proper preheating promotes good oven spring and a nicely browned crust.
Brush and Sprinkle Before Baking
Right before baking, brush the top of the proofed dough with the reserved garlic-herb butter. Reach into crevices as best you can without deflating the dough.
Sprinkle flaky sea salt evenly over the top. This final seasoning enhances flavor and adds a pleasant, delicate crunch.
Bake Until Deep Golden
Place the pan in the preheated oven and bake for 30–35 minutes. Watch for a deep golden-brown top and check the internal temperature, aiming for about 93°C (200°F).
If the top browns too quickly, tent loosely with foil during the last 10 minutes so the interior finishes cooking.
Cool Briefly and Remove from Pan
Set the baked bread on a cooling rack and let it rest in the pan for 10–15 minutes. Run a knife gently around the edges to loosen.
Carefully lift or invert the loaf out of the pan. Transfer it directly to the rack so the bottom doesn’t become soggy from trapped steam.
Serve Warm and Pull Apart
Serve the bread slightly warm for the best texture and flavor. Place it in the center of the table and let guests pull apart pieces with their hands.
Enjoy as a side to soups, salads, or pasta. Leftovers can be reheated gently in the oven to refresh the crust and crumb.
Ingredient Swaps
- Use whole milk, 2%, or unsweetened plant milk (oat, soy, almond) interchangeably; richer milk = softer crumb.
- Swap bread flour with all-purpose if needed; reduce liquid by ~1–2 tbsp if dough feels very sticky.
- Replace butter with vegan butter or neutral oil; skip Parmesan or use a vegan hard cheese for dairy-free.
- Fresh parsley can be swapped for cilantro, chives, or 1–2 tsp dried mixed herbs; adjust garlic up or down to taste or use garlic powder (about 1–2 tsp) if fresh isn’t available.
- Sugar can be replaced with honey, maple syrup, or omitted entirely for a less sweet, more savory loaf.
You Must Know
– Avoid • For dense, under-risen layers: Don’t rely on the clock; keep proofing until the dough is visibly puffy and 70–90% to the top of the pan, even if this takes up to 2 hours.
Sourdough timing varies with room temp; under-proofing gives a tight, bready pull instead of soft, feathery layers.
– Flavor Boost • For bigger garlic-herb impact: Stir the minced garlic and herbs into the warm (not hot) 60 g butter and let it sit at least 10–15 minutes before using.
This brief steeping time infuses the fat, so the flavor carries through all layers instead of just the surface.
– Scale • To serve a crowd or just a few: For a double batch, multiply all ingredients by 2 and use either two 9×5 pans or a 9×13-inch pan, keeping stacks the same thickness and checking doneness at 30 minutes, then every 5 minutes.
For half a batch, cut everything in half and use a 8×4-inch loaf pan, starting doneness checks around 22–25 minutes.
Serving Tips
- Serve warm in the pan, centered on the table for easy pulling and sharing.
- Pair with marinara, warm pizza sauce, or herbed olive oil for dipping.
- Plate alongside soups like tomato basil, minestrone, or creamy potato-leek.
- Use as a garlicky side for roasted chicken, steak, or grilled vegetables.
- Turn leftovers into savory sliders with mozzarella, prosciutto, or roast turkey.
Storage & Make-Ahead
This bread keeps in the fridge, tightly wrapped, for up to 4 days.
Rewarm gently in a 150°C (300°F) oven to refresh.
You can make the dough a day ahead and refrigerate after the first rise.
Baked leftovers freeze well, double-wrapped, for up to 2 months.
Reheating
Reheat gently: wrap bread in foil and warm in a 300°F (150°C) oven.
Or briefly microwave covered with a damp towel.
Or skillet-toast slices over low heat with a lid.
Game-Day Party Favorite
On game day, I almost always reach for this sourdough garlic pull-apart bread because it turns a coffee table into a buffet in seconds.
You set it down, still warm, and the room shifts—people lean in, eyes go straight to those golden, buttery edges.
Each piece pulls away in a soft, steamy cloud of garlic and herbs. You don’t need knives, plates, or even much conversation; hands just instinctively reach for the next pillowy square, trails of melted butter and Parmesan left on fingertips.
I love how it anchors a spread of wings, dips, and veggies, but still steals the spotlight. It’s casual, shareable, and feels like you baked something special just for this game.
Final Thoughts
Give this Sourdough Garlic Pull-Apart Bread a try the next time you’re craving something cozy and shareable fresh from the oven.
Don’t hesitate to tweak the herbs, cheese, or garlic levels to make it your own perfect version.
Frequently Asked Questions
Can I Make This Bread Fully Vegan Without Sacrificing Texture and Flavor?
Yes, you can. I’d swap milk for creamy oat milk, butter for vegan butter, and egg for a flax egg. Your loaf will still rise tall, tear softly, and flood your kitchen with garlicky warmth.
How Do I Adapt This Recipe for High-Altitude Baking Conditions?
You’ll reduce starter and milk slightly, add a bit more flour, and shorten rises; at altitude, dough puffs faster. I’d watch for pillowy softness, bake hotter, and tent early so the crust doesn’t scorch.
Can I Freeze the Unbaked, Shaped Dough for Later Baking?
Yes, you can. Shape and assemble, chill until firm, then wrap tightly and freeze. When you’re ready, thaw in the fridge overnight, let it puff at room temperature, then bake until gorgeously golden and fragrant.
What’s the Best Way to Scale This Recipe for a Crowd?
I’d simply double or triple everything by weight, then divide the dough into multiple pans so each bakes evenly—more bronzed edges, more fragrant steam, more buttery shards your guests can tear into, still warm.
How Do I Adjust Fermentation Times for Very Hot or Very Cold Kitchens?
I watch the dough, not the clock: in heat, I shorten ferment and proof until just puffy; in cold, I lengthen or cold‑proof overnight. Trust the look—airy, billowy, delicately jiggling like a soft pillow.
Sourdough Garlic Pull Apart Bread
Equipment
- 1 stand mixer with dough hook (optional, can mix by hand)
- 2 large mixing bowls
- 1 Small mixing bowl
- 1 9×5-inch loaf pan (or 8–9 inch round cake pan)
- 1 Whisk
- 1 Silicone spatula
- 1 pastry brush
- 1 bench scraper or sharp knife
- 1 Rolling Pin
- 1 clean kitchen towel or plastic wrap
- 1 Cooling rack
Ingredients
- 240 gram sourdough starter 100% hydration, active and bubbly
- 240 milliliter warm milk about 30°C / 86°F
- 50 gram granulated sugar
- 1 large egg room temperature
- 75 gram unsalted butter melted and cooled slightly
- 500 gram bread flour
- 9 gram fine sea salt
- 60 gram unsalted butter for garlic coating; melted
- 4 clove garlic finely minced
- 10 gram fresh parsley finely chopped
- 30 gram grated Parmesan cheese
- 2 gram dried oregano
- 2 gram dried thyme
- 2 gram flaky sea salt for topping
Instructions
- In a large mixing bowl whisk together the active sourdough starter, warm milk, sugar, egg, and melted butter until smooth.
- Add the bread flour and fine sea salt to the bowl and mix with a spatula until a shaggy dough forms.
- Knead the dough by hand or with a stand mixer on medium-low speed for 8–10 minutes until smooth, elastic, and only slightly tacky.
- Shape the dough into a ball, place it in a lightly oiled bowl, cover with a kitchen towel or plastic wrap, and let it rise at warm room temperature for 2–3 hours until puffy and nearly doubled.
- While the dough rises, combine the 60 g melted butter, minced garlic, chopped parsley, grated Parmesan, dried oregano, and dried thyme in a small bowl and set aside.
- Once risen, gently deflate the dough and turn it out onto a lightly floured work surface.
- Using a rolling pin, roll the dough into a rectangle approximately 30×40 cm (12×16 inches).
- Brush the surface of the dough evenly with the garlic-herb butter mixture, reserving 1–2 tablespoons for the top.
- With a bench scraper or knife, cut the rectangle into strips about 5 cm (2 inches) wide, then cut those strips into squares or rectangles roughly 5×5 cm (2×2 inches).
- Stack several dough pieces loosely together and arrange them upright, cut sides up, in a greased loaf pan (or in concentric rings in a round pan), leaving a little space between stacks for rising.
- Cover the pan loosely and let the dough proof at warm room temperature for 60–90 minutes until noticeably puffy and almost to the top of the pan.
- About 20 minutes before baking, preheat the oven to 190°C (375°F).
- Just before baking, brush the top of the dough with the reserved garlic butter and sprinkle with flaky sea salt.
- Bake for 30–35 minutes until the bread is deep golden brown and the internal temperature reaches about 93°C (200°F).
- Remove the pan from the oven, cool on a rack for 10–15 minutes, then carefully run a knife around the edges and lift or invert the bread out of the pan.
- Serve warm, allowing guests to pull apart pieces at the table.
Notes

Cynthia Weatherford is a seasoned chef and culinary enthusiast who serves as the Recipe creator of Somonday. With decades of experience in the kitchen and a passion for exploring diverse cuisines, Cynthia brings a blend of creativity and technique to every dish. Known for transforming simple ingredients into show-stopping meals, Cynthia believes that cooking is an art form anyone can master. Dedicated to inspiring home cooks, Cynthia shares approachable recipes, pro tips, and culinary wisdom to make every meal memorable.