
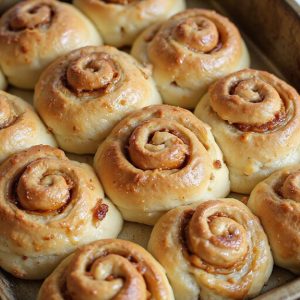
There’s something about pulling a tray of golden, spiraled buns from the oven—the way the honey glaze catches the light, the gentle crackle of crust giving way to a pillowy, vanilla-scented crumb—that instantly softens the day.
These sourdough honey buns are a cozy, bakery-style treat, perfect for an unhurried weekend breakfast or a simple dessert, yet surprisingly low-effort once your dough is mixed and resting.
They’re ideal for comfort seekers, sweet-tooth fans, and anyone learning to love their sourdough starter beyond basic loaves.
I remember a rainy Sunday when plans fell through and the house felt a little too quiet.
I mixed the dough, let it slowly rise while I read, then shaped the buns just in time for an evening “coffee and something sweet” moment that turned the whole day around.
They shine at lazy Sunday suppers, brunch gatherings, and last-minute cravings. Ready to bring this dish to life?
Why You’ll Love It
- Delivers rich, complex flavor from long-fermented sourdough and honey
- Stays incredibly soft and fluffy with a tender, pull-apart crumb
- Makes ahead easily with overnight dough rest and flexible proofing
- Uses simple pantry ingredients—no commercial yeast required
- Glazes beautifully for a shiny, bakery-style finish at home
Ingredients
- 120 g active sourdough starter — 100% hydration, bubbly and recently fed
- 240 g whole milk, warm — just above room temp to comfort-warm the starter
- 80 g honey — a light or wildflower honey balances sweetness and flavor
- 1 large egg, room temperature — take out of the fridge 30 minutes early
- 75 g unsalted butter, melted and cooled — still liquid but not hot
- 500 g all-purpose flour — standard protein content (about 10–11%) works well
- 8 g fine sea salt — distributes more evenly than coarse salt
- 80 g unsalted butter, very soft — easily spreadable for the filling
- 80 g honey — complements the brown sugar for a deep honey flavor
- 80 g light brown sugar, packed — adds moisture and caramel notes
- 5 g ground cinnamon — use fresh, fragrant cinnamon for best aroma
- 2 g fine sea salt — sharpens and balances the sweetness
- 40 g unsalted butter — for a rich, shiny glaze base
- 60 g honey — primary sweetener and flavor in the glaze
- 60 g powdered sugar, sifted — prevents lumps in the glaze
- 15 g whole milk — adjust slightly for thicker or thinner glaze
- 2 g vanilla extract — rounds out the honey flavor
- 1 g fine sea salt — a pinch to keep the glaze from tasting flat
Step-by-Step Method
Mix the wet ingredients
Whisk the active sourdough starter, warm milk, honey, egg, and cooled melted butter in the stand mixer bowl. Combine until smooth and uniform with no streaks of egg or butter.
Make certain the milk is warm, not hot, to avoid harming the starter. Proper mixing here helps the dough hydrate and ferment evenly later.
Form the dough
Add the flour and salt to the wet mixture. Stir with a silicone spatula until a shaggy, rough dough forms and no dry flour remains.
Scrape the sides and bottom of the bowl so everything is incorporated. This initial mixing phase readies the dough for kneading and prevents flour pockets in the final buns.
Knead until smooth
Attach the dough hook and knead on medium-low speed for 8–10 minutes. Aim for a smooth, elastic dough that feels soft and slightly tacky but not sticky.
If kneading by hand, work on a lightly floured surface. Resist adding too much extra flour. Stop when the dough stretches without tearing easily.
Bulk ferment the dough
Shape the kneaded dough into a smooth ball. Place it in a lightly oiled bowl, turning once to coat.
Cover with plastic wrap or a clean kitchen towel. Let it ferment at room temperature for 3–4 hours. Look for a slightly puffy dough that feels lighter and shows small bubbles when gently pressed.
Cold-proof overnight
Transfer the covered bowl to the refrigerator. Cold-proof the dough for 6–8 hours or overnight.
This slow fermentation deepens flavor and makes the dough easier to roll and handle. The dough will firm up in the fridge but still rise gradually. Keep it covered to prevent drying or forming a skin.
Roll out the dough
Lightly flour your work surface and rolling pin. Turn the chilled dough out and gently pat it into a rectangle.
Roll it into a 12×18-inch (30×45 cm) sheet, keeping the thickness even. Rotate the dough occasionally and add a light dusting of flour if needed. Avoid tearing or stretching excessively.
Make the honey filling
In a medium bowl, combine the very soft butter, honey, packed light brown sugar, ground cinnamon, and salt. Stir until completely smooth and spreadable.
Make sure there are no lumps of butter or sugar. The mixture should be thick yet easy to spread. Properly blended filling gives even flavor throughout each spiral.
Spread the filling
Spread the honey-butter mixture evenly over the rolled dough using a spatula. Leave a 1-inch (2.5 cm) border along one long edge so the roll can seal.
Cover all other areas right to the edges. Keep the layer smooth and consistent so each bun receives a balanced amount of sweetness and spice.
Roll and seal the log
Starting from the long edge opposite the clean border, roll the dough into a tight log. Roll evenly without stretching too hard.
When you reach the clean edge, pinch the seam firmly to seal. Turn the log seam-side down. Gently shape and straighten the log so it’s uniform in thickness along its length.
Cut the buns
Trim a thin slice from each end if they’re uneven. Use a sharp knife or bench scraper to cut the log into 12 equal pieces.
Saw gently rather than pressing straight down to avoid squashing the spirals. Aim for consistent width so the buns bake evenly. Turn cut pieces so the spiral faces up.
Arrange and proof the buns
Grease a 9×13-inch baking pan thoroughly. Place the buns in the pan with slight space between each for expansion.
Cover the pan with plastic wrap or a kitchen towel. Proof at warm room temperature for 2–3 hours. They’re ready when noticeably puffy and nearly touching, but not collapsing or deflating.
Bake the buns
About 20 minutes before baking, preheat the oven to 350°F (175°C). Uncover the pan and place it on the center rack.
Bake for 22–25 minutes until lightly golden and the centers reach 190–195°F (88–90°C). Tent loosely with foil if browning too quickly. Remove from the oven and let cool briefly.
Prepare the honey glaze
While the buns bake, melt the butter and honey together in a small saucepan over low heat. Remove from heat, then whisk in the sifted powdered sugar, milk, vanilla, and salt until completely smooth.
Adjust with a splash of milk if too thick. Keep the glaze slightly warm so it spreads and soaks nicely.
Glaze and serve
Let the baked buns cool in the pan for 10–15 minutes. Brush or drizzle the warm honey glaze generously over the tops, allowing it to seep into the spirals.
Optionally finish with an extra light drizzle of honey. Transfer buns to a wire rack if desired. Serve warm or at room temperature.
Ingredient Swaps
- Milk: Use any unsweetened non-dairy milk (oat, almond, soy) 1:1; for extra richness, add 1–2 tbsp oil if using very low‑fat milk.
- Butter: Swap with vegan butter or neutral oil (about 10–15% less oil by weight than butter).
- Egg: Replace with 60 g unsweetened applesauce or 1 flax egg (1 tbsp ground flax + 3 tbsp water) for an egg-free version.
- Flour: Substitute up to 50% of the all-purpose flour with bread flour for chewier buns, or with a soft wheat flour if AP is unavailable.
- Honey: Use maple syrup or agave in the dough and filling; for strict vegans, use maple in the glaze and adjust powdered sugar slightly to keep it thick.
You Must Know
– Doneness • If the buns look pale at 25 minutes
Use an instant-read thermometer in a center bun and keep in the oven until it hits 190–195°F (88–90°C); the tops should be light golden, not deep brown.
This guarantees the middles aren’t doughy even if the exterior looks done early.
– Troubleshoot • If the dough feels too sticky to handle when kneading or rolling
Lightly dust with flour in 5–10 g (1–2 tsp) increments only until it’s tacky but not gluey.
Too much flour (more than ~30 g extra) will give you dense, dry buns instead of soft, fluffy ones.
– Troubleshoot • If the buns spread sideways instead of rising tall
Roll the log snugly but not tight, and proof until each bun looks about 50–75% puffier and nearly touching (often 2–3 hours, longer if your room is below 70°F/21°C).
Under-proofed spirals expand outward in the oven instead of up.
– Make-Ahead • For overnight morning buns with minimal work
After cutting and panning, cover and refrigerate 8–12 hours.
In the morning, bring the pan to room temp until the buns look visibly puffy and jiggly (often 45–90 minutes) before going into the oven.
This slows fermentation so flavor develops without over-proofing.
– Flavor Boost • To deepen honey and sourdough character
Extend the cold fermentation of the dough to up to 24 hours in the fridge (step between bulk rise and shaping), watching that it doesn’t more than double in volume.
The long, cool time builds complex tang and richer honey notes without extra sweetness.
Serving Tips
- Serve warm with extra honey drizzle and a sprinkle of flaky sea salt.
- Pair with hot coffee, chai, or strong black tea for a cozy breakfast.
- Plate with fresh berries or sliced citrus to balance the sweetness.
- Turn into a dessert: add vanilla ice cream and toasted chopped nuts.
- Arrange on a wooden board with fruit, soft cheese, and nuts for brunch.
Storage & Make-Ahead
Sourdough honey buns keep in the fridge for up to 4 days, tightly covered.
Rewarm gently in a low oven or microwave before serving.
For make-ahead, shape and refrigerate overnight, then bake next day.
Baked buns also freeze well, wrapped airtight, for up to 2 months.
Thaw, then reheat.
Reheating
Reheat buns gently to keep them soft.
In a 300°F oven for 8–10 minutes, briefly in the microwave with a damp towel, or covered on a low stovetop skillet until warmed through.
State-Fair Bake-Sale Favorite
Nothing draws a crowd at a state fair or bake sale quite like a pan of warm, golden spirals glossed in honey.
I’ve watched people follow the scent the way bees chase blossoms—heads turning, noses lifting, feet speeding up as that buttery, fermented sweetness hangs in the air.
When you set out a tray of these sourdough honey buns, you’re not just selling dessert; you’re selling a memory.
The soft, tear-apart dough, the sticky, cinnamon–brown sugar swirls, the shine of the glaze catching the light—everyone wants “just one more.”
I like to stack them close, so the sides stay tender and the tops stay glossy, and I always keep a warm batch coming.
They never last.
Final Thoughts
Give these Sourdough Honey Buns a try and enjoy how the sweet honey and subtle tang of sourdough come together in every soft, buttery bite.
Don’t be afraid to tweak the filling or glaze to make them your own—add spices, citrus zest, or even chopped nuts for a fun twist.
Frequently Asked Questions
Can I Make These Buns Without a Stand Mixer or Special Equipment?
You absolutely can. I’d mix everything in a big bowl, knead by hand until smooth and springy, roll with a bottle if needed, then bake in any similar pan—the dough’s feel will guide you.
How Do Altitude or Humidity Affect Fermentation and Baking Times?
They’ll change everything, so watch the dough, not the clock. At high altitude or low humidity, I shorten bakes and hydrate more; in muggy heat, I chill dough sooner and expect slower, lazier rises.
Are These Buns Suitable for People With Mild Lactose Intolerance?
They’re probably not ideal as written, since milk, butter, and glaze all carry lactose. You could swap lactose‑free milk and butter, then taste the tender, honeyed crumb without the bellyache’s low, slow thunder.
Can I Convert This Recipe to a Vegan Version Successfully?
Yes, you can. I’d swap butter for vegan butter, milk for creamy oat milk, egg for flax egg, honey for maple syrup. You’ll still pull apart tender spirals, glossy, fragrant, and softly sweet.
How Can I Scale This Recipe for a Crowd or Smaller Batch?
You can scale this up or down by multiplying every ingredient by your chosen factor; I’d keep pan depth similar so the spirals still rise like soft, golden clouds, swirled tight and fragrant in buttered metal.
Sourdough Honey Buns
Equipment
- 1 stand mixer with dough hook (or large mixing bowl)
- 1 medium mixing bowl
- 1 Small saucepan
- 1 9×13 inch baking pan
- 1 Silicone spatula
- 1 Rolling Pin
- 1 pastry brush
- 1 sharp knife or bench scraper
- 1 plastic wrap or clean kitchen towel
- 1 wire cooling rack
Ingredients
- 120 gram active sourdough starter 100% hydration
- 240 gram whole milk warm
- 80 gram honey
- 1 large egg room temperature
- 75 gram unsalted butter melted and cooled
- 500 gram all-purpose flour
- 8 gram fine sea salt
- 80 gram unsalted butter very soft
- 80 gram honey
- 80 gram light brown sugar packed
- 5 gram ground cinnamon
- 2 gram fine sea salt
- 40 gram unsalted butter
- 60 gram honey
- 60 gram powdered sugar sifted
- 15 gram whole milk
- 2 gram vanilla extract
- 1 gram fine sea salt
Instructions
- In the bowl of a stand mixer, whisk together the sourdough starter, warm milk, honey, egg, and melted butter until smooth.
- Add the flour and salt to the wet mixture and stir with a spatula until a shaggy dough forms.
- Knead with the dough hook on medium-low speed (or by hand) for 8–10 minutes until the dough is smooth, elastic, and slightly tacky but not sticky.
- Shape the dough into a ball, place it in a lightly oiled bowl, cover, and let ferment at room temperature for 3–4 hours until slightly puffy.
- Transfer the bowl to the refrigerator and cold-proof the dough for 6–8 hours or overnight to develop flavor and make rolling easier.
- When ready to shape, lightly flour your work surface and roll the chilled dough into a rectangle about 12×18 inches (30×45 cm).
- In a small bowl, mix the softened butter, honey, brown sugar, cinnamon, and salt until you have a smooth, spreadable paste.
- Spread the filling evenly over the dough, leaving a 1-inch (2.5 cm) border along one long edge.
- Starting from the opposite long edge, roll the dough up tightly into a log, pinching the seam to seal.
- Trim the ends if uneven, then cut the log into 12 equal pieces with a sharp knife or bench scraper.
- Grease a 9×13-inch baking pan and arrange the buns in the pan with a little space between each.
- Cover the pan with plastic wrap or a kitchen towel and let the buns proof at warm room temperature for 2–3 hours, until noticeably puffy and nearly touching.
- About 20 minutes before baking, preheat the oven to 350°F (175°C).
- Bake the buns for 22–25 minutes, until lightly golden on top and the centers register about 190–195°F (88–90°C).
- While the buns bake, make the glaze by gently heating the butter and honey in a small saucepan until melted, then whisking in powdered sugar, milk, vanilla, and salt until smooth.
- Let the buns cool in the pan for 10–15 minutes, then brush or drizzle generously with the warm honey glaze.
- Serve the sourdough honey buns warm or at room temperature, optionally adding an extra light drizzle of honey on top.
Notes

Cynthia Weatherford is a seasoned chef and culinary enthusiast who serves as the Recipe creator of Somonday. With decades of experience in the kitchen and a passion for exploring diverse cuisines, Cynthia brings a blend of creativity and technique to every dish. Known for transforming simple ingredients into show-stopping meals, Cynthia believes that cooking is an art form anyone can master. Dedicated to inspiring home cooks, Cynthia shares approachable recipes, pro tips, and culinary wisdom to make every meal memorable.


