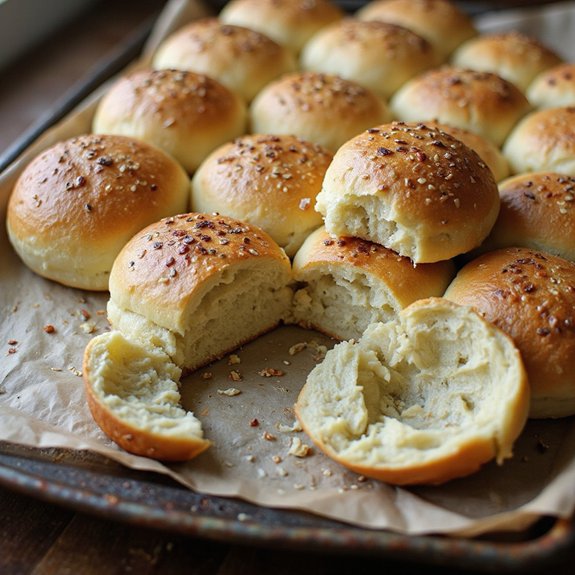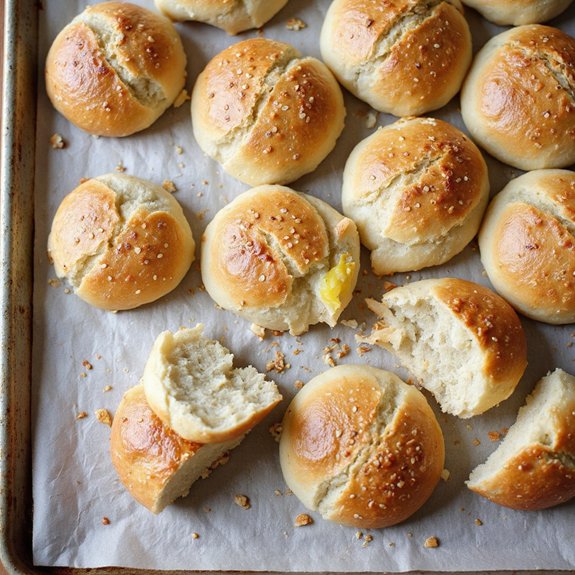
There’s something about a golden, just-baked sourdough bun that makes even the simplest sandwich feel special.
Picture lightly blistered crusts, soft and airy interiors, and that gentle tangy aroma drifting through your kitchen.
These sourdough sandwich buns turn any filling—juicy burgers, roasted veggies, deli stacks—into a satisfying, bakery-worthy meal.
They’re ideal for anyone who loves make-ahead comfort: meal-preppers, families, beginners looking to level up, or hosts who like easy entertaining.
On one hectic weekday, a batch of these buns in the freezer saved dinner; I pulled them out, reheated them, and suddenly leftover chicken became a cozy, sit-down meal instead of a rushed snack.
These buns shine at Sunday suppers, casual gatherings, and quick lunches when you want something homemade but unfussy. You’ll mix, shape, let time and your starter do the work, then bake.
Ready to bring this recipe to life?
Why You’ll Love It
- Delivers rich, tangy sourdough flavor in a soft, tender crumb.
- Creates sturdy, fluffy buns that hold juicy burger or sandwich fillings.
- Uses simple pantry ingredients and active starter—no commercial yeast required.
- Adapts easily to overnight fermentation for flexible, make-ahead baking.
- Freezes well, so you can bake once and enjoy buns anytime.
Ingredients
- 120 g active sourdough starter — 100% hydration, recently fed and bubbly
- 250 g warm water — about 80°F/27°C to keep fermentation lively
- 30 g granulated sugar — adds tenderness and light sweetness
- 60 g unsalted butter, melted and cooled — cool so it doesn’t kill the starter
- 1 large egg, room temperature — helps with structure and color
- 500 g bread flour — higher protein for strong, fluffy buns
- 10 g fine sea salt — enhances flavor and gluten strength
- 1 large egg, beaten — for a glossy egg wash finish
- 15 g sesame seeds — optional topping for flavor and crunch
Step-by-Step Method
Mix the wet ingredients
Whisk the active starter, warm water, sugar, melted cooled butter, and room-temperature egg in a large mixing bowl.
Blend until the mixture looks smooth and uniform, with no streaks of egg or butter. Use warm, not hot, water to avoid harming the starter.
Set the bowl aside while you prepare the dry ingredients.
Combine into a shaggy dough
Add the bread flour and salt directly to the wet mixture. Stir with a wooden spoon or spatula until no dry flour remains.
The dough should look rough and scrappy, not smooth. Scrape down the sides of the bowl as you mix.
Stop once everything is hydrated and loosely clumped together.
Develop the gluten
Turn the dough out onto a lightly floured surface. Knead for 8–10 minutes until smooth, elastic, and slightly tacky, adding minimal flour. Alternatively, leave it in the bowl and perform stretch-and-folds every 10 minutes for 4 rounds.
Aim for a cohesive dough that resists tearing when gently stretched.
Bulk ferment until doubled
Shape the dough into a smooth ball and place it in a lightly oiled bowl. Cover with plastic wrap or a damp towel to prevent drying.
Let it rise at warm room temperature, around 75–80°F (24–27°C). Allow the dough to double in size, which typically takes 2–3 hours depending on starter strength and temperature.
Divide and pre-shape the pieces
Gently turn the risen dough onto a lightly floured surface, preserving as much air as possible. Use a dough scraper or sharp knife to divide it into 8 equal portions by weight.
Lightly dust sticky spots if needed. Handle the dough gently to avoid degassing excessively and maintain light, airy texture.
Shape into smooth buns
Take each piece and tuck the edges underneath, rotating it against the work surface to create surface tension. Form a tight, smooth ball with the seam on the bottom.
Place each ball seam-side down on a parchment-lined baking sheet. Space them several inches apart to allow room for spreading and rising.
Flatten and proof the buns
Gently press each ball with your palm to create a bun about 1 inch thick. Cover loosely with plastic wrap or a clean kitchen towel so they don’t dry out.
Let the buns proof at room temperature until puffy and nearly doubled, about 60–90 minutes. They should wobble slightly when the tray is gently shaken.
Preheat and apply egg wash
Near the end of proofing, preheat your oven to 400°F (200°C) so it’s fully hot. Beat one egg in a small bowl.
Carefully brush the tops of the buns with a thin, even layer, avoiding drips down the sides. Sprinkle sesame seeds over the egg-washed tops if desired, pressing lightly so they adhere.
Bake until golden and set
Place the baking sheet on the center oven rack. Bake for 15–18 minutes, rotating once if needed for even browning. Look for deep golden tops and a firm feel.
Check for an internal temperature of about 200°F (93°C) with an instant-read thermometer to confirm they’re fully baked through.
Cool and soften the crust
Transfer the hot buns immediately to a wire cooling rack to prevent soggy bottoms. For a softer sandwich-style crust, drape a clean kitchen towel over the buns for 10–15 minutes to trap steam.
Then uncover and let them cool completely. Slice only when fully cool to avoid squashing or gummy interiors.
Ingredient Swaps
- Butter: Swap with 60 g neutral oil (canola, sunflower, or light olive oil) or 60 g melted coconut oil for a dairy-free version.
- Egg (in dough): Replace 1 egg with 45 g unsweetened applesauce or 45 g plant-based yogurt for an egg-free dough.
- Sugar: Use equal weight honey, maple syrup, or light brown sugar; reduce water by ~5–10 g if using liquid sweeteners.
- Bread flour: Use all-purpose flour; start with 480 g and add up to 20 g more if the dough feels too sticky.
- Sesame seeds: Substitute with poppy seeds, everything bagel seasoning, oats, or omit for a plain top.
You Must Know
– Avoid – Avoid adding extra flour late to “fix” stickiness once gluten is developed; instead, lightly oil your hands and work surface.
Extra flour at this stage tightens the crumb and can turn soft sandwich buns into dry, bready rolls.
Serving Tips
- Split, toast lightly, and fill with deli meats, cheese, lettuce, and tomato.
- Use as burger buns with juicy patties, melted cheese, and your favorite toppings.
- Serve warm with butter alongside soups, stews, or chili.
- Make breakfast sandwiches with eggs, bacon or sausage, and cheese.
- Slice for mini sliders or pulled pork sandwiches at parties.
Storage & Make-Ahead
Store cooled buns in an airtight container at room temperature for 2–3 days.
For longer storage, refrigerate up to 4–5 days, though this can dry them slightly.
For easiest make-ahead, bake, cool completely, then wrap each bun tightly in plastic and place in a freezer bag.
Freeze for up to 2 months.
Thaw at room temperature, still wrapped, then refresh in a 300°F (150°C) oven for 5–8 minutes to revive softness.
Reheating
Reheat buns gently to preserve softness.
Briefly microwave covered with a damp towel, warm in a 300°F (150°C) oven wrapped in foil, or steam cut sides on a covered skillet.
Regional Sourdough Bun Traditions
Once you’ve warmed yesterday’s buns back to pillowy life, it’s hard not to imagine how different corners of the world enjoy their own sourdough rolls.
I picture San Francisco fog curling around tangy, crackle‑topped buns, split and stuffed with Dungeness crab.
In New England, I taste sourdough lobster‑roll buns, butter‑brushed and toasted, their tender crumb soaking up briny juices.
Head south and I imagine smoky pulled pork piled onto glossy, sesame‑flecked buns, the sour edge slicing through rich fat.
Across the Atlantic, I think of German Brötchen—snappy crust, cottony interior—perfect for sharp cheese and pickles.
In the Mediterranean, I’d bake olive‑oil enriched sourdough buns, faintly fruity, to cradle grilled vegetables and herbs.
Final Thoughts
Give these sourdough sandwich buns a try and see how much they elevate your everyday lunches and burgers.
Once you’ve made them once, have fun tweaking the sweetness, toppings, or size to create your perfect custom bun.
Frequently Asked Questions
Can I Convert This Sourdough Bun Recipe to a Gluten-Free Version?
Yes, you can, but you’ll need a gluten‑free bread blend, extra hydration, and xanthan gum. I’d describe the dough as soft clay, scoopable not stretchy, and let you shape tender mounds rather than tight balls.
How Do Altitude Changes Affect Proofing and Baking Times for These Buns?
Altitude speeds everything up: yeast works faster, dough rises higher, and buns bake quicker. I’d watch for jiggly, airy dough, shorten proofing, lower oven heat slightly, and pull them when they’re deeply golden, smelling nutty.
What’s the Best Way to Scale This Recipe for a Crowd?
I’d scale everything by weight, keep batches to 2–3× max, and mix separately. Feel the dough: soft, pillowy, faintly tacky. Stagger proofs and bakes so your kitchen smells like warm, buttery heaven for hours.
Can I Use These Buns for Sweet Applications Like Dessert Sandwiches?
Yes, you can. I’d split one warm, let the buttery crumb cradle ice cream or macerated berries, drizzle honey or chocolate, then toast lightly so the edges crackle while the center stays pillowy-sweet.
How Do I Troubleshoot Buns That Spread Too Much Instead of Rising Tall?
I’d chill the shaped dough so it firms, strengthen gluten with thorough kneading, and avoid over-proofing. Picture bouncy, cool rounds that hold their shoulders high, not puddling into soft, sleepy disks on the pan.

Sourdough Sandwich Buns
Equipment
- 1 Kitchen scale
- 1 large mixing bowl
- 1 Medium bowl
- 1 Dough scraper
- 1 Whisk
- 1 Wooden spoon or spatula
- 1 Baking sheet
- 1 sheet parchment paper
- 1 plastic wrap or clean kitchen towel
- 1 pastry brush
- 1 wire cooling rack
Ingredients
- 120 gram active sourdough starter 100% hydration
- 250 gram warm water about 80°F/27°C
- 30 gram granulated sugar
- 60 gram unsalted butter melted and cooled
- 1 large egg room temperature
- 500 gram bread flour
- 10 gram fine sea salt
- 1 large egg beaten for egg wash
- 15 gram sesame seeds optional topping
Instructions
- In a large mixing bowl, whisk together the active sourdough starter, warm water, sugar, melted butter, and egg until well combined.
- Add the bread flour and salt to the bowl and mix with a wooden spoon or spatula until a shaggy dough forms.
- Turn the dough onto a lightly floured surface and knead for 8–10 minutes until smooth and slightly tacky, or perform stretch-and-folds in the bowl every 10 minutes for 4 rounds.
- Shape the dough into a smooth ball, place it back into the lightly oiled bowl, cover with plastic wrap or a damp towel, and let rise at warm room temperature until doubled, about 2–3 hours depending on starter strength and room temperature.
- Gently turn the risen dough onto a lightly floured surface and divide it into 8 equal pieces using a dough scraper or knife.
- Shape each piece into a tight ball by tucking the edges underneath, then place seam-side down on a parchment-lined baking sheet, spacing them a few inches apart.
- Gently flatten each ball with your palm to form bun shapes about 1 inch thick.
- Cover the buns lightly with plastic wrap or a clean towel and let them proof at room temperature until puffy and nearly doubled, about 60–90 minutes.
- Near the end of the proofing time, preheat your oven to 400°F (200°C).
- Brush the tops of the buns gently with beaten egg, then sprinkle with sesame seeds if using.
- Bake the buns on the center rack for 15–18 minutes until deep golden brown and an internal temperature of about 200°F (93°C) is reached.
- Transfer the baked buns to a wire cooling rack and let cool completely before slicing for sandwiches.
Notes

Cynthia Weatherford is a seasoned chef and culinary enthusiast who serves as the Recipe creator of Somonday. With decades of experience in the kitchen and a passion for exploring diverse cuisines, Cynthia brings a blend of creativity and technique to every dish. Known for transforming simple ingredients into show-stopping meals, Cynthia believes that cooking is an art form anyone can master. Dedicated to inspiring home cooks, Cynthia shares approachable recipes, pro tips, and culinary wisdom to make every meal memorable.