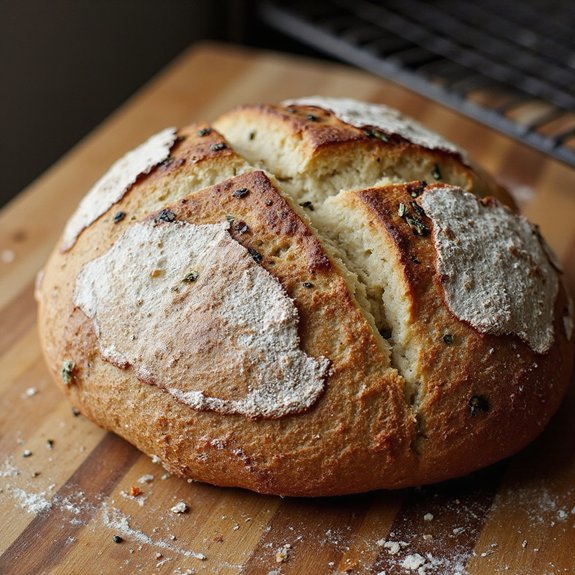
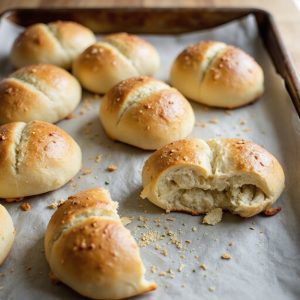
There’s something about a tray of freshly baked sourdough sub rolls, their golden tops crackling gently as they cool, that makes the whole kitchen feel like a bakery.
The edges are crisp and blistered, the centers soft and chewy, with that unmistakable tangy aroma of long-fermented dough.
These rolls are the ultimate versatile staple—perfect for hearty sandwiches, saucy meatball subs, or toasted garlic bread—and once your starter is active, they come together with just a bit of hands-on time spread through the day.
They’re ideal for meal-preppers, sandwich-loving families, and anyone who wants bakery-quality bread at home.
I still remember a chaotic weekday when unexpected guests arrived; a batch of these rolls, pulled from the freezer and reheated, turned leftover roast chicken into a “wow, you made this?” dinner.
They shine at Sunday suppers, easy entertaining, or quick grab-and-go lunches.
Ready to bring this dough to life?
Why You’ll Love It
- Delivers bold flavor from real sourdough starter, not commercial yeast.
- Bakes into soft, sturdy rolls perfect for loaded subs and hoagies.
- Uses simple pantry ingredients you probably already have on hand.
- Adapts to your schedule with room-temperature or overnight cold proof.
- Freezes beautifully, so you can bake once and enjoy rolls all week.
Ingredients
- 150 g active sourdough starter — 100% hydration, recently fed and bubbly
- 300 g warm water — about 80–85°F for gentle fermentation
- 30 g olive oil — adds tenderness and subtle flavor
- 25 g granulated sugar — lightly sweetens and boosts browning
- 500 g bread flour — higher protein for chewy, structured rolls
- 10 g fine sea salt — seasons dough and strengthens gluten
- 1 large egg — for a rich, glossy egg wash finish
- 15 ml water — thins the egg wash so it brushes on smoothly
Step-by-Step Method
Mix the Wet Ingredients
Whisk the active sourdough starter, warm water, olive oil, and sugar in a large mixing bowl.
Blend until the mixture looks mostly smooth and the starter is well dispersed.
This guarantees even fermentation and a consistent crumb. Scrape down the sides as needed to incorporate any clinging starter or oil.
Form the Shaggy Dough
Add the bread flour and fine sea salt to the wet mixture. Stir with a spoon or dough scraper until no dry flour remains and a rough, shaggy dough forms.
Don’t worry about smoothness yet. Focus on thoroughly hydrating the flour for easier kneading and better gluten development later.
Knead Until Smooth and Elastic
Knead the dough by hand on a lightly floured surface for 8–10 minutes, or use a stand mixer with a dough hook on low for 6–8 minutes.
Aim for a smooth, elastic dough that feels slightly tacky but not sticky. Avoid adding excess flour, which can make the rolls dense and dry.
Let the Dough Bulk Ferment
Shape the dough into a ball and place it in a lightly oiled bowl. Cover with a clean kitchen towel or plastic wrap to prevent drying.
Let it rest at room temperature for 3–4 hours. Wait until the dough becomes noticeably puffy and aerated, showing active fermentation and partial rise.
Divide the Dough Evenly
Gently deflate the risen dough and turn it onto a lightly floured work surface.
Weigh the dough, then divide it into 8 equal portions using a dough scraper or sharp knife.
This guarantees uniform size and even baking. Keep the pieces covered lightly with a towel as you work to prevent drying.
Pre-Shape and Rest the Portions
Shape each portion into a loose ball by tucking the edges underneath. Arrange them on the work surface and cover lightly with a towel.
Let them rest for 10–15 minutes. This short bench rest relaxes the gluten, making the dough easier to roll into neat, tight sub shapes without tearing.
Shape into Sub Rolls
Work with one portion at a time. Gently flatten it into a small rectangle with your fingers.
Roll it up tightly from the long edge, pressing as you go to build tension.
Pinch the seam to seal and gently roll into a log about 6–7 inches long. Repeat with remaining pieces.
Arrange and Proof the Rolls
Place the shaped rolls seam-side down on parchment-lined baking sheets, spacing them a few inches apart to allow room for expansion.
Lightly cover with a towel or lightly oiled plastic wrap.
Proof at room temperature for 2–3 hours, until very puffy and nearly doubled in size.
Preheat the Oven and Prepare Egg Wash
About 30 minutes before baking, preheat your oven to 400°F (200°C) with a rack in the middle.
In a small bowl, whisk the beaten egg with 15 ml water to make an egg wash.
Have a pastry brush ready. The egg wash will give the rolls a shiny, golden-brown crust when baked.
Brush, Score, and Bake the Rolls
Gently brush the tops of the proofed rolls with egg wash, taking care not to press down and deflate them.
Use a sharp knife or lame to make one long, shallow slash down each roll’s center.
Bake for 18–20 minutes, rotating pans halfway, until deep golden and hollow-sounding underneath.
Cool and Set the Crumb
Transfer the baked rolls immediately to a cooling rack. Allow them to cool for at least 30–45 minutes before slicing.
This resting time lets the crumb set and moisture redistribute, giving a better texture.
For softer crust, loosely tent the warm rolls with a clean towel as they cool.
Ingredient Swaps
- Flour: You can swap up to half the bread flour with all-purpose flour; for whole wheat, replace 25–30% of the bread flour and add 10–20 g extra water if the dough feels stiff.
- Oil & sugar: Any neutral oil or melted butter works in place of olive oil; replace sugar 1:1 with honey, maple syrup, or light brown sugar.
- Egg wash: For an egg‑free wash, brush with milk, cream, or plant milk; for vegan, use plant milk with a little oil or maple syrup for shine.
- Starter type: If your starter is stiffer or looser than 100% hydration, adjust the flour or water slightly to maintain a soft, only slightly tacky dough.
You Must Know
– **Scale • To change batch size accurately, multiply all ingredients by the same factor (e.g., ×1.5 for 12 rolls = 750 g flour, 225 g starter, 450 g water, 45 g oil, 37–38 g sugar, 15 g salt) and keep individual pieces around 110–120 g each**.
Similar dough weight per roll keeps texture and baking time consistent.
Serving Tips
- Pile with deli meats, cheese, lettuce, tomato, and pickles for classic subs.
- Serve warm with meatballs, marinara, and melted provolone for hearty meatball subs.
- Split, toast lightly, and fill with grilled vegetables and hummus for a vegetarian option.
- Use as mini garlic bread loaves alongside pasta or soups.
- Make breakfast subs: scrambled eggs, bacon or sausage, and cheese on toasted rolls.
Storage & Make-Ahead
Store baked rolls in an airtight container in the fridge for up to 4–5 days.
Slice as needed and lightly toast to refresh.
For make-ahead, freeze fully cooled rolls (whole or sliced) up to 2 months, tightly wrapped.
Thaw at room temperature, then warm in a 300°F oven.
Reheating
Reheat rolls gently: wrap in foil and warm in a 300°F oven 8–10 minutes.
Briefly microwave wrapped in a damp towel.
Or warm cut sides in a covered skillet on low.
Sourdough Subs in Delis
Step into a neighborhood deli in your mind for a moment, and you can almost smell it: warm sourdough sub rolls stacked behind the glass, their crackly golden crusts giving way to a tender, tangy crumb just waiting to cradle layers of meat, cheese, and crisp veggies.
Whenever I spot sourdough on the deli menu, I always choose it. That gentle tang cuts through rich mayo and oil, so every bite tastes bright instead of heavy.
I notice how the sturdy crumb soaks up tomato juices and vinaigrette but doesn’t collapse, even when the sandwich is seriously overstuffed.
When you bring your own rolls to a local deli, the staff usually pauses, smiles, and handles them like something special.
Final Thoughts
Give these sourdough sub rolls a try and see how they level up your sandwiches at home.
Don’t be afraid to tweak the sweetness, crust softness, or size to make them perfect for your own favorite fillings.
Frequently Asked Questions
How Do I Troubleshoot Dense or Gummy Sourdough Sub Rolls?
I fix dense, gummy rolls by letting dough rise longer, kneading to a smooth windowpane, and baking fully. I picture a sunlit kitchen, patient bubbles forming, then golden loaves cooling while I resist slicing too early.
Can I Adapt This Recipe for a Sourdough Sub Roll Business?
Yes, you can adapt it for a business. I’d scale ingredients by weight, stagger overnight proofs, and test bake times. Picture trays of bronzed rolls, steam curling up like morning fog in your first shop.
How Do Altitude or Climate Changes Affect Proofing These Rolls?
Altitude and humidity quietly rewrite your proofing clock; I watch dough swell faster in thin mountain air, slower on damp coastal mornings. Trust the dough, not the timer—aim for billowy, jiggly rolls before baking.
What Common Mistakes Ruin the Texture of Sourdough Sub Rolls?
You’ll ruin texture by underproofing, overproofing, or adding too much flour. When I rushed a chilly-morning batch, my rolls baked dense as pebbles—proof longer, keep dough slightly tacky, and handle it like a sleepy cat.
How Can Kids Safely Help Make Sourdough Sub Rolls?
Kids can safely help by stirring wet ingredients, dusting flour, shaping chubby little logs, and brushing egg wash while I handle knives and the hot oven; I love watching their floury hands and bright, yeasty smiles.
Sourdough Sub Rolls
Equipment
- 1 large mixing bowl
- 1 digital kitchen scale
- 1 measuring spoon set
- 1 Dough scraper
- 1 stand mixer with dough hook (optional)
- 1 clean kitchen towel or plastic wrap
- 2 parchment-lined baking sheets
- 1 sharp knife or lame
- 1 pastry brush
- 1 Cooling rack
Ingredients
- 150 gram active sourdough starter 100% hydration
- 300 gram warm water about 80–85°F
- 30 gram olive oil
- 25 gram granulated sugar
- 500 gram bread flour
- 10 gram fine sea salt
- 1 large egg for egg wash; beaten
- 15 milliliter water for egg wash
Instructions
- In a large mixing bowl, whisk together the active sourdough starter, warm water, olive oil, and sugar until mostly smooth.
- Add the bread flour and salt to the bowl and mix with a spoon or dough scraper until a rough shaggy dough forms.
- Knead the dough by hand for 8–10 minutes or in a stand mixer on low speed for 6–8 minutes until smooth, elastic, and only slightly tacky.
- Shape the dough into a ball, place it in a lightly oiled bowl, cover with a kitchen towel or plastic wrap, and let it rest at room temperature for 3–4 hours until noticeably puffy.
- After the bulk rise, gently deflate the dough and turn it out onto a lightly floured work surface.
- Weigh the dough and divide it into 8 equal portions using a dough scraper or sharp knife.
- Shape each portion into a rough ball, cover lightly with a towel, and let rest for 10–15 minutes to relax the gluten.
- Working with one piece at a time, gently flatten into a rectangle, then roll it up tightly from the long side, pinching the seam to form a log about 6–7 inches long.
- Place each shaped roll seam-side down on the parchment-lined baking sheets, spacing them a few inches apart.
- Lightly cover the rolls with a kitchen towel or lightly oiled plastic wrap and proof at room temperature for 2–3 hours, or until almost doubled and very puffy.
- About 30 minutes before baking, preheat the oven to 400°F (200°C) and place a rack in the middle position.
- In a small bowl, whisk together the beaten egg and 15 ml water to make an egg wash.
- Gently brush the tops of the proofed rolls with the egg wash, taking care not to deflate them.
- Use a sharp knife or lame to make one long shallow slash down the center of each roll.
- Bake the rolls for 18–20 minutes, rotating the pans halfway through, until deep golden brown and hollow-sounding when tapped on the bottom.
- Transfer the baked rolls to a cooling rack and let cool for at least 30–45 minutes before slicing and serving.
Notes

Cynthia Weatherford is a seasoned chef and culinary enthusiast who serves as the Recipe creator of Somonday. With decades of experience in the kitchen and a passion for exploring diverse cuisines, Cynthia brings a blend of creativity and technique to every dish. Known for transforming simple ingredients into show-stopping meals, Cynthia believes that cooking is an art form anyone can master. Dedicated to inspiring home cooks, Cynthia shares approachable recipes, pro tips, and culinary wisdom to make every meal memorable.