
There’s something about walking into your kitchen and being greeted by the warm, tangy aroma of freshly baked sourdough that feels like a hug.
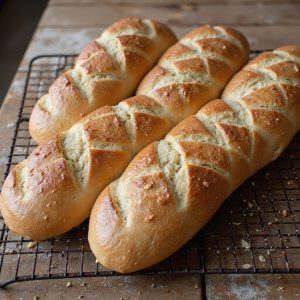
This sourdough “Subway-style” bread is soft yet sturdy, with a golden crust that crackles lightly when you slice it and a pillowy interior perfect for piling high with sandwich fillings.
It’s a cozy, versatile loaf that works for everyday meals—think quick lunches, make-ahead subs, or easy family dinners—and it’s surprisingly doable on a relaxed afternoon.
This bread is ideal for sandwich lovers, meal-preppers, and anyone who wants bakery-style loaves without the mystery ingredients.
I still remember a hectic week when we skipped takeout and built DIY subs on this bread; everyone chose their own fillings, and dinner basically made itself.
It’s perfect for Sunday suppers, packed lunches, and casual gatherings where a big platter of sandwiches saves the day.
Ready to bring this bread to life?
Why You’ll Love It
- Delivers tangy, bakery-style flavor with simple sourdough ingredients
- Creates soft, fluffy loaves perfect for overstuffed sandwiches and subs
- Uses natural fermentation instead of commercial yeast for gentle digestion
- Adapts easily to toppings like herbs, seeds, or cheese
- Freezes beautifully, so you can bake once and enjoy all week
Ingredients
- 200 g active sourdough starter 100% hydration — use freshly fed, bubbly starter
- 350 g warm water about 80–85°F — just warm to the touch, not hot
- 30 g granulated sugar — helps browning and soft crumb
- 30 g olive oil plus extra for greasing — use a mild, good-quality oil
- 500 g bread flour — higher protein for better chew and rise
- 10 g fine sea salt — evenly seasons the dough
- 10 g essential wheat gluten optional — boosts structure for a Subway-like texture
- 1 large egg beaten — for a shiny, soft crust via egg wash
- 15 ml water — thins the egg wash for easy brushing
Step-by-Step Method
Mix the Wet Ingredients
Whisk the active sourdough starter, warm water, sugar, and olive oil in a large bowl. Blend until the mixture looks mostly smooth and the sugar is dissolved.
Make certain the starter is well-distributed so fermentation is even. Set aside briefly while you prepare the dry ingredients.
Combine the Dry Ingredients
Measure the bread flour, fine sea salt, and vital wheat gluten into a separate bowl. Stir thoroughly to distribute the salt and gluten evenly.
Break up any clumps with your fingers or a whisk. This helps guarantee a uniform dough texture and consistent gluten development later during kneading.
Bring Dough Together
Add the dry mixture to the wet mixture all at once. Stir with a sturdy spoon or dough whisk until a shaggy dough forms.
Make sure no dry flour pockets remain. Scrape the sides and bottom of the bowl. The dough should look rough and slightly sticky at this stage.
Knead Until Smooth
Knead the dough by hand on a lightly floured surface or use a stand mixer with a dough hook on low speed. Work for 8–10 minutes until the dough becomes smooth, elastic, and slightly tacky.
Avoid adding too much flour. The dough should stretch without tearing easily.
Bulk Ferment the Dough
Lightly oil a clean bowl and place the dough inside, turning once to coat. Cover with plastic wrap or a damp towel.
Let it rise at warm room temperature for 2–3 hours. Wait until it has roughly doubled in size, indicating proper fermentation and gas development.
Divide the Dough Evenly
Turn the risen dough onto a lightly floured surface. Gently deflate it without aggressively punching it down.
Use a digital scale and dough scraper to divide the dough into four equal pieces. Keep pieces covered with a towel to prevent drying as you shape each one.
Shape into Sub Loaves
Work with one piece at a time. Flatten it into a rectangle with your hands.
Roll it tightly from the long edge into a log 10–12 inches long. Pinch the seam closed along the bottom and tuck in the ends slightly. Aim for even thickness along the entire length.
Arrange on Baking Sheets
Line two baking sheets with parchment paper. Place each shaped log seam-side down, spacing them apart to allow for rising and spreading.
Adjust their position so they bake evenly without touching. Lightly cover with plastic wrap or a damp towel to prevent skin forming.
Proof Until Puffy
Let the loaves proof at warm room temperature for 60–90 minutes. Watch for them to become puffy and noticeably larger.
Use the poke test: gently press a fingertip into the dough; it should spring back slowly, leaving a slight indentation. Avoid over-proofing so they still have oven spring.
Preheat and Prepare for Steam
About 30 minutes before baking, preheat your oven to 425°F (220°C). Place an empty metal pan on the lower rack to create steam later.
Make sure the racks are arranged so the bread bakes in the center. This preheating step guarantees even heat and better oven spring.
Make the Egg Wash
Whisk the large egg with 15 ml of water in a small bowl until smooth and thin. This egg wash gives the loaves a shiny, golden crust.
Keep the brush ready. Avoid overly thick egg wash, which can pool or bake into dark, tough patches on the crust.
Brush and Score the Loaves
Gently uncover the proofed loaves. Lightly brush the tops with egg wash, taking care not to press down and deflate them.
With a sharp knife or lame, score 3–4 diagonal slashes across each loaf. Cut swiftly and decisively to allow controlled expansion as they bake.
Create Steam and Bake
Just before loading the bread, spray the oven walls with water or pour a small amount of hot water into the preheated empty pan. Quickly place the baking sheets in the oven.
Bake for 15–18 minutes until the loaves are deep golden and sound hollow when tapped underneath.
Cool Before Slicing
Remove the loaves from the baking sheets and transfer to a wire rack immediately. Let them cool for at least 30 minutes.
This cooling time allows the crumb to set and moisture to redistribute. Slice only when fully cooled for clean cuts and a soft, sandwich-friendly texture.
Ingredient Swaps
- Use all-purpose flour instead of bread flour; reduce water by 10–20 g if the dough feels too sticky.
- Replace sugar 1:1 with honey, maple syrup, or light brown sugar; for sugar-free, use an equivalent weight of inulin or leave it out (bread will be less soft/sweet).
- Swap olive oil with any neutral oil or melted butter; for oil-free, omit and lightly increase water if needed.
- For dairy-free, skip any butter topping and stick with olive oil; the dough itself is already dairy-free.
- Replace egg wash with plant milk or a mix of plant milk + a little oil for a vegan crust.
- If you can’t find vital wheat gluten, just omit it; texture will be slightly less chewy but still good.
You Must Know
- Troubleshoot • If your dough feels stiff instead of soft and tacky: Drizzle in 5–10 g warm water and work it in until the dough just barely releases from your fingers. A too‑firm dough (like modeling clay) won’t puff well, giving tight, bready loaves instead of Subway‑style softness.
- Doneness • To know the loaves are fully cooked but still soft: Look for a rich golden top, pale‑gold sides, and a hollow sound when tapped on the bottom after about 15–18 minutes, or an internal temp of 195–200°F (90–93°C). Pulling them much darker drives off moisture and makes the crust tough instead of tender.
- Troubleshoot • If your loaves spread out like fat baguettes: Next time, shape more tightly (firm rolling and pinching), and let the second rise stop when they’re about 60–75% larger, not doubled—roughly 60–90 minutes at warm room temp. Overproofed dough loses strength and collapses sideways instead of rising upward.
- Scale • For fewer or more loaves: Multiply every ingredient by 0.5 for 2 loaves (e.g., 250 g flour, 100 g starter), or by 1.5 for 6 loaves (750 g flour, 300 g starter). Keep the same fermentation cues—dough should roughly double in bulk and feel airy—rather than relying on exact clock times.
- Flavor Boost • For a stronger sourdough tang and softer crumb: After the initial rise, refrigerate the covered dough 8–12 hours at 38–40°F (3–4°C), then shape cold and let it warm/proof until puffy (may take 90–120 minutes). The chill slows yeast, lets acids build, and improves flavor and sliceability.
Serving Tips
- Slice lengthwise and fill with deli meats, cheese, lettuce, tomato, and condiments.
- Toast lightly and serve alongside soups like tomato basil or chicken noodle.
- Make garlic bread: brush with garlic butter, sprinkle parsley, and broil briefly.
- Use for breakfast sandwiches with eggs, bacon or sausage, and melted cheese.
- Cut into strips, toast, and serve as dippers with spinach or artichoke dip.
Storage & Make-Ahead
This sourdough Subway bread keeps in the fridge for 4–5 days, well-wrapped or in an airtight bag.
It freezes very well: cool completely, wrap tightly, and freeze up to 2 months.
Thaw at room temperature, then refresh in a 325°F (165°C) oven for 5–8 minutes to revive softness.
Reheating
Reheat slices wrapped in a damp paper towel in the microwave (10–15 seconds).
Reheat whole loaves in a 300°F oven (8–10 minutes).
Reheat on a covered, low-heat skillet until just warm.
Subway’s Sourdough Sandwich Legacy
Step into a Subway on a busy afternoon, and you can almost trace the chain’s history in the scent of warm bread—soft rolls lined up behind the glass, each one promising a made‑to‑order sandwich.
I still picture the sandwich artist’s quick hands, that paper‑thin knife glide, and the way those pillowy loaves cradle stacks of fillings without collapsing.
When I bake this sourdough version at home, I’m chasing that same balance: soft, light crumb, gentle chew, and a crust that yields instead of shatters.
It’s the bread that made fully loaded footlongs feel everyday‑special.
With an active starter and a careful bake, you’re not just copying a sub roll—you’re recreating a tiny slice of that familiar, comforting ritual.
Final Thoughts
Give this sourdough Subway-style bread a try and see how close you can get to your favorite sandwich loaf at home.
Don’t be afraid to tweak the toppings, herbs, or bake time to make it perfectly your own.
Frequently Asked Questions
Can I Make This Sourdough Bread Completely Vegan Without Egg Wash or Dairy?
Yes, you can, and it’ll still bake up beautifully. I’d swap the egg wash for brushed olive oil or plant milk; picture golden, fragrant loaves emerging from your oven, soft crust gleaming gently, entirely and confidently vegan.
How Can I Adapt This Recipe for a Bread Machine or Food Processor?
You can. For a bread machine, I’d use “dough” cycle only, then shape and bake as written. With a food processor, I’d pulse just until the dough smooths, then rise, shape, and bake normally.
What Are Common Troubleshooting Tips if My Loaves Bake up Dense or Gummy?
If your loaves turn dense or gummy, I’d first lengthen fermentation, then proof until a gentle poke springs back slowly. I’d also bake a bit longer, guarantee an active starter, and avoid slicing before fully cooled.
How Do High-Altitude Conditions Affect Fermentation and Baking Times for This Recipe?
At high altitude, I’d lengthen fermentation, shorten bake time slightly, and watch dough, not clock. Thinner air dries loaves faster, so I’d proof until softly domed, then bake just to deep golden, tender-centered perfection.
Can I Freeze the Shaped Dough and Bake the Sourdough Sub Rolls Later?
Yes, you can. I shape the rolls, freeze on a tray until firm, then bag airtight. When you’re ready, thaw in warmth, let them puff like pillows, then bake until deeply golden and fragrant.
Sourdough Subway Bread
Equipment
- 2 Mixing bowls
- 1 digital kitchen scale
- 1 Measuring spoons set
- 1 Dough scraper
- 1 stand mixer with dough hook (optional)
- 2 baking sheets
- 2 sheets parchment paper
- 1 sharp knife or lame
- 1 plastic wrap roll or 2 clean kitchen towels
- 1 spray bottle (for water)
Ingredients
- 200 gram active sourdough starter 100% hydration
- 350 gram warm water about 80–85°F
- 30 gram granulated sugar
- 30 gram olive oil plus extra for greasing
- 500 gram bread flour
- 10 gram fine sea salt
- 10 gram vital wheat gluten optional for chewier texture
- 1 large egg beaten for egg wash
- 15 milliliter water for thinning egg wash
Instructions
- In a mixing bowl whisk together the active sourdough starter, warm water, sugar, and olive oil until mostly smooth.
- In a separate bowl combine bread flour, salt, and vital wheat gluten, then mix to distribute evenly.
- Add the dry ingredients to the wet mixture and stir until a shaggy dough forms with no dry flour patches remaining.
- Knead the dough by hand or with a stand mixer on low speed for 8–10 minutes until it becomes smooth, elastic, and slightly tacky but not sticky.
- Lightly oil a clean bowl, place the dough inside, cover with plastic wrap or a damp towel, and let rise at warm room temperature for 2–3 hours until roughly doubled.
- Gently turn the dough out onto a lightly floured surface and divide it into 4 equal pieces by weight.
- Working with one piece at a time, flatten into a rectangle, then roll tightly from the long side into a log about 10–12 inches long, pinching the seam closed.
- Place each shaped log seam-side down on a parchment-lined baking sheet, spacing them apart so they have room to expand.
- Lightly cover the loaves with plastic wrap or a damp towel and let proof at warm room temperature for 60–90 minutes until puffy and noticeably larger but still springy.
- About 30 minutes before baking, preheat the oven to 425°F (220°C) and place an empty pan on the lower rack for steam if desired.
- In a small bowl whisk together the egg and 15 ml water to make a thin egg wash.
- Gently brush the tops of the proofed loaves with the egg wash, taking care not to deflate them.
- Use a sharp knife or lame to score 3–4 diagonal slashes across each loaf to allow controlled expansion.
- Just before loading the bread, spray the oven walls with water or pour a small amount of hot water into the empty pan to create steam.
- Place the baking sheets in the oven and bake for 15–18 minutes until the loaves are deep golden brown and sound hollow when tapped on the bottom.
- Remove the bread from the oven and transfer the loaves to a wire rack to cool for at least 30 minutes before slicing.
Notes

Cynthia Weatherford is a seasoned chef and culinary enthusiast who serves as the Recipe creator of Somonday. With decades of experience in the kitchen and a passion for exploring diverse cuisines, Cynthia brings a blend of creativity and technique to every dish. Known for transforming simple ingredients into show-stopping meals, Cynthia believes that cooking is an art form anyone can master. Dedicated to inspiring home cooks, Cynthia shares approachable recipes, pro tips, and culinary wisdom to make every meal memorable.


