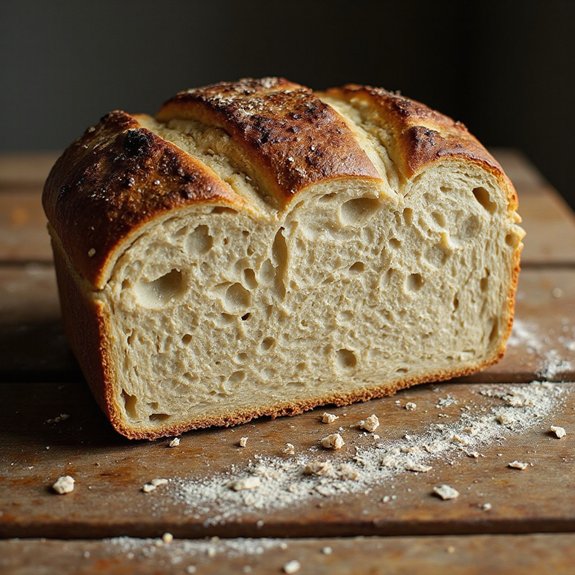
There’s something about a crackling, golden-brown loaf of sourdough wheat bread cooling on the counter that makes a kitchen feel like home.
The crust is deep amber and blistered, the inside soft and tender, with a gentle tang and the warm, nutty aroma of toasted wheat.
This is a cozy, slow-crafted staple—not a rushed weeknight fix, but a deeply satisfying loaf that rewards a bit of patience.
It’s perfect for beginners curious about sourdough, comfort seekers who love thick toast, and meal-preppers who plan hearty sandwiches and simple, rustic dinners.
I still remember one rainy Sunday when a rough week had everyone on edge. That loaf, sliced warm with butter melting into each airy pocket, turned into quiet comfort around the table.
It shines at lazy Sunday suppers, shared brunches, and anytime you need real, honest bread.
Ready to bring this loaf to life?
Why You’ll Love It
- Delivers bold, tangy flavor with a nutty whole wheat finish
- Builds great texture: crisp crust outside, soft and chewy inside
- Relies on simple, affordable ingredients—mostly flour, water, and salt
- Fits your schedule with flexible room-temperature or overnight proofing
- Elevates everyday sandwiches, toast, and bruschetta into something special
Ingredients
- 100 g active sourdough starter — 100% hydration, bubbly and recently fed
- 350 g water — room temperature for easier mixing and fermentation
- 300 g bread flour — unbleached, higher protein for better structure
- 200 g whole wheat flour — finely ground for good texture and flavor
- 9 g fine sea salt — dissolves evenly and seasons the crumb
- 10 g water — for dissolving the salt before mixing in
- 10 g olive oil — for lightly greasing the bowl to reduce sticking (optional)
- 20 g rice flour — for dusting the proofing basket to prevent sticking (or wheat flour)
Step-by-Step Method
Mix the Starter and Water
Whisk the active sourdough starter with room-temperature water in a large bowl. Break up any clumps until the mixture looks milky and mostly smooth.
This helps distribute yeast and bacteria evenly. Use a spatula to scrape the sides so no starter remains stuck, guaranteeing even fermentation from the very beginning.
Combine the Flours
Add the bread flour and whole wheat flour directly to the starter mixture. Mix with your hands or a dough scraper until all dry bits disappear.
Expect a rough, shaggy dough at this stage. Don’t worry about smoothness or gluten yet. Just make sure there are no dry pockets of flour left.
Rest for Autolyse
Cover the bowl with a towel or lid and let the dough rest for 30–60 minutes. Leave it at room temperature.
During this autolyse period, the flour hydrates and gluten begins to form on its own. This rest makes the dough easier to handle and improves flavor and final texture.
Dissolve and Add the Salt
In a small cup, dissolve the sea salt in the measured water. Pour this salt solution over the rested dough.
Use wet hands to pinch, squeeze, and fold the dough repeatedly. Work until the dough feels cohesive and the salty liquid disappears. This method distributes salt without tearing the dough excessively.
Stretch and Fold the Dough
Cover the bowl and begin bulk fermentation. Every 30–45 minutes for the first 2 hours, perform stretch-and-folds.
Grab one side of the dough, stretch it up, and fold it over itself. Rotate the bowl and repeat several times. This gently strengthens gluten and builds structure without kneading on the counter.
Bulk Ferment Until Risen
After the final fold, let the dough rest undisturbed. Watch for a 50% increase in volume, visible bubbles along the sides, and a slightly domed surface.
This usually takes 3–4 hours total, depending on room temperature. Avoid over-proofing; the dough should feel airy yet still elastic when gently pressed.
Pre-Shape the Dough
Lightly flour the work surface and carefully turn the dough out of the bowl. Use a scraper to avoid tearing.
Gently tuck edges toward the center to form a loose round. Don’t degas aggressively; preserve air bubbles. Let the dough rest uncovered for 15–20 minutes to relax before final shaping.
Shape into Final Loaf
After the bench rest, perform the final shaping. Form a tight boule or batard by folding and gently dragging the dough across the counter to create surface tension.
Aim for a smooth, taut exterior without tearing. This tension helps the loaf rise upward in the oven instead of spreading outward.
Prepare and Fill the Basket
Dust a proofing basket or lined bowl generously with rice flour or wheat flour. Guarantee the sides are coated to prevent sticking.
Place the shaped dough seam-side up into the basket. The seam will later open slightly in the oven, helping expansion. Cover with a towel or plastic wrap to prevent drying.
Proof at Room Temperature or Cold
Choose your proofing method. Let the dough rise at room temperature for 1–2 hours for a quicker bake, or refrigerate 10–14 hours for a slow, cold proof.
Cold proofing develops deeper flavor and makes scoring easier. In both cases, the dough should look slightly puffy and spring back slowly when pressed.
Preheat the Oven and Dutch Oven
About 45 minutes before baking, place a Dutch oven with its lid inside your oven. Preheat to 475°F (245°C).
This ensures the pot is thoroughly hot, which helps create strong oven spring. Preheating also mimics a professional steam-injected oven by trapping steam from the dough during the initial bake.
Transfer and Score the Dough
When ready to bake, carefully remove the hot Dutch oven. Invert the dough from the basket onto parchment or directly into the pot, now seam-side down.
Quickly score the top with a sharp knife or lame to control expansion. Make confident, deep cuts to guide how the loaf opens in the oven.
Steam-Bake with the Lid On
Cover the Dutch oven with its lid and place it back into the hot oven. Bake at 475°F (245°C) for 20 minutes.
The covered environment traps steam from the dough. This steam keeps the crust supple early on, allowing maximum oven spring and helping create a glossy, blistered surface.
Finish Baking Uncovered
Remove the lid and reduce oven temperature to 450°F (230°C). Continue baking for 18–22 minutes.
Watch for a deep golden-brown crust and firm feel when tapped. The internal temperature should be around 205–210°F (96–99°C), if measured. This uncovered stage drives off moisture and crisps the crust.
Cool Completely Before Slicing
Carefully lift the loaf from the Dutch oven and transfer it to a wire rack. Let it cool for at least 1–2 hours.
Resist cutting while warm, as steam escaping can make the crumb gummy and collapse structure. Once fully cooled, slice with a sharp bread knife and enjoy the developed flavor and texture.
Ingredient Swaps
- Use all-purpose flour in place of bread flour if needed; reduce water by 10–20 g if the dough feels too loose.
- For 100% whole wheat, replace the bread flour with more whole wheat and add 10–20 g extra water, as it absorbs more.
- For a vegan loaf, the recipe is already compliant; just skip the optional olive oil for a completely oil-free version.
- If you lack rice flour for dusting, use a 50/50 mix of all-purpose and whole wheat flour to help prevent sticking.
You Must Know
– Doneness • If the loaf looks done but you’re unsure: Tap the bottom; it should sound hollow and the crust should feel firm all over, or check that the internal temp is around 205–210°F (96–99°C).
This keeps you from underbaking a loaf that looks dark but is still doughy inside.
– Troubleshoot • If your dough spreads like a pancake before baking: Shorten any warm rise if it goes beyond doubling in volume and chill the shaped dough at least 8–10 hours before baking.
This prevents overproofing and lets the gluten set so the loaf holds height.
– Troubleshoot • When the crumb is very tight or gummy**: For tight crumb, make sure the dough rises at least 50% in bulk and shows visible side bubbles; for gumminess, allow at least 1–2 hours of cooling** before slicing.
Proper fermentation plus full cooling lets starches set and open up the interior.
– Flavor Boost • To increase tang or wheat complexity: Keep the shaped dough in the fridge up to 14 hours and use a starter that has peaked within the past 4–8 hours.
A cool, long rise plus a ripe (not collapsed) starter boosts acidity and deepens whole wheat flavor.
– Scale • For a smaller or larger loaf: Adjust all ingredients by the same factor (e.g., 0.5× for a small loaf, 1.5× for a big one) and then watch the same visual cues—about 50% rise in bulk and dough that jiggles slightly when the bowl is shaken.
Scaling by ratio keeps hydration, saltiness, and texture in balance.
Serving Tips
- Serve slightly warm with salted butter and a drizzle of honey or jam.
- Pair with hearty soups or stews like tomato, lentil, or beef barley.
- Use for open-faced sandwiches topped with avocado, eggs, or smoked salmon.
- Toast slices and serve alongside cheese, olives, and cured meats on a snack board.
- Cube and toast into croutons for green salads or roasted vegetable bowls.
Storage & Make-Ahead
Store cooled sourdough wheat bread at room temperature, wrapped in a bag or bread box, for 3–4 days.
For make-ahead, slice and freeze in an airtight bag up to 2–3 months; toast from frozen.
Avoid refrigerating, which speeds staling and dries the crumb.
Reheating
For best texture, reheat slices wrapped in foil in a 300°F oven.
Briefly microwave with a mug of water to avoid drying, or warm in a covered skillet over low heat.
Gold‑Rush Baking Traditions
Although we bake in tidy home kitchens now, sourdough wheat bread carries the wild spirit of the Gold‑Rush camps, where miners nursed their “mother” starter like a living treasure.
I picture a blackened pot at the edge of a campfire, dough rising slowly while pickaxes rest and the night turns cold.
When I refresh my starter, I’m echoing those rough‑handed bakers who slept with their crock tucked in a bedroll so it wouldn’t freeze.
They worked without scales or timers, judging dough by feel, warmth, and instinct.
You can borrow that mindset: trust your hands, watch how the dough relaxes, listen for the brittle crackle of the crust.
Each loaf becomes a small reenactment of that patient frontier craft.
Final Thoughts
Give this sourdough wheat bread recipe a try and enjoy a loaf that’s full of flavor, texture, and character.
Once you’ve baked it once, don’t hesitate to tweak the flour blend, hydration, or proofing time to make it your own signature bread.
Frequently Asked Questions
Can I Make This Loaf Entirely With Whole Wheat Flour, No Bread Flour?
Yes, you can, but the loaf’ll be denser. I’d add 10–15% more water, knead or fold longer, and let it ferment fully. Expect a deeper, nuttier flavor and a tighter, rustic crumb.
How Do I Fix a Loaf That Consistently Bakes up Dense and Heavy?
You fix dense loaves by feeding your starter earlier, extending bulk until the dough looks airy, and adding more water. I’d give it stronger shaping tension, a longer cold proof, and bake fully for deep color.
What’s the Best Way to Rescue an Over‑Proofed Sourdough Dough?
You can gently reshape, chill, then bake it in a supportive vessel. I’d deflate it softly, pre‑shape tighter, cold‑proof in the fridge, then bake straight from cold in a Dutch oven for maximum lift.
How Can I Adapt This Recipe for a Bread Machine or Stand Mixer?
You can absolutely adapt it: I’d use a stand mixer on low for mixing and early kneading, then let you handle the folds, shaping, and oven baking; bread machines struggle with sourdough’s flexible timing.
Which Altitude Adjustments Are Needed for Fermentation and Baking Times?
You’ll shorten bulk and proof by 20–40% above 3,000 feet, watching dough volume and bubbles, not the clock. I’d also bake hotter and slightly shorter, shielding the crust if it darkens too fast.

Sourdough Wheat Bread
Equipment
- 1 large mixing bowl
- 1 kitchen scale (or set of measuring cups and spoons)
- 1 dough scraper or spatula
- 1 proofing basket or medium bowl
- 1 clean kitchen towel
- 1 Dutch oven with lid or 1 baking stone plus steam tray
- 1 sharp knife or bread lame
- 1 wire cooling rack
Ingredients
- 100 gram active sourdough starter 100% hydration
- 350 gram water room temperature
- 300 gram bread flour unbleached
- 200 gram whole wheat flour finely ground
- 9 gram fine sea salt
- 10 gram water for dissolving salt
- 10 gram olive oil optional; for greasing bowl
- 20 gram rice flour or extra wheat flour; for dusting basket
Instructions
- In a large mixing bowl, whisk together 100 g active sourdough starter and 350 g room-temperature water until mostly dissolved.
- Add 300 g bread flour and 200 g whole wheat flour, then mix with a dough scraper or hands until no dry flour remains and a shaggy dough forms.
- Cover the bowl and let the dough rest (autolyse) for 30–60 minutes at room temperature.
- In a small cup, dissolve 9 g fine sea salt in 10 g water, then pour it over the rested dough.
- Pinch and fold the dough with wet hands until the salt water is fully incorporated and the dough feels cohesive.
- Cover the bowl and bulk ferment the dough for 3–4 hours at room temperature, performing 3–4 sets of stretch-and-folds every 30–45 minutes during the first 2 hours.
- After the final fold, let the dough rest undisturbed until it has risen by about 50% and shows bubbles along the sides and top.
- Lightly flour your work surface, gently turn the dough out, and shape it into a loose round, then let it rest for 15–20 minutes uncovered.
- After the bench rest, perform a final tightening shape (boule or batard), creating surface tension by gently dragging the dough against the counter.
- Dust a proofing basket or lined bowl generously with rice flour, then place the dough seam-side up into the basket.
- Cover and proof at room temperature for 1–2 hours, or refrigerate for 10–14 hours for a slow, cold proof.
- About 45 minutes before baking, place a Dutch oven (with lid) in the oven and preheat to 475°F (245°C).
- When ready to bake, carefully remove the hot Dutch oven, invert the dough seam-side down onto a piece of parchment or directly into the pot, and score the top with a sharp knife or lame.
- Cover with the lid and bake at 475°F (245°C) for 20 minutes.
- Remove the lid, reduce temperature to 450°F (230°C), and bake for another 18–22 minutes until deep golden brown and the crust feels firm.
- Carefully remove the bread from the Dutch oven and cool on a wire rack for at least 1–2 hours before slicing.
Notes

Cynthia Weatherford is a seasoned chef and culinary enthusiast who serves as the Recipe creator of Somonday. With decades of experience in the kitchen and a passion for exploring diverse cuisines, Cynthia brings a blend of creativity and technique to every dish. Known for transforming simple ingredients into show-stopping meals, Cynthia believes that cooking is an art form anyone can master. Dedicated to inspiring home cooks, Cynthia shares approachable recipes, pro tips, and culinary wisdom to make every meal memorable.