There’s something about rolling cool, blush-pink dough between your palms and breathing in that sweet strawberry aroma that feels instantly uplifting.
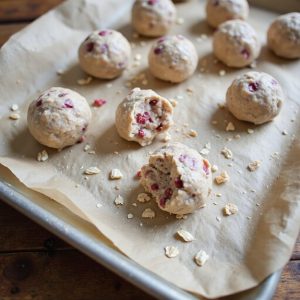
These Strawberry Cheesecake Protein Balls are a no-bake, poppable treat—soft, creamy, and studded with bits of oats—ready in about 15 minutes.
They’re perfect for busy mornings, post-workout snacks, sweet-tooth fans, and anyone trying to keep things a bit lighter without giving up dessert vibes.
I first threw these together on a chaotic Monday, when I’d skipped breakfast and was two Zoom calls deep.
A couple of these chilled bites—tangy, cheesecake-like, with a gentle vanilla finish—kept me focused and made me feel just a little more taken care of.
They shine during meal prep Sundays, for after-dinner cravings, lunchbox treats, or an easy, healthier option to set out at casual gatherings. Ready to bring this dish to life?
Why You’ll Love It
- Delivers nostalgic strawberry cheesecake flavor in a quick snack bite
- Packs in protein to keep you fuller between meals
- Comes together in one bowl with simple, accessible ingredients
- Stores well in the fridge for grab-and-go snacking
- Easily customizable with different protein powders or mix-ins
Ingredients
- 1 cup rolled oats — use old-fashioned oats for best texture
- 1 cup freeze-dried strawberries, crushed — pulverize into fine crumbs for even flavor
- 1 cup vanilla protein powder — choose a brand you enjoy the taste of
- 4 oz cream cheese, softened — let sit at room temperature for easy mixing
- 2 tbsp Greek yogurt, plain — adds tangy cheesecake flavor
- 3 tbsp honey — adjust to taste for desired sweetness
- 1 tsp vanilla extract — real vanilla gives better flavor than imitation
- 1 pinch fine salt — balances sweetness and brightens strawberry flavor
- 2–4 tbsp milk, any type, as needed — add gradually until dough holds together
Step-by-Step Method
Line the tray
Prepare a flat surface before you start mixing. Line a rimmed baking sheet or large plate with parchment or wax paper.
Smooth it out so it lies flat and reaches the edges. Set the tray aside within easy reach.
This prevents the protein balls from sticking and makes transferring them to the fridge simple.
Combine the dry ingredients
Measure the rolled oats, crushed freeze-dried strawberries, vanilla protein powder, and a pinch of fine salt into a medium mixing bowl.
Stir thoroughly with a spoon or spatula until everything looks evenly distributed. Break up any clumps of strawberries or protein powder.
This step guarantees every bite has balanced flavor and texture throughout.
Add the creamy components
Spoon in the softened cream cheese and Greek yogurt directly into the dry mixture. Drizzle in the honey and add the vanilla extract.
Start folding the ingredients together with the spoon or spatula.
Press the back of the spoon against the bowl to help the cream cheese incorporate smoothly without leaving large lumps in the mixture.
Bring the dough together
Keep stirring and pressing until the mixture starts forming clumps and resembles a thick, cohesive dough.
Scrape down the sides of the bowl to collect any dry bits. If you see pockets of dry oats or powder, press them into the creamy parts.
Aim for a mixture that mostly sticks together when squeezed in your hand.
Adjust with milk
Add milk one tablespoon at a time, mixing well after each addition. Observe the texture closely.
Stop adding milk when the mixture holds together easily when pressed but doesn’t feel wet or overly sticky.
If it becomes too loose, sprinkle in a little more oats or protein powder to firm it up again.
Shape the protein balls
Scoop out about one tablespoon of the mixture using a measuring spoon or small scoop.
Roll it between your palms to form a smooth, round ball. Apply gentle, even pressure so it doesn’t crack.
If the mixture sticks, lightly dampen your hands. Aim for uniform size so the balls chill and firm up evenly.
Arrange and chill
Place each formed ball on the prepared parchment-lined tray, spacing them slightly apart so they don’t stick together.
Continue until all the mixture is used. Transfer the tray to the refrigerator.
Chill the protein balls for at least 30 minutes, allowing them to firm up and develop their ideal cheesecake-like texture.
Store for later
Once the protein balls are firm, move them into an airtight container.
Arrange them in a single layer or separate layers with parchment to prevent sticking. Store the container in the refrigerator for up to five days.
For longer storage, freeze them and thaw in the fridge before eating for best texture and flavor.
Ingredient Swaps
- Make it dairy-free: use vegan cream cheese, dairy-free yogurt, plant-based protein powder, and non-dairy milk.
- For nut-free: choose oat, rice, or pea protein powder and a neutral milk like oat or rice milk.
- Budget/availability swaps: replace freeze-dried strawberries with finely chopped dried strawberries or raisins and a spoonful of strawberry jam; swap honey with maple syrup or agave.
You Must Know
- Troubleshoot – If the dough feels crumbly and won’t hold when you squeeze a portion in your hand, work in an extra 1 teaspoon milk at a time until a test ball stays together after 10–15 seconds at room temp; this keeps the balls tender instead of chalky.
- Troubleshoot – If your palms get coated and the balls look ragged, lightly dampen your hands with cold water every 3–4 balls; a thin moisture layer keeps the surface smooth and gives a “truffle-like” finish you can see right away.
- Flavor Boost – For a stronger “cheesecake” vibe, add a tiny pinch more salt (about 1/16 teaspoon) and 1–2 drops extra vanilla, then taste a pea-sized bit after chilling 10 minutes; cold dulls sweetness, so aim for slightly sweeter than you think at this stage.
- Scale – To double the recipe cleanly, keep everything at 2× except the milk and honey; start with 3 tablespoons honey and 3 tablespoons milk, then adjust so the final dough is soft but not tacky when you press a 1-tablespoon scoop.
- Make-Ahead – For freezer storage up to 2 months, arrange the balls in a single layer and freeze 1 hour, then move to an airtight container; thaw 10–15 minutes in the fridge or 5–10 minutes at room temp until the centers feel just slightly cool but no longer firm like ice.
Serving Tips
- Serve chilled in mini cupcake liners for a clean, bite-size party presentation.
- Pair with fresh strawberry slices and a dollop of Greek yogurt on the side.
- Arrange on a platter with other flavored protein balls for a colorful snack board.
- Drizzle lightly with melted white chocolate for a dessert-style, cheesecake-inspired finish.
- Pack in small snack containers with mixed nuts for an on-the-go protein boost.
Storage & Make-Ahead
Strawberry cheesecake protein balls keep well in the fridge for up to 5 days in an airtight container.
They’re great for meal prep—make a batch on Sunday for snacks all week.
For longer storage, freeze in a single layer, then transfer to a container; enjoy within 2–3 months.
Reheating
These are best enjoyed chilled, not hot.
If desired, briefly soften in the microwave 5–10 seconds, or place at room temperature 10–15 minutes; avoid oven or stovetop reheating.
Strawberry Cheesecake Snack Trends
Once your protein balls are chilled and ready, you’re right in step with one of the coziest snack trends around: strawberry cheesecake everything.
Everywhere I look, classic desserts are shrinking into bite-sized, protein-packed treats, and these little bites fit right in—like something you’d find in a chic coffee shop case, lined up beside cold brew and oat milk lattes.
I love how this trend leans into nostalgia without the sugar crash. Strawberry cheesecake shows up in yogurts, overnight oats, smoothie bowls, even ice cream bars—but these protein balls feel especially practical.
You can tuck a few into a lunchbox, keep a container on your desk, or pair them with tea at night when you want dessert vibes without turning on the oven.
Final Thoughts
Give these Strawberry Cheesecake Protein Balls a try for your next snack break—you might find they become a new staple in your fridge.
Don’t be afraid to tweak the sweetness, protein powder, or mix-ins to make them perfectly your own.
Frequently Asked Questions
Can I Calculate the Exact Protein, Calorie, and Macro Breakdown per Ball?
Yes, you can. I’d plug each ingredient into a nutrition calculator, total the calories, protein, carbs, and fats, then divide each value by 16, so every ball’s macros feel precisely measured and reassuring.
How Can I Make This Recipe Fully Vegan and Still Taste Like Cheesecake?
You can, and I’d guide you like this: swap cream cheese and yogurt for vegan versions, honey for maple syrup, milk for plant milk, then add lemon zest and extra vanilla so every bite still whispers “cheesecake.”
What’s the Best Way to Package These for Gifting or Bake Sales?
I’d tuck each one into mini parchment cups, nestle them in a kraft bakery box, then add twine and handwritten labels. I’d keep them chilled until pickup so they arrive firm, fragrant, and irresistible.
Can I Ship These Protein Balls Without Refrigeration, and for How Long Safely?
You can’t safely ship them unrefrigerated for more than a few hours; they’re perishable. I’d tell you to use cold packs, insulation, and 1–2 day shipping max, or freeze beforehand to stretch safety.
Strawberry Cheesecake Protein Balls
Equipment
- 1 medium mixing bowl
- 1 Small bowl
- 1 mixing spoon or spatula
- 1 set measuring cups
- 1 set measuring spoons
- 1 rimmed baking sheet or large plate
- 1 sheet parchment paper or wax paper
- 1 airtight container
Ingredients
- 1 cup rolled oats
- 1 cup freeze-dried strawberries crushed
- 1 cup vanilla protein powder
- 4 ounce cream cheese softened
- 2 tablespoon Greek yogurt plain
- 3 tablespoon honey
- 1 teaspoon vanilla extract
- 1 pinch fine salt
- 1 2–4 tablespoons milk any type; as needed
Instructions
- Line a baking sheet or large plate with parchment or wax paper and set aside.
- In the medium mixing bowl, combine rolled oats, crushed freeze-dried strawberries, vanilla protein powder, and salt, stirring until evenly mixed.
- In the same bowl, add softened cream cheese, Greek yogurt, honey, and vanilla extract.
- Stir the mixture with the spoon or spatula until it starts to come together into a thick dough.
- Add milk 1 tablespoon at a time, stirring after each addition, until the mixture holds together when pressed but is not sticky.
- Scoop out about 1 tablespoon of the mixture and roll it between your palms to form a smooth ball.
- Place each formed ball onto the prepared parchment-lined baking sheet or plate.
- Continue shaping balls with the remaining mixture, spacing them slightly apart.
- Refrigerate the tray of protein balls for at least 30 minutes to firm up.
- Transfer the chilled strawberry cheesecake protein balls to an airtight container and store in the refrigerator until serving.
Notes

Cynthia Weatherford is a seasoned chef and culinary enthusiast who serves as the Recipe creator of Somonday. With decades of experience in the kitchen and a passion for exploring diverse cuisines, Cynthia brings a blend of creativity and technique to every dish. Known for transforming simple ingredients into show-stopping meals, Cynthia believes that cooking is an art form anyone can master. Dedicated to inspiring home cooks, Cynthia shares approachable recipes, pro tips, and culinary wisdom to make every meal memorable.