
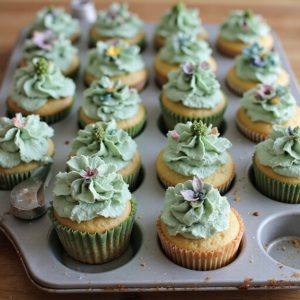
Picture a tray of tiny terracotta “pots,” each one crowned with plump, buttercream succulents in shades of sage, dusty rose, and soft jade.
These succulent cupcakes are a cozy, showstopping dessert—simple vanilla or chocolate bases dressed up with creamy frosting that’s ready in about an hour.
They’re perfect for sweet-tooth fans, creative bakers, and anyone who needs a low-stress but impressive treat for birthdays, showers, or easy entertaining.
I still remember a hectic Sunday when guests arrived early and my carefully planned layer cake failed spectacularly. I quickly switched to cupcakes, piping little cactus swirls and rosettes on top.
Those “emergency” succulent cupcakes became the star of the night; people couldn’t stop talking about how pretty—and surprisingly easy—they were.
Whether it’s a last-minute gathering, a quiet afternoon project, or a special treat for someone you love, these cupcakes fit right in. Ready to bring this dessert to life?
Why You’ll Love It
- Delivers tender, moist vanilla cupcakes with a rich, buttery crumb.
- Creates stunning, realistic “potted” succulents that impress without special art skills.
- Uses simple pantry ingredients and basic baking tools most kitchens have.
- Customizes easily with your favorite colors, succulent shapes, and designs.
- Makes a showstopping dessert perfect for parties, showers, and gifts.
Ingredients
- 1 1/2 cups all-purpose flour — spoon and level for accurate measuring
- 1 1/2 teaspoons baking powder — assures a light, fluffy rise
- 1/4 teaspoon baking soda — balances acidity from sour cream
- 1/4 teaspoon fine salt — enhances overall flavor
- 1/2 cup unsalted butter, softened — bring to room temp for easy creaming
- 3/4 cup granulated sugar — gives sweetness and structure
- 2 large eggs, room temperature — mix in one at a time for smooth batter
- 2 teaspoons vanilla extract — use pure vanilla for best flavor
- 1/2 cup whole milk, room temperature — prevents batter from curdling
- 1/4 cup sour cream, room temperature — adds moisture and tenderness
- 1 cup unsalted butter, softened — base for smooth, pipeable frosting
- 3 1/2 cups powdered sugar, sifted — sifting prevents lumpy frosting
- 2 teaspoons vanilla extract — flavors the buttercream
- 2 tablespoons heavy cream or milk — adjust for desired piping consistency
- 1/8 teaspoon fine salt — balances sweetness in the frosting
- 4–6 drops green gel food coloring, assorted shades — create varied succulent greens
- 2–3 drops pink gel food coloring — for accent succulent tips and blooms
- 2–3 drops purple gel food coloring — adds depth and contrast
- 2–3 drops yellow gel food coloring — use sparingly for small flower details
Step-by-Step Method
Preheat the oven to 350°F (175°C). Line a standard 12-cup muffin tin with paper cupcake liners.
Make sure the rack is placed in the center of the oven for even baking. Set the prepared pan aside while you mix the batter so it’s ready as soon as the batter is finished.
Combine Dry Ingredients
Whisk together the flour, baking powder, baking soda, and salt in a medium mixing bowl. Break up any lumps so the mixture is light and uniform. Set this bowl aside.
Keeping the dry ingredients separate and evenly combined helps the cupcakes rise properly and maintain a tender crumb.
Cream Butter & Sugar
Beat the softened butter and granulated sugar in a large mixing bowl with a hand or stand mixer on medium speed. Continue mixing for 2–3 minutes until the mixture looks pale, light, and fluffy.
This step incorporates air into the batter, which helps create soft, well-risen cupcakes.
Add Eggs & Vanilla
Add the eggs one at a time to the butter mixture. Beat well after each addition until fully incorporated and smooth.
Mix in the vanilla extract until evenly distributed. Scrape down the sides of the bowl with a spatula to make certain everything blends together without streaks of egg or butter.
Mix Milk & Sour Cream
Whisk together the whole milk and sour cream in a small bowl until completely smooth. Make sure there are no lumps of sour cream remaining.
Using room-temperature dairy helps it blend easily into the batter and contributes to a moist, tender cupcake texture without overmixing.
Alternate Dry & Wet
Add one-third of the dry ingredients to the butter mixture and mix on low just until combined. Pour in half of the milk mixture and mix gently.
Repeat with another third of the dry ingredients, the remaining milk mixture, then the final dry portion. Mix only until just combined to avoid tough cupcakes.
Fill & Bake
Divide the batter evenly among the 12 liners, filling each about two-thirds full. Use a spoon or scoop for consistency.
Place the pan in the preheated oven and bake for 16–18 minutes. Check doneness by inserting a toothpick into the center; it should come out clean or with a few moist crumbs.
Cool Completely
Remove the pan from the oven and let the cupcakes cool in the tin for 5 minutes. Carefully transfer them to a wire cooling rack.
Allow them to cool completely for at least 25 minutes. Don’t frost while warm, or the buttercream will melt and slide off, ruining the succulent designs.
Beat Butter for Frosting
Place softened butter in a large mixing bowl. Beat on medium-high speed for about 2 minutes until the butter is creamy, smooth, and slightly paler in color.
Properly aerated butter is the base of a fluffy buttercream that pipes cleanly and holds detailed succulent shapes without collapsing.
Add Sugar & Vanilla
Gradually add the sifted powdered sugar, about 1/2 cup at a time, mixing on low to avoid a sugar cloud. Once incorporated, increase the speed to medium until smooth.
Add the vanilla extract and salt. Scrape the bowl as needed so the frosting stays uniform in texture and flavor.
Adjust Consistency
Add 1 tablespoon of heavy cream or milk to the frosting and beat on medium-high until light and fluffy. If the frosting feels too thick to pipe, add a little more cream, a teaspoon at a time.
Aim for a pipeable but firm consistency that will hold ridges and details for succulent petals.
Tint Frosting Shades
Divide the frosting into 4–5 small bowls. Tint each portion with gel food coloring, using a variety of greens for realistic succulents.
Add small amounts of pink, purple, or yellow for accent blooms. Mix well. Use gel colors to keep the frosting thick and stable, avoiding the thinning effect of liquid dyes.
Prepare Piping Bags
Fit piping bags with a leaf tip, small round tip, and small star tip. Fill each bag with different frosting colors, folding the tops to prevent leaks.
Avoid overfilling to maintain better control. Squeeze some frosting back into the bowl if the bag feels too full or difficult to handle precisely.
Base Coat Cupcakes
If desired, spread a thin layer of plain or lightly tinted frosting over each cooled cupcake with an offset spatula or butter knife. Create a smooth, even surface to support the piped succulents.
This base layer helps any small gaps between piped shapes look intentional and fully covered.
Pipe Succulent Clusters
Pipe small rosettes, stars, and rounded mounds in clusters on each cupcake, using the different piping tips. Vary the sizes and colors to mimic various succulent types.
Keep the shapes close together to resemble a full potted arrangement. Work slowly so each element maintains clean edges and definition.
Add Leaves & Details
Use the leaf tip to pipe small, pointed leaves around and between the clusters. Angle the tip slightly and pull away to create sharp leaf tips.
Add occasional accent dots or mini blooms with the round and star tips. Layer shapes to build dimension and a natural, organic look across the cupcake top.
Chill to Set
Place the decorated cupcakes in the refrigerator for 15–20 minutes to help the buttercream firm up. This brief chill sets the succulent shapes so they hold during serving and transport.
After chilling, serve the cupcakes slightly cool or at room temperature for the best flavor and texture.
Ingredient Swaps
- Use cake flour instead of all-purpose flour for a softer crumb, or a 1:1 gluten-free all-purpose blend if needed.
- Swap sour cream with plain Greek yogurt, and whole milk with any rich dairy-free milk (like oat or almond) plus 1 tablespoon of neutral oil.
- For dairy-free cupcakes and frosting, use vegan butter sticks and plant milk, and be sure your food coloring is gel-based and labeled vegan.
You Must Know
– Make-Ahead – To work in stages, keep unfrosted cupcakes covered at room temp for up to 24 hours, and store colored buttercream in airtight containers in the fridge for up to 3 days.
Let frosting sit 20–30 minutes at room temp, then beat briefly until fluffy before piping so your succulents hold sharp details.
Serving Tips
- Serve on a wooden board or slate for a “mini potted garden” effect.
- Arrange cupcakes in a terra-cotta pot lined with parchment for a centerpiece.
- Pair with light herbal tea or citrusy lemonade to complement the delicate vanilla flavor.
- Dust serving platter lightly with crushed graham crackers to mimic sandy soil.
- Mix succulent cupcakes with plain frosted ones for a varied, textured dessert display.
Storage & Make-Ahead
Store decorated succulent cupcakes in an airtight container in the fridge for up to 3 days.
Bring to room temperature before serving for best texture.
Cupcakes (unfrosted) freeze well up to 2 months.
Thaw in the fridge, then decorate.
Frosted cupcakes can be frozen up to 1 month.
Reheating
Reheat succulent cupcakes gently: briefly microwave unfrosted cupcakes 5–10 seconds.
Or warm in a 300°F (150°C) oven for 5–8 minutes.
Avoid stovetop methods to preserve texture and decorations.
Succulent Cupcakes on Wedding Tables
Lantern-lit tables instantly feel more welcoming when each place setting holds a tiny “potted” garden in the form of a succulent cupcake. I love how guests lean in, expecting soil and stone, then realize it’s tender cake under “terra-cotta” liners and buttercream rosettes.
When I design a wedding table, I picture your guests brushing candlelight over the cupcakes, admiring shaded greens and dusky pink tips, like sun-kissed echeverias.
I keep the palette soft—sage, moss, pale jade—so the cupcakes echo eucalyptus garlands and simple white plates. The buttercream’s vanilla scent mingles with flowers, while a faint chill from the frosting contrasts with the warm room.
Each cupcake doubles as décor and dessert, a small, edible keepsake waiting by every glass.
Final Thoughts
Now that you know how to make these succulent cupcakes, have fun experimenting with different colors, shapes, and arrangements to make them your own.
Don’t be afraid to tweak the flavors or designs—each batch can be a new “garden” to create and share.
Frequently Asked Questions
Can I Use Natural Food Colorings Instead of Gel for the Succulents?
Yes, you can, but I’d warn you the colors run softer and the frosting loosens. Think matcha, spirulina, beet, blueberry—earthy greens and dusky pinks that feel like a desert garden at sunset.
How Do I Prevent Air Bubbles in My Buttercream While Piping?
I prevent bubbles by mixing on low, then pressing the buttercream against the bowl like smoothing wet sand. I always stir slowly with a spatula, fill bags carefully, and squeeze out the first squiggly inch.
Are These Cupcakes Suitable for People With Nut Allergies?
Yes, they’re generally safe for nut‑allergic guests, since I don’t add nuts, but I’d urge you to check every label, avoid cross‑contamination, and confirm your kitchen’s nut‑free—scent of vanilla shouldn’t hide hidden risks.
What’s the Best Way to Transport Fully Decorated Succulent Cupcakes?
I’d tuck them into a deep cupcake carrier, each swirl cradled in its own well, then slide the box into my car’s flattest spot, cool interior humming, so every tiny petal arrives perfectly intact.
Can I Freeze the Frosted Cupcakes Without Ruining the Succulent Designs?
Yes, you can. I chill them uncovered until firm, then wrap each in plastic and freeze. When you’re ready, I thaw them in the fridge, unwrapped at the end so the colors stay crisp.
Succulent Cupcakes
Equipment
- 1 standard 12-cup muffin tin
- 12 paper cupcake liners
- 2 medium mixing bowls
- 1 large mixing bowl
- 1 hand mixer or stand mixer
- 3 silicone spatulas
- 1 Whisk
- 1 set measuring cups
- 1 set measuring spoons
- 1 wire cooling rack
- 2 piping bags
- 3 small piping tips (leaf tip, small round tip, small star tip)
- 1 offset spatula or butter knife
Ingredients
- 1 1/2 cup all-purpose flour
- 1 1/2 teaspoon baking powder
- 1/4 teaspoon baking soda
- 1/4 teaspoon fine salt
- 1/2 cup unsalted butter softened
- 3/4 cup granulated sugar
- 2 large eggs room temperature
- 2 teaspoon vanilla extract
- 1/2 cup whole milk room temperature
- 1/4 cup sour cream room temperature
- 1 cup unsalted butter softened
- 3 1/2 cup powdered sugar sifted
- 2 teaspoon vanilla extract
- 2 tablespoon heavy cream or milk
- 1/8 teaspoon fine salt
- 1 4–6 drops green gel food coloring assorted shades
- 1 2–3 drops pink gel food coloring
- 1 2–3 drops purple gel food coloring
- 1 2–3 drops yellow gel food coloring
Instructions
- Preheat the oven to 350°F (175°C) and line the muffin tin with 12 paper liners.
- In a medium bowl whisk together flour, baking powder, baking soda, and salt, then set aside.
- In a large bowl beat the softened butter and granulated sugar with a mixer on medium speed until light and fluffy, about 2–3 minutes.
- Add the eggs one at a time, beating well after each addition, then mix in the vanilla extract.
- In a small bowl whisk together the milk and sour cream until smooth.
- Add one-third of the dry ingredients to the butter mixture and mix on low just until combined.
- Add half of the milk mixture and mix on low, then repeat alternating dry ingredients and milk mixture, ending with dry ingredients, mixing only until just combined.
- Divide the batter evenly among the 12 cupcake liners, filling each about two-thirds full.
- Bake the cupcakes for 16–18 minutes or until a toothpick inserted in the center comes out clean.
- Remove the pan from the oven and let the cupcakes cool in the tin for 5 minutes.
- Transfer the cupcakes to a wire rack and cool completely for at least 25 minutes before frosting.
- To make the buttercream, beat the softened butter in a large bowl on medium-high speed until creamy and pale, about 2 minutes.
- Gradually add the powdered sugar, 1/2 cup at a time, mixing on low until incorporated, then increasing to medium speed until smooth.
- Add vanilla extract, salt, and 1 tablespoon of heavy cream or milk, then beat on medium-high until fluffy, adding more cream as needed for a pipeable consistency.
- Divide the frosting into 4–5 small bowls to create different succulent colors.
- Tint each portion of frosting with gel food coloring to get various greens and a few accent colors like pink, purple, and yellow, mixing well.
- Fit piping bags with a leaf tip, small round tip, and small star tip, then fill each bag with a different color frosting.
- If desired, spread a thin layer of plain frosting on top of each cooled cupcake with an offset spatula to create a base.
- Pipe small rosettes, stars, and rounded mounds in clusters to resemble different succulent shapes on each cupcake.
- Use the leaf tip to add small pointed leaves around the clusters to complete the succulent look.
- Chill the decorated cupcakes in the refrigerator for 15–20 minutes to help the frosting set before serving.
Notes

Cynthia Weatherford is a seasoned chef and culinary enthusiast who serves as the Recipe creator of Somonday. With decades of experience in the kitchen and a passion for exploring diverse cuisines, Cynthia brings a blend of creativity and technique to every dish. Known for transforming simple ingredients into show-stopping meals, Cynthia believes that cooking is an art form anyone can master. Dedicated to inspiring home cooks, Cynthia shares approachable recipes, pro tips, and culinary wisdom to make every meal memorable.


