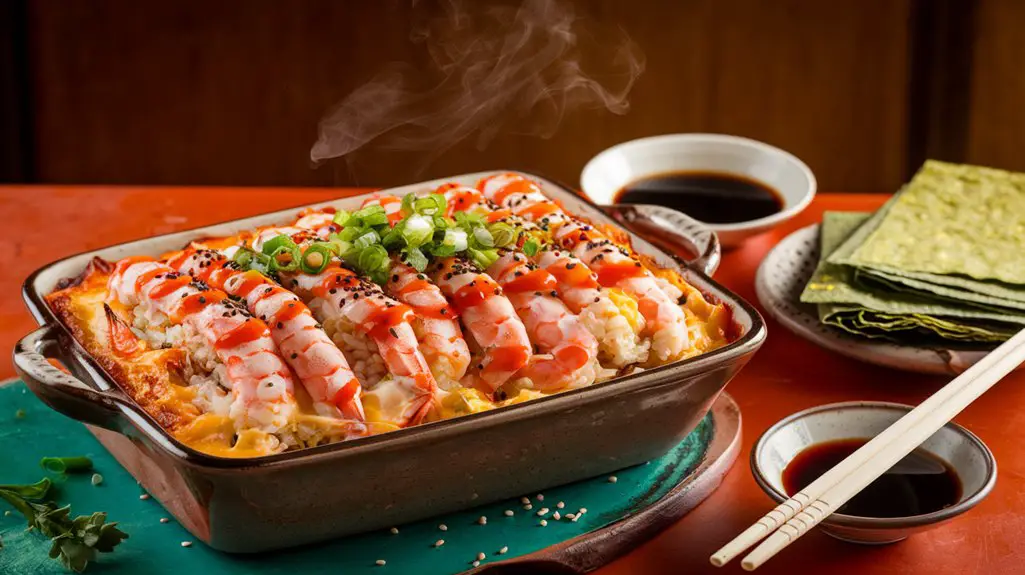
Imagine transforming the delicate flavors of sushi into a warm, comforting casserole that’s perfect for sharing with friends and family.
With a sushi bake, you can enjoy the rich, savory layers of seasoned rice, creamy seafood, and crisp toppings, all baked to golden perfection.
It’s a dish that invites creativity and personal touches, allowing you to express your culinary artistry.
Curious about how to create this irresistible fusion masterpiece?
Kitchen Tools Required
When preparing Sushi Bake, having the right kitchen tools on hand guarantees a smooth and efficient cooking process.
Start with a reliable rice cooker for perfectly cooked sushi rice, ensuring each grain is tender and flavorful.
A sharp chef’s knife proves essential for precisely slicing green onions and nori sheets.
Use a large mixing bowl to combine your seafood mixture thoroughly, achieving a harmonious blend of flavors.
A sturdy baking dish is vital for assembling and baking your layers, providing even heat distribution for a golden, bubbly top.
Don’t forget a silicone spatula to spread the ingredients evenly, maintaining the dish’s aesthetic.
Finally, a pair of kitchen shears simplifies cutting nori sheets into uniform pieces, enhancing the presentation of your Sushi Bake.
Recipe
Sushi Bake is a modern twist on traditional sushi, offering the same delicious flavors in a warm, shareable format.
This dish combines the comforting elements of a casserole with the classic taste of sushi, making it perfect for gatherings or a cozy night in.
With its layers of seasoned rice, creamy seafood mixture, and crispy toppings, Sushi Bake provides a satisfying culinary experience that even novice cooks can master.
It’s a versatile dish that can be customized with your favorite sushi ingredients, allowing for creativity and personalization in the kitchen.
To prepare Sushi Bake, you’ll need to start with cooking and seasoning sushi rice before layering it with a creamy seafood mixture.
The dish is then baked to perfection, resulting in a slightly golden and bubbly top.
This recipe is simple, requiring minimal cooking skills and no special equipment like rolling mats.
The end result is a delightful combination of textures and flavors that can be enjoyed by both sushi enthusiasts and those new to the cuisine.
Here’s a straightforward recipe to guide you through the process.
Ingredients:
- Sushi rice
- Rice vinegar
- Sugar
- Salt
- Imitation crab meat or cooked shrimp
- Mayonnaise
- Cream cheese
- Soy sauce
- Sriracha
- Nori sheets
- Sesame seeds
- Green onions
To make Sushi Bake, start by cooking the sushi rice according to the package instructions.
Once the rice is cooked, season it with a mixture of rice vinegar, sugar, and salt, ensuring the seasoning is well incorporated.
Spread the seasoned rice evenly in the bottom of a baking dish.
In a separate bowl, combine the imitation crab meat or cooked shrimp with mayonnaise, cream cheese, soy sauce, and Sriracha.
Mix until the ingredients are well combined, then layer this mixture evenly over the rice.
Top the dish with crumbled nori sheets and a sprinkle of sesame seeds.
Bake in a preheated oven at 375°F (190°C) for about 15-20 minutes, or until the top is slightly golden and bubbly.
Garnish with chopped green onions before serving.
For the best results, make sure the sushi rice is evenly spread in the baking dish to create a stable base for the seafood layer.
You can adjust the amount of Sriracha to control the spice level, and consider adding other toppings like avocado or cucumber for additional flavor and texture.
Serving Sushi Bake with soy sauce on the side allows guests to customize their experience.
Feel free to experiment with different types of seafood or add-ins to suit your taste preferences.
Cook & Prep Time
Preparing Sushi Bake is an efficient and enjoyable experience that won’t take much of your time.
You’ll spend about 20 minutes on preparation, guaranteeing each ingredient is perfectly seasoned and layered.
Begin by cooking the sushi rice—this step takes around 15 minutes.
As it cools, mix the seafood with mayonnaise, cream cheese, and seasonings, taking an additional 5 minutes.
Once your layers are ready, the baking process requires a brief 15-20 minutes at 375°F (190°C).
This guarantees the flavors meld beautifully, with a golden, bubbly top.
In just under an hour from start to finish, you’ll have a stunning dish ready to serve.
The efficiency of the process leaves you more time to enjoy this culinary masterpiece with your guests.
Cooking Steps
To master the art of Sushi Bake, begin by cooking your sushi rice with precision, following the package instructions for perfect texture.
Once the rice is ready, enhance its flavor by seasoning it with a balanced mixture of rice vinegar, sugar, and salt.
Next, skillfully blend your seafood with mayonnaise, cream cheese, soy sauce, and Sriracha, layer it over the seasoned rice, sprinkle sesame seeds, and bake until beautifully golden.
Step 1. Cook Rice per Instructions
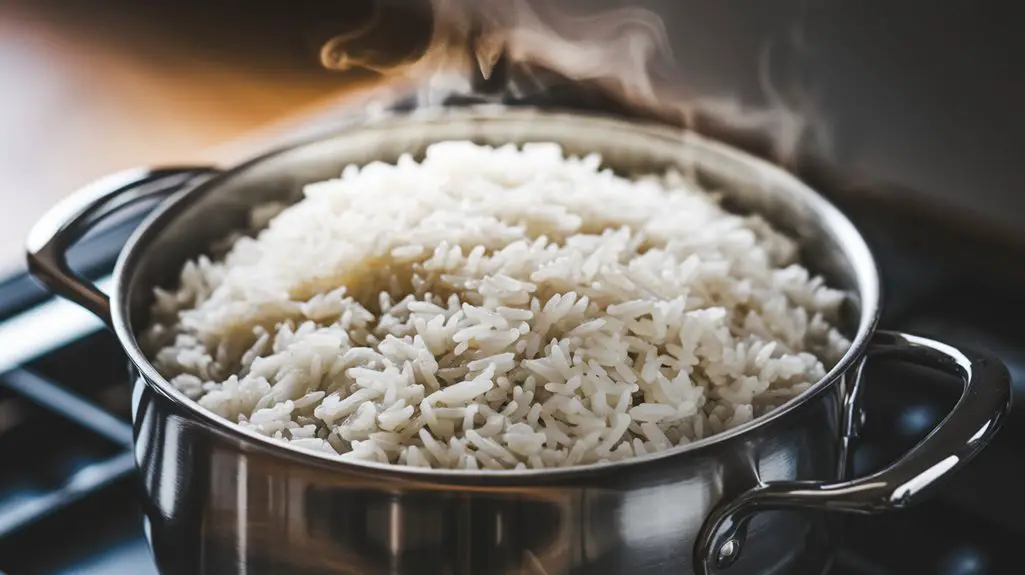
When crafting the foundation for your Sushi Bake, assure you cook the sushi rice with precision to achieve the ideal texture.
Begin by rinsing the rice thoroughly under cold water. This step removes excess starch, assuring each grain remains distinct and fluffy.
Use a rice cooker or a heavy-bottomed pot for consistent results.
For the pot method, combine rice and water, cover, and bring to a boil over medium heat.
Then, reduce the heat to low and simmer for 15-20 minutes without lifting the lid.
Once cooked, let it sit for 10 minutes, allowing the steam to finish the process.
Fluff the rice gently with a wooden spatula to maintain its integrity.
This meticulous approach assures a perfect base for your Sushi Bake.
Step 2. Season Rice With Vinegar Mixture
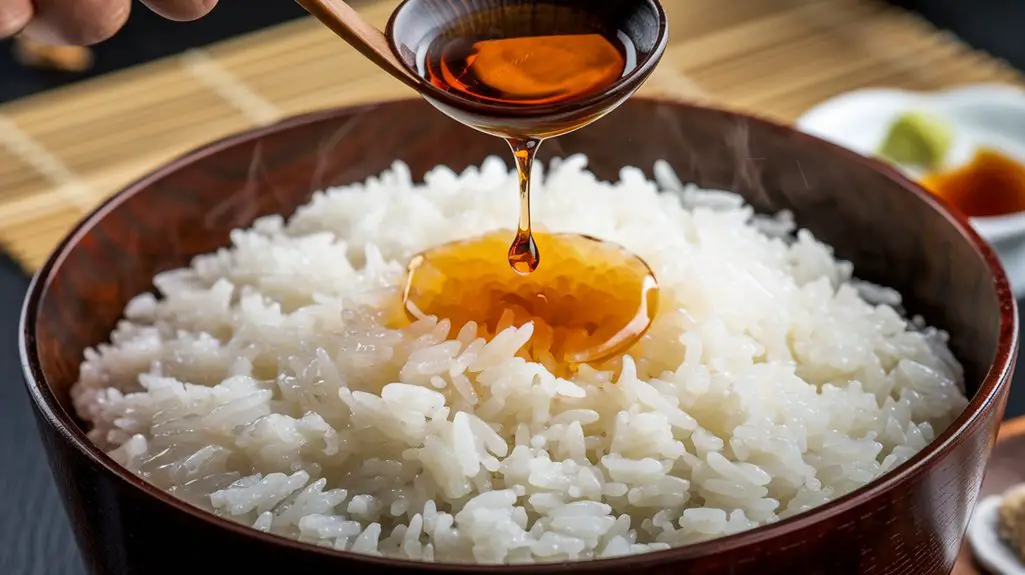
With your perfectly cooked sushi rice ready, the next step is to infuse it with a flavorful vinegar mixture.
Carefully measure rice vinegar, sugar, and salt, then combine them in a small bowl.
Stir the mixture until the sugar and salt dissolve completely, ensuring a harmonious blend.
Gently fold this seasoned mixture into the warm rice using a rice paddle or wooden spoon.
Be precise and use a slicing motion to avoid squashing the grains, allowing each grain to absorb the tangy sweetness.
This step is essential; it gives your Sushi Bake that vital sushi-like taste.
Remember, the rice should be sticky but not mushy, perfectly prepared to complement the upcoming layers of your delightful creation.
Step 3. Mix Seafood With Condiments
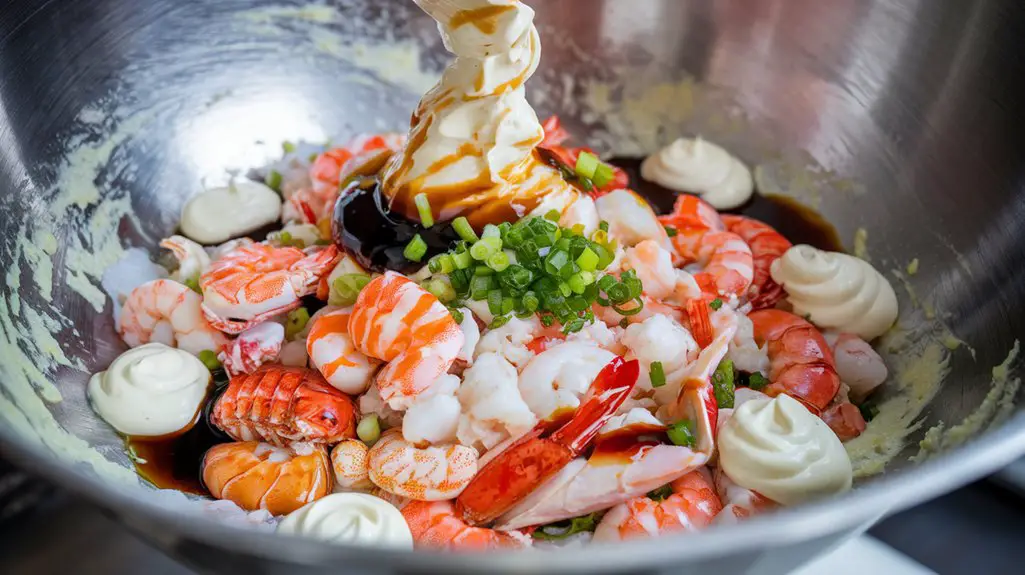
As you begin the next step of crafting your Sushi Bake, focus on creating a harmonious seafood mixture that will bring layers of flavor to your dish.
Combine the imitation crab meat or cooked shrimp with a creamy blend of mayonnaise and cream cheese.
Add soy sauce and Sriracha, adjusting to your taste for a spicy kick. This mixture should be smooth and well-integrated.
Here’s a quick guide to your ingredients:
| Ingredient | Purpose |
|---|---|
| Imitation Crab | Base flavor |
| Mayonnaise | Creaminess |
| Cream Cheese | Rich texture |
| Soy Sauce | Umami depth |
Once mixed, verify the seafood mixture is evenly combined, offering a balance of flavors that will elevate the seasoned rice beneath it.
This step is essential in developing the dish’s depth and complexity.
Step 4. Layer Seafood Over Rice
You’ve crafted a flavorful seafood mixture, and now it’s time to assemble your Sushi Bake.
Start by evenly spreading the seasoned sushi rice across the bottom of your baking dish.
This layer provides the foundation, so make certain it’s uniform and flat.
Next, take your prepared seafood mixture and gently layer it over the rice, using a spatula to achieve an even spread.
This step is vital for achieving harmonious flavors in every bite. Be meticulous, making sure the mixture reaches every corner.
As you layer, appreciate the balance of colors and textures—creamy seafood against the pristine rice.
Your precision here will set the stage for a beautifully layered dish that captures the essence of sushi in a comforting, baked form.
Step 5. Add Sesame Seeds, Bake

Sprinkle sesame seeds generously over the seafood layer, adding a touch of nutty flavor and a hint of crunch.
Watch as these tiny seeds transform your sushi bake into a textured masterpiece.
Preheat your oven to 375°F (190°C), guaranteeing even heat distribution for a perfectly baked dish.
Place the baking dish on the middle rack to avoid over-browning, and let it cook for 15-20 minutes until the top is golden and bubbly.
- Generously sprinkle sesame seeds for added texture.
- Preheat oven to 375°F (190°C).
- Bake on the middle rack for even cooking.
- Aim for a golden, bubbly top.
- Remove promptly to prevent overcooking.
These precise steps guarantee your sushi bake emerges with a delightful crust, ready to impress your taste buds.
Nutrition Information
As your Sushi Bake emerges from the oven with its enticing aroma and golden top, it’s important to appreciate not only its flavor but also its nutritional profile.
Rich in protein from imitation crab or shrimp, it offers a satisfying meal packed with energy.
The sushi rice provides a source of carbohydrates, fueling your body while keeping you satiated.
The creamy layer, featuring mayonnaise and cream cheese, adds healthy fats, enhancing the dish’s creamy texture and flavor.
Nori sheets and sesame seeds contribute essential vitamins and minerals, supporting overall wellness.
Keep an eye on portion sizes to manage calorie intake, as the rich ingredients can add up quickly.
Final Thoughts
While experimenting with Sushi Bake, you’re not just creating a dish—you’re crafting a culinary experience that melds tradition with innovation.
This fusion delicacy invites you to explore flavors without the need for complex techniques.
It’s an art form, allowing you to transform classic sushi elements into something both familiar and novel.
Consider these tips to enhance your Sushi Bake journey:
| Tip | Description |
|---|---|
| Seasoning | Balance rice vinegar, sugar, and salt for perfect rice. |
| Seafood Choice | Experiment with different seafood for varied flavors. |
| Spiciness | Adjust Sriracha for desired heat level. |
| Toppings | Add avocado or cucumber for extra texture. |
| Serving Style | Pair with soy sauce for an authentic touch. |
Your Sushi Bake creation is a reflection of culinary innovation, celebrating both tradition and personal taste preferences.
Frequently Asked Questions
Can I Use Fresh Fish Instead of Imitation Crab or Shrimp?
Yes, you can use fresh fish. Just make certain it’s cooked before layering. Opt for salmon or tuna for rich flavors. Adjust seasoning to complement the fish’s natural taste, and carefully balance ingredients to maintain harmony in every bite.
How Do I Store Leftovers and for How Long?
Store leftovers in an airtight container, refrigerating for up to three days. Confirm it’s cooled completely before sealing to maintain freshness. When reheating, use an oven for even warming, preserving the dish’s delightful texture and flavors.
What Are Some Vegetarian Alternatives for the Seafood Layer?
For a vegetarian touch, replace seafood with roasted vegetables like bell peppers or mushrooms. Incorporate tofu or edamame for protein. Infuse with soy sauce and sesame oil for flavor depth. Customize to reflect your artistry and taste.
Can I Prepare Sushi Bake in Advance and Bake It Later?
Yes, you can prepare it in advance. Assemble the layers, cover tightly, and refrigerate. When ready, bake it until golden and bubbly. This method saves time and lets flavors meld beautifully, ensuring a delicious result.
What Side Dishes Pair Well With Sushi Bake?
You’ll enhance your meal with sides like miso soup, seaweed salad, or pickled ginger. These dishes complement the rich flavors and offer a revitalizing contrast. Don’t forget a crisp cucumber salad for added texture and balance.

Cynthia Weatherford is a seasoned chef and culinary enthusiast who serves as the Recipe creator of Somonday. With decades of experience in the kitchen and a passion for exploring diverse cuisines, Cynthia brings a blend of creativity and technique to every dish. Known for transforming simple ingredients into show-stopping meals, Cynthia believes that cooking is an art form anyone can master. Dedicated to inspiring home cooks, Cynthia shares approachable recipes, pro tips, and culinary wisdom to make every meal memorable.