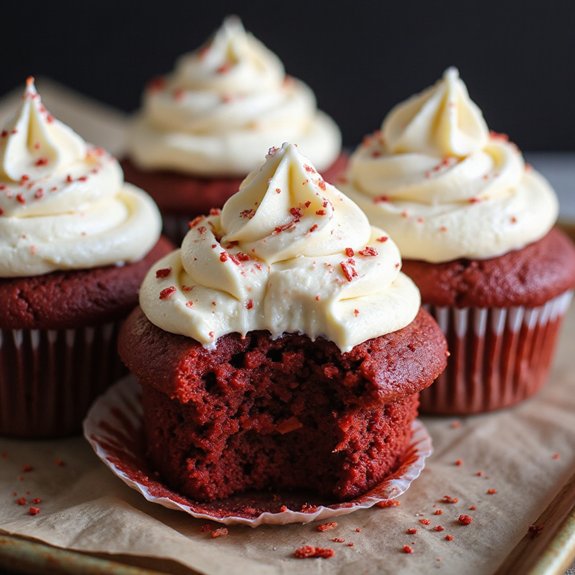
There’s something about peeling back a cupcake liner to reveal a rich, crimson crumb that feels instantly celebratory.
These vegan red velvet cupcakes are a cozy, bakery-style dessert: tender, velvety cake crowned with a swirl of creamy dairy-free frosting, ready in under an hour from mixing bowl to first bite.
They’re perfect for sweet-tooth fans, plant-based eaters, and anyone who loves a showstopping treat without complicated steps.
I still remember a rainy Sunday when friends dropped by unannounced; this recipe turned a quiet afternoon into an impromptu party.
The kitchen filled with the warm scent of cocoa and vanilla, and no one guessed they were vegan until I told them.
These cupcakes shine at birthday gatherings, last-minute cravings, easy entertaining, or as a comforting dessert after a long week.
Ready to bring this dish to life?
Why You’ll Love It
- Delivers classic red velvet flavor with zero dairy or eggs.
- Creates ultra-soft, tender crumbs thanks to simple vegan buttermilk.
- Uses easy-to-find pantry ingredients and standard baking equipment.
- Whips up quickly, perfect for parties, holidays, or weeknight treats.
- Crowds-pleasing cream cheese frosting that even non-vegans will love.
Ingredients
- 240 ml unsweetened almond milk — room temperature for proper “buttermilk” curdling
- 1 tbsp apple cider vinegar — helps create vegan buttermilk and tender crumb
- 200 g granulated sugar — standard white sugar for classic sweetness
- 80 ml neutral vegetable oil — use canola or sunflower for a neutral flavor
- 60 ml unsweetened applesauce — acts as an egg replacer and keeps cupcakes moist
- 2 tsp vanilla extract — real vanilla deepens the classic red velvet flavor
- 1 tbsp red liquid food coloring (vegan) — choose a high‑quality vegan brand for vibrant color
- 190 g all-purpose flour — regular wheat flour for soft, light structure
- 2 tbsp cornstarch — lightens the crumb and adds softness
- 2 tbsp unsweetened cocoa powder (natural) — avoid Dutch‑process so the red color stays bright
- 1 tsp baking soda — reacts with vinegar for lift and tenderness
- 1 tsp baking powder — adds extra rise and fluffiness
- 0.5 tsp fine sea salt — balances sweetness and enhances flavor
- 120 g vegan cream cheese (chilled) — firm straight from the fridge for sturdy frosting
- 60 g vegan butter (softened) — slightly softened so it creams smoothly
- 240 g powdered sugar (sifted) — sifting prevents lumps in the frosting
- 1 tsp vanilla extract (for frosting) — rounds out the tangy cream cheese flavor
Step-by-Step Method
Preheat & Prepare Pan
Preheat the oven to 175°C (350°F). Line a standard 12-cup muffin tin with paper cupcake liners, pressing them into each cup so they sit flat. Set the pan aside on a stable surface.
Preparing the tin first keeps the batter from sitting too long once it’s mixed, helping the cupcakes rise evenly.
Make the Vegan Buttermilk
Pour the room-temperature unsweetened almond milk into a medium mixing bowl. Add the apple cider vinegar and whisk briefly to combine.
Let the mixture sit undisturbed for about 5 minutes. Watch as it curdles and thickens slightly.
This vegan buttermilk helps create a tender, moist crumb in the finished cupcakes.
Whisk the Wet Ingredients
In another medium bowl, add the granulated sugar, neutral vegetable oil, unsweetened applesauce, vanilla extract, and vegan red liquid food coloring. Whisk the mixture until it looks smooth, glossy, and fully combined.
Make sure no streaks of oil or applesauce remain. This step guarantees sweetness, moisture, and color are evenly distributed throughout the batter.
Sift & Combine Dry Ingredients
In a separate bowl, sift together the all-purpose flour, cornstarch, natural unsweetened cocoa powder, baking soda, baking powder, and fine sea salt. Use a whisk to gently blend them after sifting.
Removing lumps and evenly dispersing the leavening agents helps the cupcakes bake with a consistent texture and rise properly.
Build the Batter Gently
Add half of the dry ingredients to the sugar-oil mixture and whisk just until mostly combined. Pour in half of the vegan buttermilk and whisk again briefly.
Repeat with the remaining dry ingredients and buttermilk. Mix only until a smooth batter forms. Avoid overmixing to prevent tough, dense cupcakes and keep the crumb light.
Fill the Cupcake Liners
Use a measuring cup or spoon to divide the batter evenly among the 12 cupcake liners. Fill each liner about two-thirds full to allow room for rising. Smooth the tops lightly if needed.
Check that all cupcakes are filled to a similar level so they bake at the same rate and look uniform once done.
Bake Until Just Done
Place the muffin tin on the center rack of the preheated oven. Bake for 16 to 18 minutes. Check doneness by inserting a toothpick into the center of a cupcake; it should come out clean or with a few moist crumbs.
Avoid overbaking, which can dry the cupcakes and dull their vibrant red color.
Cool in the Tin Briefly
Remove the muffin tin from the oven and set it on a wire cooling rack. Let the cupcakes cool in the tin for about 10 minutes. This short rest allows them to firm up slightly, making them easier to handle.
Don’t frost yet; warm cupcakes will melt and destabilize the cream cheese frosting.
Cool Completely on Rack
Carefully lift each cupcake from the tin and transfer them directly onto the wire cooling rack. Space them out so air can circulate around each one.
Allow the cupcakes to cool completely for at least 20 minutes. Confirm they’re fully cool to the touch before starting to frost; any residual warmth can cause the frosting to slide.
Beat the Cream Cheese & Butter
Place the chilled vegan cream cheese and softened vegan butter into a clean mixing bowl. Beat them together with a hand mixer or sturdy whisk until the mixture is smooth, creamy, and uniform. Scrape down the sides of the bowl as needed.
Properly combining these fats creates a stable, silky base for the frosting.
Add Sugar & Flavor the Frosting
Add the sifted powdered sugar and vanilla extract to the bowl. Beat again until the frosting looks light, fluffy, and spreadable. Check the consistency; if it seems too soft, beat in a bit more powdered sugar.
If still loose, chill the frosting for 15 to 20 minutes. This ensures it will hold its shape when piped or spread.
Frost & Finish the Cupcakes
Once the cupcakes are completely cool, use a spatula or piping bag to apply the vegan cream cheese frosting generously on top of each cupcake. Swirl or decorate as desired.
If the room is warm, return frosted cupcakes to the fridge briefly to set. Store leftovers covered in the refrigerator and let them sit at room temperature before serving.
Ingredient Swaps
- Use any unsweetened plant milk (soy, oat, cashew) in place of almond milk; keep the vinegar to maintain the “buttermilk” effect.
- Swap neutral oil with melted coconut oil or light olive oil; replace applesauce with mashed banana (note: slight flavor change).
- Gluten-free: use a 1:1 gluten-free all-purpose blend and add an extra tablespoon of plant milk if the batter seems thick.
- If vegan cream cheese is hard to find, make a simple frosting with just vegan butter, powdered sugar, vanilla, and a splash of plant milk.
- Cocoa: natural cocoa is best, but you can use Dutch-process in a pinch; expect a darker, less vibrant red and add a little extra food coloring.
You Must Know
– Make-Ahead • For best texture when preparing in advance: Chill frosted cupcakes airtight up to 3 days, then let them stand 10–15 minutes at room temperature before serving; this softens the crumb and frosting so they don’t taste cold or firm.
Serving Tips
- Top with crushed freeze-dried raspberries for color and tangy contrast.
- Serve on a white platter to highlight the deep red crumb.
- Pair with hot coffee or cold oat milk for a creamy balance.
- Garnish with a tiny mint leaf or chocolate shaving on each cupcake.
- Arrange in a circle with one cupcake crumbled in the center as decoration.
Storage & Make-Ahead
Store frosted cupcakes covered in the fridge for up to 3 days.
Let sit 10–15 minutes at room temperature before serving.
Unfrosted cupcakes can be made a day ahead and chilled, or frozen (well wrapped) for up to 2 months.
Thaw at room temperature, then frost.
Reheating
Reheat cupcakes un-frosted when possible.
Use microwave at 50% power for 8–12 seconds.
Or warm in a 150°C oven, loosely covered, 5–8 minutes.
Avoid stovetop reheating.
Red Velvet in Pop Culture
Once you’ve warmed a leftover cupcake to that just-baked softness, it’s easy to see why red velvet keeps stealing the spotlight far beyond our kitchens.
I see it everywhere: glossy cookbooks, bakery windows, even candle labels promising “red velvet” scent, like sugar and romance bottled up.
When I watch movies or shows, that crimson crumb often sneaks onto the screen as shorthand for celebration—birthdays, proposals, those slightly over-the-top TV weddings. It’s dramatic, camera-ready, and instantly recognizable.
What I love most is how red velvet merch has exploded: latte specials swirling pink foam, limited-edition cookies, even red velvet ice cream streaked with “cake pieces.”
Every time I spot it, I’m reminded that this once-humble cocoa cake now lives like a celebrity.
Final Thoughts
Now that you’ve got all the tips, it’s time to whip up a batch and taste them for yourself.
Feel free to tweak the flavors, colors, or frosting style to make these vegan red velvet cupcakes your own.
Frequently Asked Questions
Can I Make These Cupcakes Gluten-Free Without Affecting Texture Too Much?
Yes, you can. I’d swap the flour for a high‑quality 1:1 gluten‑free blend with xanthan gum. Expect a slightly more tender crumb, but the cupcakes will still taste lush, moist, and beautifully velvety.
How Can I Naturally Color Red Velvet Cupcakes Without Artificial Food Dye?
You can, and I’d reach for beet puree or beet powder. They blush the batter a deep, earthy crimson, scent the kitchen sweetly, and let you bite into tender cocoa crumbs without that sharp, artificial aftertaste.
What’s the Best Way to Ship These Cupcakes Without Ruining the Frosting?
Pack them snug in a cupcake box with inserts, refrigerate until frosting firms, then ship overnight with ice packs. I picture you opening the box to perfect, creamy swirls, still cool and delicately fragrant.
Are These Cupcakes Suitable for People With Nut Allergies if I Swap Almond Milk?
Yes, if you swap almond milk for oat or soy milk and guarantee every ingredient’s nut‑free, they’re suitable. I’d double‑check labels, imagine that tender crumb, safe and soft, as you take an easy, worry‑free bite.
How Do I Scale This Recipe for a Large Party or Wedding?
I’d multiply every ingredient by your servings ÷ 12, then bake in batches so each tray rises evenly. I’d mix separate bowls instead of one giant batch, keeping the batter silky, vivid, and tender.

Vegan Red Velvet Cupcakes
Equipment
- 1 standard 12-cup muffin tin
- 12 paper cupcake liners
- 2 medium mixing bowls
- 1 Small bowl
- 1 Whisk
- 1 Rubber spatula
- 1 Measuring cups set
- 1 Measuring spoons set
- 1 wire cooling rack
Ingredients
- 240 milliliter unsweetened almond milk room temperature
- 1 tablespoon apple cider vinegar
- 200 gram granulated sugar
- 80 milliliter neutral vegetable oil
- 60 milliliter unsweetened applesauce
- 2 teaspoon vanilla extract
- 1 tablespoon red liquid food coloring vegan
- 190 gram all-purpose flour
- 2 tablespoon cornstarch
- 2 tablespoon unsweetened cocoa powder natural
- 1 teaspoon baking soda
- 1 teaspoon baking powder
- 0.5 teaspoon fine sea salt
- 120 gram vegan cream cheese chilled
- 60 gram vegan butter softened
- 240 gram powdered sugar sifted
- 1 teaspoon vanilla extract for frosting
Instructions
- Preheat the oven to 175°C and line the muffin tin with the paper cupcake liners.
- In a medium bowl whisk together the almond milk and apple cider vinegar and let sit for 5 minutes to create vegan buttermilk.
- In another medium bowl whisk the sugar, vegetable oil, applesauce, vanilla extract, and red food coloring until smooth and well combined.
- In a separate bowl sift together the flour, cornstarch, cocoa powder, baking soda, baking powder, and salt.
- Add the dry ingredients to the wet mixture in two additions, alternating with the vegan buttermilk, and whisk gently just until a smooth batter forms.
- Divide the batter evenly among the 12 cupcake liners, filling each about two-thirds full.
- Bake the cupcakes for 16 to 18 minutes, or until a toothpick inserted in the center comes out clean or with a few moist crumbs.
- Transfer the muffin tin to a wire rack and let the cupcakes cool in the tin for 10 minutes.
- Carefully remove the cupcakes from the tin and let them cool completely on the wire rack for at least 20 minutes before frosting.
- For the frosting, beat the vegan cream cheese and vegan butter together in a bowl until smooth and creamy.
- Add the powdered sugar and vanilla extract to the bowl and beat again until light, fluffy, and spreadable, adjusting with a little more powdered sugar if needed for thickness.
- Once the cupcakes are fully cool, spread or pipe the cream cheese frosting generously on top of each cupcake.
Notes

Cynthia Weatherford is a seasoned chef and culinary enthusiast who serves as the Recipe creator of Somonday. With decades of experience in the kitchen and a passion for exploring diverse cuisines, Cynthia brings a blend of creativity and technique to every dish. Known for transforming simple ingredients into show-stopping meals, Cynthia believes that cooking is an art form anyone can master. Dedicated to inspiring home cooks, Cynthia shares approachable recipes, pro tips, and culinary wisdom to make every meal memorable.