Cat Shaped Chocolate Chip Cookies
Equipment
- 2 Mixing bowl
- 1 hand mixer or stand mixer
- 1 Whisk
- 1 Rubber spatula
- 1 Measuring cups set
- 1 Measuring spoons set
- 2 Baking sheet
- 2 silicone baking mat or sheet of parchment paper
- 1 Rolling Pin
- 1 cat-shaped cookie cutter
- 1 Cooling rack
Ingredients
- 2 1/4 cup all-purpose flour
- 1/2 teaspoon baking soda
- 1/2 teaspoon baking powder
- 1/2 teaspoon fine salt
- 3/4 cup unsalted butter softened
- 3/4 cup granulated sugar
- 1/2 cup light brown sugar packed
- 1 large egg room temperature
- 2 teaspoon vanilla extract
- 1 tablespoon milk
- 1 cup mini chocolate chips
- 1/4 cup mini chocolate chips reserved for decorating
- 2 tablespoon cocoa powder optional, for dusting whiskers/ears
Instructions
- Whisk the flour, baking soda, baking powder, and salt together in a bowl and set aside.
- Beat the softened butter, granulated sugar, and brown sugar together until light and fluffy, about 2 minutes.
- Mix in the egg and vanilla until fully combined and smooth.
- Add the dry ingredients in two additions, alternating with the milk, and mix just until a soft dough forms.
- Fold in 1 cup mini chocolate chips with a spatula until evenly distributed.
- Divide the dough in half, flatten into discs, wrap, and chill for 30 minutes.
- Preheat the oven to 350°F (175°C) and line baking sheets with silicone mats or parchment.
- On a lightly floured surface, roll one dough disc to 1/4-inch thickness.
- Cut cat shapes with the cookie cutter, re-rolling scraps as needed to use all dough.
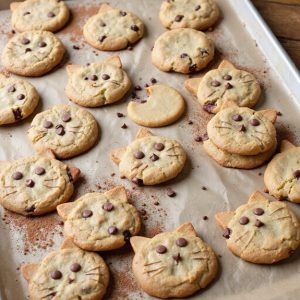
- Place cookies 2 inches apart on prepared sheets and press a few reserved mini chips in for eyes and nose.
- Bake one sheet at a time for 9 to 11 minutes until edges are just set and centers look slightly soft.
- Cool on the sheet for 5 minutes, then transfer cookies to a rack to cool completely.
- Optionally dust a touch of cocoa powder with a fine sieve to accent ears or whiskers once cooled.
- Repeat rolling, cutting, decorating, and baking with the remaining dough.
Notes
Chilling keeps the cat shapes crisp and prevents spreading, so don’t skip it; if the dough softens while cutting, pop the tray of cut cookies into the fridge for 10 minutes before baking. For clean edges, dip the cutter in flour between cuts and roll the dough evenly to the same thickness. Mini chips help maintain details better than regular chips, but you can chop regular chips if needed. If using different cookie cutter sizes, adjust bake time by 1 to 2 minutes. For soft cookies, pull them when the centers look slightly underdone; for crisper edges, bake to light golden brown. You can flavor variations with a pinch of cinnamon or swap 1/4 cup flour for cocoa for chocolate cat cookies. Store airtight up to 4 days or freeze baked cookies for 2 months, or freeze cut dough shapes and bake from frozen adding 1 to 2 minutes.
Tried this recipe?Let us know how it was!