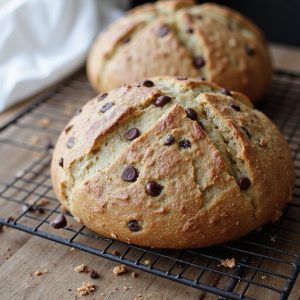
Chocolate Chip Sourdough Bread
Equipment
- 1 large mixing bowl
- 1 Medium bowl
- 1 digital kitchen scale (optional but recommended)
- 1 Dough scraper
- 1 wooden spoon or silicone spatula
- 1 proofing basket or 1 medium bowl lined with a clean kitchen towel
- 1 Dutch oven with lid or 1 heavy oven-safe pot with lid
- 1 sheet of parchment paper
- 1 sharp knife or lame for scoring
- 1 Cooling rack
Ingredients
- 100 gram active sourdough starter 100% hydration
- 325 gram water room temperature
- 450 gram bread flour
- 50 gram whole wheat flour
- 9 gram fine sea salt
- 120 gram semisweet chocolate chips
- 15 gram unsalted butter optional, for softer crumb; melted and cooled
- 10 gram granulated sugar optional, for a slightly sweeter loaf
- 5 gram neutral oil optional; for greasing bowl
Instructions
- In a large mixing bowl, whisk together the active sourdough starter and water until mostly dissolved.
- Add bread flour and whole wheat flour to the bowl and mix with a spoon or hands until no dry flour remains and a shaggy dough forms.
- Cover the bowl and let the dough rest (autolyse) for 30–45 minutes at room temperature.
- Sprinkle salt and sugar (if using) over the dough, then add melted and cooled butter (if using) and mix by pinching and folding until fully incorporated.
- Begin bulk fermentation by covering the bowl and leaving it at room temperature for 3–4 hours, performing 3–4 sets of stretch-and-folds every 30 minutes during the first 2 hours.
- After the first set of stretch-and-folds, gently sprinkle in a third of the chocolate chips, folding them into the dough without tearing it.
- Add the remaining chocolate chips over the next 1–2 sets of stretch-and-folds, distributing them as evenly as possible.
- After the final set of folds, allow the dough to rest undisturbed until it has risen by about 50% and feels airy and puffy.
- Lightly flour your work surface, gently turn out the dough, and let it rest for 10–15 minutes to relax.
- Shape the dough into a tight round or oval loaf by folding the edges toward the center and then tension-pulling it against the counter.
- Lightly flour the proofing basket or towel-lined bowl and place the shaped dough seam side up inside.
- Cover the dough and place it in the refrigerator for an overnight cold proof of 8–12 hours.
- About 45–60 minutes before baking, place the Dutch oven with its lid into the oven and preheat to 475°F (245°C).
- Remove the chilled dough from the refrigerator, place it seam side down on a piece of parchment paper, and quickly score the top with a sharp knife or lame.
- Carefully transfer the dough on the parchment into the preheated Dutch oven, cover with the lid, and place it back in the oven.
- Bake covered for 20 minutes, then remove the lid, reduce the temperature to 450°F (230°C), and bake for an additional 15–20 minutes until deep golden brown.
- Remove the loaf from the Dutch oven and place it on a cooling rack.
- Let the bread cool completely for at least 1 hour before slicing to allow the crumb to set and the chocolate to firm slightly.
Notes
For best results, make sure your starter is very active and bubbly before mixing the dough, as enriched additions like butter, sugar, and chocolate can slightly slow fermentation; if your kitchen is cool, extend bulk fermentation until the dough looks puffy rather than relying strictly on time. Use good-quality chocolate chips or chopped chocolate with at least 50–60% cocoa so they hold shape without burning, and avoid adding them too early or they may smear into the dough. Chilling the dough before baking helps the loaf keep its structure and makes scoring easier, while baking in a preheated Dutch oven traps steam for a better rise and crust. If you prefer a less sweet loaf, reduce the chocolate by 20–30 g or omit the sugar, and if your dough feels too sticky, lightly wet your hands instead of adding extra flour to maintain a soft, open crumb.
Tried this recipe?Let us know how it was!