Dutch Oven Sourdough Bread
Equipment
- 1 Mixing bowl
- 1 digital kitchen scale
- 1 measuring cup
- 1 measuring spoon set
- 1 Dough scraper
- 1 Dutch oven with lid (4–6 quart)
- 1 parchment paper sheet
- 1 proofing basket or medium bowl
- 1 clean kitchen towel
- 1 sharp knife or bread lame
- 1 wire cooling rack
Ingredients
- 500 gram bread flour
- 375 gram water room temperature
- 100 gram active sourdough starter 100% hydration
- 10 gram fine sea salt
Instructions
- In a mixing bowl, whisk together the water and active sourdough starter until mostly dissolved.
- Add the bread flour and mix with your hand or a dough scraper until no dry flour remains and a shaggy dough forms.
- Cover the bowl and let the dough rest for 30 minutes at room temperature for autolyse.
- Sprinkle the fine sea salt over the dough and gently pinch and fold the dough until the salt is fully incorporated.
- Begin bulk fermentation by covering the bowl and letting it sit at room temperature for 3–4 hours, depending on room warmth.
- During the first 2 hours of bulk fermentation, perform 3–4 sets of stretch-and-folds every 30 minutes, lifting and folding the dough over itself from each side.
- After the final set of folds, let the dough rest undisturbed until it has risen by about 50% and looks airy with bubbles along the sides.
- Lightly flour your work surface and gently turn the dough out onto it, trying not to deflate it.
- Pre-shape the dough into a loose round by folding the edges toward the center and flipping it seam-side down, then gently tightening it into a ball.
- Cover the dough with a kitchen towel and let it rest for 20–30 minutes.
- Lightly flour the top of the dough, flip it over, and shape it into a tight round or oval by folding and rolling to create surface tension.
- Generously flour your proofing basket or line a bowl with a floured kitchen towel.
- Place the shaped dough seam-side up into the prepared basket or bowl.
- Cover and let the dough proof at room temperature for 30–60 minutes, then transfer to the refrigerator to cold-proof for 12–14 hours.
- About 45 minutes before baking, place the Dutch oven with its lid into your oven and preheat to 250°C (480°F).
- Cut a piece of parchment paper large enough to lift the dough and place it on your counter.
- Gently invert the chilled dough onto the parchment so it is now seam-side down.
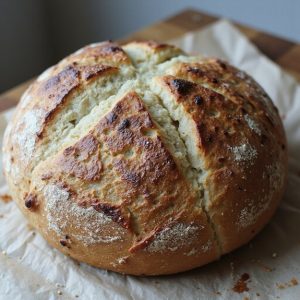
- Using a sharp knife or bread lame, score the top of the dough with a deep slash about 1 cm (½ inch) deep.
- Carefully remove the preheated Dutch oven from the oven, lift the dough using the parchment, and lower it into the pot.
- Cover with the lid and return the Dutch oven to the oven to bake for 20 minutes at 250°C (480°F).
- After 20 minutes, reduce the oven temperature to 230°C (450°F), remove the lid, and continue baking for 20–25 minutes until the crust is deep golden-brown.
- Use oven mitts to carefully lift the bread out of the Dutch oven by the parchment and transfer it to a wire cooling rack.
- Allow the bread to cool completely for at least 1–2 hours before slicing to let the crumb set and moisture redistribute.
Notes
A strong, active starter is crucial for good rise, so ensure it has doubled and is bubbly before mixing the dough. Room temperature and timing are flexible: in a cooler kitchen, bulk fermentation may take longer, so rely on signs like dough volume and bubbles more than the clock. The cold-proof in the refrigerator helps both flavor and shaping, making the dough easier to score cleanly. Adjust hydration slightly if your flour is very strong or weak, adding a spoonful of water or flour as needed to achieve a soft but manageable dough. For an even crisper crust, leave the finished loaf in the switched-off oven with the door slightly ajar for 5–10 minutes after baking, and always let the bread cool fully to avoid a gummy interior.
Tried this recipe?Let us know how it was!