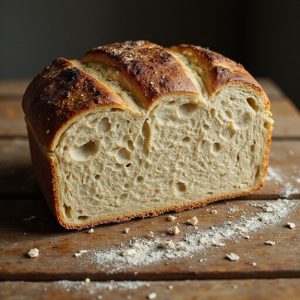
High Hydration Sourdough Bread
Equipment
- 2 Mixing bowls
- 1 digital kitchen scale
- 1 Dough scraper
- 1 bench scraper
- 1 proofing basket or 1 medium bowl lined with a floured towel
- 1 Dutch oven with lid (or 1 heavy lidded oven-safe pot)
- 1 spray bottle (optional)
- 1 clean kitchen towel
- 1 razor blade or sharp knife for scoring
- 1 wire cooling rack
Ingredients
- 100 gram active sourdough starter 100% hydration
- 400 gram water room temperature
- 500 gram bread flour unbleached
- 10 gram fine sea salt
Instructions
- In a mixing bowl, whisk together the active sourdough starter and water until mostly dissolved.
- Add the bread flour and mix with your hand or a dough scraper until no dry flour remains and a shaggy dough forms.
- Cover the bowl and let the dough rest (autolyse) for 30–60 minutes at room temperature.
- Sprinkle the salt over the dough and pinch and fold it into the dough until evenly incorporated.
- Begin the first set of stretch and folds by grabbing one edge of the dough, stretching it up, and folding it over, turning the bowl and repeating 4–6 times.
- Cover and repeat stretch and folds every 30 minutes for a total of 3–4 sets over 1.5–2 hours.
- After the final set, cover the dough and let it bulk ferment at room temperature until roughly doubled in size, bubbly, and jiggly, about 4–6 hours depending on temperature.
- Lightly flour your work surface and gently turn the dough out onto it, trying not to deflate it.
- Pre-shape the dough into a loose round using a bench scraper, then let it rest uncovered for 20–30 minutes.
- Lightly flour the surface and your hands, then shape the dough into a tight boule or batard by stretching the surface to create tension.
- Generously flour the proofing basket (or towel-lined bowl), then place the dough seam-side up into it.
- Cover and let the dough proof at room temperature for 1–2 hours, or refrigerate for 8–12 hours for a cold retard.
- About 45 minutes before baking, place the Dutch oven (with lid) into your oven and preheat to 250°C (480°F).
- When ready to bake, carefully remove the hot Dutch oven from the oven and gently invert the dough onto a piece of parchment or directly into the pot, seam-side down.
- Score the top of the dough with a razor blade or sharp knife to allow for controlled expansion.
- Cover with the lid and bake for 20 minutes at 250°C (480°F).
- Remove the lid, reduce the oven temperature to 230°C (450°F), and bake for an additional 20–25 minutes until deep golden brown.
- Carefully remove the loaf from the Dutch oven and place it on a wire rack to cool completely for at least 1 hour before slicing.
Notes
High hydration doughs feel sticky and loose at first, so resist the urge to add extra flour and instead work quickly with slightly wet hands and a dough scraper to handle it. Temperature is crucial to fermentation speed: a warmer kitchen will shorten bulk and proof times, while a cooler one will lengthen them, so rely on dough appearance (bubbly, airy, and jiggly) more than the clock. A long cold retard in the fridge not only improves flavor and makes scoring easier, it also helps the dough firm up, which is useful with high hydration recipes. Steam is key to a crisp, shiny crust, so keep the Dutch oven covered for the first part of the bake, and if not using a Dutch oven, add steam by spraying the oven walls or placing a pan of hot water on a lower rack. Always let the bread cool fully before slicing so the crumb can set; cutting too early can make the interior gummy even if it’s fully baked.
Tried this recipe?Let us know how it was!