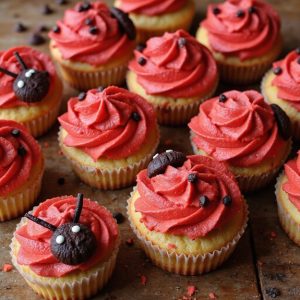
Ladybug Cupcakes
Equipment
- 1 Muffin tin (12-cup)
- 12 paper cupcake liners
- 2 Mixing bowls
- 1 Electric mixer or whisk
- 1 Rubber spatula
- 1 wire cooling rack
- 3 piping bags
- 3 small round piping tips
- 1 toothpick or skewer
- 1 small offset spatula or butter knife
Ingredients
- 1 1/2 cup all-purpose flour
- 1 cup granulated sugar
- 1 1/2 teaspoon baking powder
- 1/4 teaspoon baking soda
- 1/4 teaspoon fine salt
- 1/2 cup unsalted butter softened
- 2 large eggs room temperature
- 1/2 cup whole milk room temperature
- 2 teaspoon vanilla extract
- 1 1/2 cup powdered sugar sifted
- 1/2 cup unsalted butter softened
- 1 tablespoon heavy cream or milk
- 1 teaspoon vanilla extract
- 1 1–2 drops red gel food coloring
- 1 1–2 drops black gel food coloring
- 1 1–2 drops white gel food coloring optional, for eye highlights
- 24 mini chocolate chips or candy pieces
- 12 chocolate wafer cookies or large chocolate buttons
- 2 tablespoon mini chocolate chips for spots
Instructions
- Preheat oven to 350°F (175°C) and line the muffin tin with 12 paper cupcake liners.
- In a mixing bowl whisk together flour, granulated sugar, baking powder, baking soda, and salt.
- Add softened butter, eggs, milk, and vanilla extract to the dry ingredients and beat on medium speed until smooth and just combined.
- Divide the batter evenly among the 12 liners, filling each about two-thirds full.
- Bake the cupcakes for 16–18 minutes or until a toothpick inserted in the center comes out clean.
- Transfer the pan to a wire rack for 5 minutes, then remove the cupcakes from the pan and cool completely on the rack.
- To make the buttercream, beat softened butter until creamy, then gradually add powdered sugar, vanilla, and cream, beating until light and fluffy.
- Divide the frosting into three small bowls, tinting one portion red, one black, and leaving one plain or tinting lightly white if desired.
- Fit three piping bags with small round tips and fill separately with the red, black, and white frostings.
- Pipe a smooth dome of red frosting over each cooled cupcake to form the ladybug body.
- Use black frosting to pipe a semicircle “head” at one edge of each cupcake.
- Draw a straight line of black frosting down the center of the red dome to create the wing split.
- Add small dots of black frosting or press mini chocolate chips into the red area to make the ladybug spots.
- Press one chocolate wafer cookie or large chocolate button upright at the head area for extra dimension if using.
- Pipe two small black dots on each head for eyes, then add tiny white dots on top with white frosting for highlights if desired.
- Chill the decorated cupcakes in the refrigerator for about 30 minutes to set the frosting before serving.
Notes
For best results, make sure all refrigerated ingredients are at room temperature before mixing so the batter emulsifies smoothly and bakes evenly, and avoid overmixing once the flour is added to keep the cupcakes tender. Gel food coloring works better than liquid for achieving bright red and deep black without thinning the frosting, and you can test colors on a small spoonful of frosting first to avoid over-tinting. If your frosting becomes too soft to hold shape while piping, chill it for 10–15 minutes and try again, and always cool cupcakes completely before decorating to prevent melted, sliding frosting. Store decorated cupcakes in a covered container in a cool place or the refrigerator and bring them to room temperature before serving so the cake is soft and the flavors are at their best.
Tried this recipe?Let us know how it was!