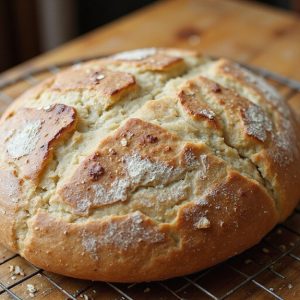
Low Carb Sourdough Bread
Equipment
- 1 digital kitchen scale
- 2 medium mixing bowls
- 1 large mixing bowl
- 1 dough whisk or sturdy spoon
- 1 bench scraper or spatula
- 1 proofing basket or 1 medium bowl lined with a floured towel
- 1 Dutch oven with lid (4–5 qt) or 1 baking stone plus 1 oven-safe pan for steam
- 1 piece parchment paper
- 1 sharp knife or lame for scoring
- 1 wire cooling rack
Ingredients
- 120 gram active sourdough starter 100% hydration
- 240 gram warm water about 80–85°F
- 60 gram plain Greek yogurt full-fat
- 160 gram almond flour finely ground blanched
- 80 gram oat fiber not oat bran
- 40 gram vital wheat gluten
- 20 gram ground golden flaxseed
- 10 gram psyllium husk powder finely ground
- 8 gram fine sea salt
- 8 gram extra-virgin olive oil
- 6 gram granular low-carb sweetener optional for better fermentation
Instructions
- Feed your sourdough starter 4–8 hours before baking so it becomes bubbly, active, and at least doubled in volume.
- In a large bowl whisk together almond flour, oat fiber, vital wheat gluten, ground flaxseed, psyllium husk powder, and salt until evenly combined.
- In a separate bowl mix warm water, Greek yogurt, olive oil, sweetener, and active sourdough starter until smooth.
- Pour the wet mixture into the dry ingredients and stir with a dough whisk or sturdy spoon until a thick, sticky dough forms.
- Let the dough rest in the bowl for 10–15 minutes to allow psyllium and flax to hydrate and firm up the mixture.
- Lightly oil your hands and perform several stretch-and-folds in the bowl, pulling the dough from the edge toward the center 8–10 times to build structure.
- Shape the dough into a tight round or oval by tucking the edges underneath, using a bench scraper if needed.
- Place the shaped dough seam-side up in a lightly oiled or oat-fiber-dusted proofing basket or lined bowl.
- Cover loosely and allow to proof at room temperature for 60–90 minutes, or until slightly puffy and about 30–50% larger.
- About 30 minutes before baking, place a Dutch oven with its lid into the oven and preheat to 450°F (230°C).
- Carefully turn the proofed dough onto a piece of parchment paper so it is seam-side down.
- Score the top of the dough with a sharp knife or lame to control expansion during baking.
- Using the parchment as a sling, carefully lower the dough into the preheated Dutch oven and cover with the lid.
- Bake covered for 25 minutes to allow the bread to rise and develop steam.
- Remove the lid, reduce the oven temperature to 425°F (220°C), and bake for an additional 15 minutes or until deep golden brown and firm.
- Lift the bread out of the Dutch oven using the parchment and place it on a wire rack.
- Allow the loaf to cool completely for at least 1–2 hours before slicing to let the crumb set and moisture redistribute.
Notes
Extra tips: Because this loaf relies on nut flour, fibers, and vital wheat gluten instead of traditional wheat flour, the dough will feel denser and more fragile than classic sourdough, so avoid adding extra water unless it is too crumbly to hold together. Psyllium and flax continue to gel as the dough rests, making the structure stronger, which is why the initial rest and full cooling time are critical for a good sliceable crumb. For a tangier flavor, extend the bulk proof in a cooler spot or refrigerate the shaped dough overnight and bake straight from the fridge. If your starter is not very active, reduce the oat fiber slightly (by 10–15 g) and add the same amount of warm water to give fermentation a small boost. Store the bread wrapped in the refrigerator for up to 5 days, slice thinly to keep carbs in check, and toast before serving to enhance both flavor and texture.
Tried this recipe?Let us know how it was!