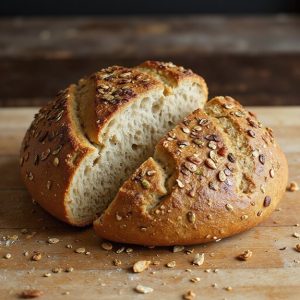
Seeded Sourdough Bread
Equipment
- 1 digital kitchen scale
- 2 medium mixing bowls
- 1 large mixing bowl
- 1 Dough scraper
- 1 Wooden spoon or spatula
- 1 proofing basket or 1 medium bowl lined with a floured kitchen towel
- 1 cast-iron Dutch oven with lid (4–5 qt)
- 1 sharp lame or serrated knife
- 1 clean spray bottle (optional)
- 1 wire cooling rack
Ingredients
- 100 gram active sourdough starter 100% hydration
- 375 gram water room temperature
- 450 gram bread flour
- 50 gram whole wheat flour
- 10 gram fine sea salt
- 25 gram raw sunflower seeds toasted
- 25 gram raw pumpkin seeds toasted
- 20 gram sesame seeds toasted
- 10 gram flaxseeds
- 10 gram rolled oats
- 10 gram honey optional
- 10 gram olive oil for bowl and hands
- 10 gram mixed seeds extra for topping
Instructions
- In a large mixing bowl, whisk together the active sourdough starter and water until mostly dissolved.
- Add the bread flour and whole wheat flour to the bowl and mix until no dry flour remains, then cover and rest for 30–45 minutes (autolyse).
- Sprinkle the salt and honey over the dough and mix with wet hands or a spatula until fully incorporated.
- In a dry skillet over low heat, lightly toast the sunflower seeds, pumpkin seeds, and sesame seeds until fragrant, then let them cool.
- Add the cooled toasted seeds, flaxseeds, and rolled oats to the dough and gently fold until evenly distributed.
- Cover the bowl and let the dough bulk ferment at room temperature for 3–4 hours, performing 3–4 sets of stretch-and-folds every 30–45 minutes during the first 2 hours.
- After bulk fermentation, lightly oil your hands and work surface, then turn the dough out and gently pre-shape it into a loose round.
- Let the pre-shaped dough rest on the counter, covered, for 20–30 minutes to relax.
- Shape the dough into a tight round or oval loaf, creating surface tension without tearing the skin.
- Lightly flour the proofing basket or towel-lined bowl, then place the dough seam side up into the basket.
- Cover the basket and proof at room temperature for 1–2 hours, or refrigerate for 8–12 hours for a slow cold proof.
- About 45 minutes before baking, place the Dutch oven with its lid into the oven and preheat to 475°F (245°C).
- When ready to bake, carefully remove the hot Dutch oven, gently invert the dough onto a piece of parchment or directly into the pot so it is seam side down.
- Lightly mist or brush the top of the dough with water and sprinkle the extra mixed seeds evenly over the surface, pressing gently so they adhere.
- Score the top of the loaf with a lame or sharp knife to allow controlled expansion.
- Cover the Dutch oven with its lid and bake for 20 minutes at 475°F (245°C).
- Remove the lid, reduce the oven temperature to 450°F (230°C), and continue baking for 18–22 minutes or until the crust is deeply golden and the loaf sounds hollow when tapped.
- Carefully transfer the baked bread to a wire rack and let it cool completely for at least 1 hour before slicing.
Notes
For best results, use an active, bubbly starter that has recently peaked; sluggish starter will lengthen fermentation and can lead to dense bread. Adjust fermentation time based on room temperature: warmer kitchens shorten bulk and proof times, while cooler ones lengthen them, so rely on dough cues (a smoother surface, 50–75% volume increase, and airy feel) rather than the clock. Hydration and seeds can vary by brand, so if the dough feels very wet, give it extra folds instead of adding a lot more flour. Toasting seeds intensifies flavor and reduces chewiness, but cool them fully before adding or they can overheat the dough. A cold-proofed loaf is easier to score and often yields better oven spring. Always cool the bread thoroughly before slicing to avoid a gummy interior, and store it cut side down on a board or in a paper bag to keep the crust crisp.
Tried this recipe?Let us know how it was!