Sourdough For Beginners
Equipment
- 2 Mixing bowls
- 1 digital kitchen scale
- 1 Dough scraper
- 1 Dutch oven or lidded heavy pot (4–5 quart)
- 1 proofing basket or medium bowl
- 1 clean kitchen towel
- 1 measuring cup
- 1 Spoon
- 1 sharp knife or lame
- 1 wire cooling rack
Ingredients
- 100 gram active sourdough starter bubbly and recently fed
- 350 gram water room temperature
- 500 gram bread flour
- 10 gram fine sea salt
- 1 Extra flour for dusting
Instructions
- In a mixing bowl, whisk together the active sourdough starter and water until mostly dissolved.
- Add the bread flour to the bowl and mix with a spoon or your hand until no dry flour remains and a shaggy dough forms.
- Cover the bowl with a towel and let the dough rest (autolyse) for 30–45 minutes at room temperature.
- Sprinkle the salt over the dough, then pinch and fold the dough until the salt is fully incorporated.
- Begin bulk fermentation by covering the bowl and letting the dough rest at room temperature for 3–4 hours.
- During the first 2 hours of bulk fermentation, perform 3–4 sets of stretch-and-folds every 30 minutes by gently stretching a side of the dough up and folding it over itself.
- After the final stretch-and-fold, let the dough rest undisturbed until it has risen by about 50% and looks airy with bubbles along the sides.
- Lightly flour your work surface, gently turn the dough out, and shape it into a loose round using your dough scraper.
- Let the dough rest on the counter for 15–20 minutes, uncovered, to relax.
- Perform a final shape by tightening the surface of the dough into a taut ball or oval, depending on your proofing basket.
- Generously flour your proofing basket or line a bowl with a floured kitchen towel, then place the dough seam side up inside.
- Cover the dough and let it proof at room temperature for 1–2 hours, or refrigerate for 6–10 hours for a slower, cold proof.
- About 45 minutes before baking, place your Dutch oven with its lid into the oven and preheat to 475°F (245°C).
- When ready to bake, carefully remove the hot Dutch oven, gently invert the dough onto a piece of parchment or directly into the pot so it is seam side down.
- Use a sharp knife or lame to score the top of the dough with a ½-inch deep cut to allow expansion.
- Cover the Dutch oven with its lid and bake for 20 minutes at 475°F (245°C).
- Remove the lid, reduce the oven temperature to 450°F (230°C), and bake for another 20–25 minutes until deep golden brown.
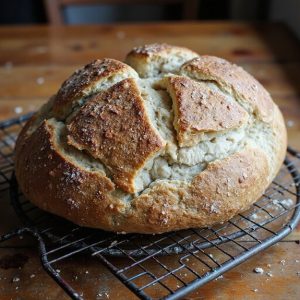
- Carefully remove the loaf from the Dutch oven and place it on a wire rack to cool completely for at least 1 hour before slicing.
Notes
For best results, make sure your starter is active and bubbly (it should at least double after feeding) before mixing the dough, as weak starter is the most common cause of dense loaves; adjust water slightly if your dough feels very dry or extremely sticky, since flour absorbs differently in each kitchen. Room temperature strongly affects fermentation time, so in a warm kitchen the dough may be ready faster, while in a cool kitchen it may need more time—watch for signs like volume increase and bubbles rather than relying only on the clock. A gentle touch during shaping helps preserve gas and gives an open crumb, and scoring deeply enough helps control where the bread expands. Finally, allow the loaf to cool fully before cutting so the crumb can set and stay moist, and store leftovers cut-side down on a board or in a paper bag to keep the crust crisp.
Tried this recipe?Let us know how it was!