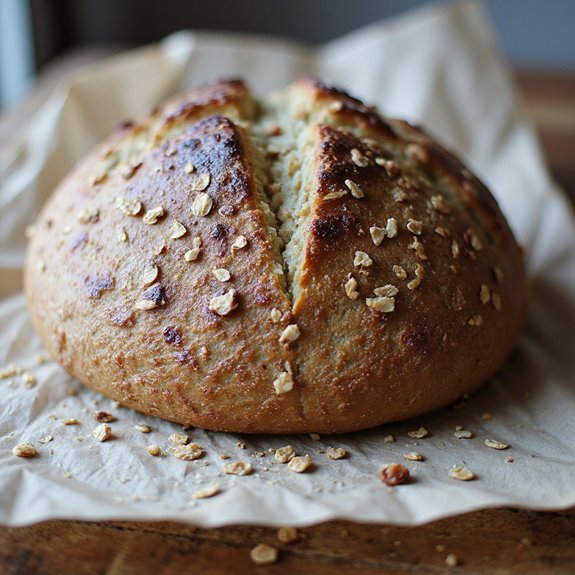
There’s something about pulling a bronzed, crackly loaf of buckwheat sourdough from the oven that makes the whole kitchen feel calmer.
The crust sings as it cools, releasing a nutty, toasty aroma, while the crumb inside is tender, moist, and softly speckled with buckwheat’s slate-gray hue.
This is a cozy, slow-crafted bread—perfect for leisurely breakfasts, simple soup-and-bread dinners, or rustic sandwiches—yet once your starter’s active, it slips easily into a regular routine.
Buckwheat sourdough is ideal for home bakers who want something wholesome, naturally leavened, and a bit special: beginners keen to move beyond basic loaves, gluten-conscious families, or anyone craving nourishing comfort.
I started leaning on this bread during a stretch of busy weeks when cooking felt overwhelming; a slice, still warm, with butter and honey turned leftover soup into a satisfying Sunday supper.
It’s equally at home at casual gatherings or quiet weekday lunches. Ready to bring this loaf to life?
Why You’ll Love It
- Delivers deep, nutty flavor with a gentle natural sweetness.
- Balances hearty buckwheat with light, open sourdough crumb.
- Builds great texture from optional crunchy toasted buckwheat groats.
- Relies on long, slow fermentation for improved digestibility and flavor.
- Bakes beautifully in a Dutch oven for crackly, artisan crust.
Ingredients
- 150 g active sourdough starter, 100% hydration — bubbly and recently fed for best rise
- 300 g water, room temperature — filtered if your tap water is heavily chlorinated
- 200 g buckwheat flour — light or dark, fresh-milled if possible
- 200 g bread flour — high-protein for better structure
- 40 g whole wheat flour — adds flavor and extra nutrition
- 9 g fine sea salt — avoids harsh mineral taste of iodized salt
- 10 g honey (optional) — balances buckwheat’s earthy flavor
- 10 g olive oil (optional) — adds tenderness to the crumb
- 30 g water, extra for bassinage (optional) — adjust for softer, more open crumb
- 20 g buckwheat groats, toasted (optional) — for crunchy texture contrast
- 10 g rice flour — for dusting banneton to prevent sticking
Step-by-Step Method
Mix the Starter and Water
Whisk the active sourdough starter with 300 g room-temperature water in a large bowl. Dissolve the starter mostly so no thick lumps remain.
Aim for an even, milky mixture. This guarantees the wild yeast and bacteria are well distributed. Proper mixing here supports an even rise and balanced fermentation later.
Combine the Flours and Autolyse
Add buckwheat flour, bread flour, and whole wheat flour to the bowl. Mix with your hand or a dough scraper until no dry patches remain.
Form a rough, shaggy dough. Cover the bowl and rest for 45–60 minutes. Allow the flour to hydrate fully. This relaxes the dough and improves gluten development with less kneading.
Incorporate Salt, Honey, and Oil
Sprinkle the fine sea salt evenly over the dough. Add honey and olive oil if using. Use squeezing and folding motions to work them in thoroughly.
Make certain no salty pockets remain. Mix until the dough feels cohesive again. This step balances flavor and strengthens gluten, while honey and oil add tenderness and subtle sweetness.
Adjust Hydration with Bassinage
Evaluate the dough’s feel; it should be soft but not stiff. Gradually add up to 30 g extra water if needed. Use pinching and folding motions to incorporate it evenly.
Avoid dumping all the water at once. Stop when the dough is supple yet manageable. Proper hydration helps buckwheat integrate without making the dough gummy.
Build Strength with Stretch and Folds
Rest the dough, then perform 3–4 sets of stretch and folds over 2 hours. Every 30 minutes, lift a side of the dough, stretch it up, and fold it over.
Rotate the bowl and repeat from all sides. Cover between sets. Gently build structure without tearing. This method strengthens the gluten network while preserving gas.
Add Toasted Buckwheat Groats
If using, toast buckwheat groats until fragrant and lightly colored, then cool. Gently fold them into the dough during the second or third stretch-and-fold set.
Distribute them evenly without deflating the dough. Avoid pressing too hard. The groats provide pleasant crunch and nutty flavor, complementing the buckwheat flour’s earthiness.
Let the Dough Bulk Ferment
After the final fold, cover the bowl and leave the dough at room temperature. Wait until it looks puffed, slightly domed, and shows bubbles around the edges.
Expect 2–4 hours, depending on warmth. Don’t rush this stage. Proper bulk fermentation develops flavor, aeration, and strength, vital for a well-risen loaf.
Shape the Dough Tightly
Lightly flour the work surface. Gently turn the dough out, trying not to degas it fully. Fold edges toward the center to form a round or oval.
Use your hands to tension the dough against the counter, tightening the outer surface. Create a smooth, taut skin. This tension helps the loaf keep shape and rise upwards.
Prepare and Fill the Banneton
Generously dust a banneton or cloth-lined bowl with rice flour. Coat all surfaces to prevent sticking. Lift the shaped dough carefully and place it seam side up into the banneton.
Adjust the shape if needed. Cover with a clean kitchen towel. Proper flouring and careful placement guarantee easy release and neat form after proofing.
Cold Proof the Dough
Transfer the covered banneton to the refrigerator. Proof for 8–12 hours, allowing a slow, controlled rise. Check for gentle aeration; the dough should feel lighter and slightly springy.
Avoid overproofing. Cold proofing deepens flavor, firms the dough for easier scoring, and fits conveniently into an overnight schedule.
Preheat the Dutch Oven
About 45 minutes before baking, place the Dutch oven with its lid in your oven. Preheat to 240°C (465°F).
Allow enough time for the pot and oven to heat thoroughly. A fully preheated vessel traps steam efficiently. This environment promotes good oven spring, a glossy crust, and well-developed color on your finished loaf.
Invert and Score the Loaf
Cut a piece of parchment larger than the loaf. Remove the banneton from the fridge. Invert the dough gently onto the parchment so it’s seam side down.
Use a lame or sharp knife to score the top with a decisive slash or pattern. Score deeply enough to guide expansion and prevent uncontrolled ruptures during baking.
Bake Covered, Then Uncovered
Carefully place the parchment and dough into the preheated Dutch oven. Cover with the lid and bake for 25 minutes at 240°C (465°F).
Remove the lid, reduce the temperature to 220°C (430°F), and bake 18–20 minutes more. Aim for a deep brown crust and hollow sound when tapped. Adjust time slightly for your oven’s behavior.
Cool Completely Before Slicing
Transfer the baked loaf to a cooling rack. Let it cool at least 1–2 hours.
Resist slicing early, as the crumb needs time to set. Cutting while hot can cause gumminess, especially with buckwheat. Once fully cool, slice with a sharp serrated knife. Enjoy the balanced tang, nutty flavor, and open yet tender crumb.
Ingredient Swaps
- Use all-purpose flour instead of bread flour if needed; reduce the extra bassinage water slightly, as it absorbs less.
- Swap whole wheat flour with spelt, rye, or more bread flour; expect slightly different flavor and fermentation speed.
- For a vegan loaf, omit honey or replace it 1:1 with maple syrup or skip it entirely.
- If you can’t find buckwheat flour, use a mix of rye and whole wheat for a similarly hearty, earthy profile (the bread will no longer be buckwheat-based).
- Replace olive oil with any neutral oil or melted butter, or omit for a leaner, chewier crust.
You Must Know
- Doneness • If the loaf looks done but you’re unsure: Use an instant‑read thermometer in the center; pull it at 96–99°C / 205–210°F. This confirms the crumb is set and prevents a gummy interior that underbaked buckwheat can cause.
- Troubleshoot • If your dough spreads flat after shaping: Next time, reduce total water by 15–20 g and add one extra set of stretch‑and‑fold within the first 2 hours. Buckwheat weakens structure; slightly lower hydration plus more strength work keeps the loaf taller.
- Troubleshoot • When the crumb turns out dense or tight: Let bulk fermentation continue until the dough rises at least 50–75% and shows visible bubbles at the edge of the bowl, even if this adds 30–60 minutes. Underfermentation is the top reason heavy buckwheat loaves don’t open up.
- Flavor Boost • For a nuttier, more complex taste: Lightly toast the buckwheat flour on a pan over medium heat for 5–8 minutes until it smells fragrant and just starts to darken, then cool completely before using. This deepens flavor without extra ingredients.
- Scale • To make a smaller test loaf (about 5 slices): Halve all ingredients (e.g., 75 g starter, 150 g water, 100 g buckwheat flour, 100 g bread flour, 20 g whole wheat flour; salt to 4–5 g).
Time cues (bubbles, rise, aroma) stay the same, but total bake time usually shortens by 5–8 minutes.
Serving Tips
- Serve warm slices with salted butter and a drizzle of honey.
- Pair with soft goat cheese, smoked salmon, and fresh dill for open-faced tartines.
- Use as a hearty base for avocado toast with radishes and toasted seeds.
- Plate alongside roasted vegetable soup or lentil stew for a rustic meal.
- Toast leftovers and top with nut butter and sliced pears for breakfast.
Storage & Make-Ahead
Buckwheat sourdough keeps in the fridge for 5–7 days, well-wrapped in beeswax or plastic and then a paper bag to prevent drying.
For make-ahead, slice, then freeze up to 2–3 months in an airtight bag.
Toast slices straight from frozen for the best texture and flavor.
Reheating
Reheat slices gently.
In a 160°C (320°F) oven, wrapped in foil for 8–10 minutes.
Briefly in a microwave with a damp towel.
Or on a covered skillet over low heat.
Buckwheat Bread in Folklore
Long before I ever mixed buckwheat into a sourdough, people baked with it as if it carried a little weather and earth inside it.
I picture rough hands grinding the triangular seeds, steam rising from clay ovens, the air thick with toasty, nut‑brown aroma.
In Slavic tales, buckwheat porridge and dark loaves often meant winter protection: a bowl on the table to keep hunger from the door, a charm stronger than any spell.
In parts of Japan, soba made from buckwheat marked crossings—year’s end, journeys begun, journeys survived.
When I bake with it, I feel those old stories clinging to the flour: protection, passage, endurance—woven into every crackle of the crust and tender crumb.
Final Thoughts
Give this buckwheat sourdough a try and see how the nutty flavor and soft crumb fit into your weekly baking routine.
Once you’ve made it once, play around with the hydration, add-ins, or flours to make a version that’s perfectly your own.
Frequently Asked Questions
How Can I Troubleshoot a Dense or Under-Risen Buckwheat Sourdough Loaf?
I’d warm your kitchen, feed your starter twice, and lengthen bulk ferment until the dough billows and jiggles. I’d also boost hydration, avoid extra flour, and guarantee a fierce preheat so the loaf springs instead of slumps.
What Are the Nutritional Benefits of Buckwheat Sourdough Versus Regular Sourdough Bread?
It offers more protein, fiber, and minerals, plus a richer, nuttier earthiness. I taste deeper flavor, steadier energy, and easier digestibility, while its lower gluten and higher antioxidants let your body feel quietly nourished, not weighed down.
Can I Adapt This Recipe for a Gluten-Free or Celiac-Friendly Version?
Yes, you can, but I’d swap all wheat flours for certified gluten-free blends, make sure your starter’s gluten-free, and keep hydration slightly lower so the dough feels like thick, pillowy batter rather than elastic dough.
How Does Ambient Temperature Affect Fermentation Times for Buckwheat Sourdough?
Ambient temperature speeds or slows fermentation; warmer rooms make your dough rise faster, cooler ones stretch the hours. I watch softness, bubbles, and aroma—when it looks puffed and smells tangy-sweet, I know it’s ready.
Which Spreads, Toppings, or Pairings Best Complement Buckwheat Sourdough’s Flavor?
I’d pair it with tangy goat cheese, honey, and cracked pepper; or smoky salmon, lemon, and dill. I also love it toasted with salted butter, fig jam, or earthy mushroom pâté alongside strong black coffee.
Buckwheat Sourdough Bread
Equipment
- 1 large mixing bowl
- 1 medium mixing bowl
- 1 digital kitchen scale
- 1 measuring jug
- 1 Dough scraper
- 1 Dutch oven with lid or baking stone
- 1 banneton or medium bowl lined with cloth
- 1 clean kitchen towel
- 1 lame or sharp knife
- 1 Cooling rack
Ingredients
- 150 gram active sourdough starter 100% hydration
- 300 gram water room temperature
- 200 gram buckwheat flour
- 200 gram bread flour
- 40 gram whole wheat flour
- 9 gram fine sea salt
- 10 gram honey optional
- 10 gram olive oil optional
- 30 gram extra water for bassinage optional
- 20 gram buckwheat groats toasted optional; for crunch
- 10 gram rice flour for dusting banneton
Instructions
- In the large mixing bowl, whisk together the active sourdough starter and 300 g water until the starter is mostly dissolved.
- Add the buckwheat flour, bread flour, and whole wheat flour to the bowl and mix with your hand or a dough scraper until no dry bits remain, then cover and rest for 45–60 minutes (autolyse).
- Sprinkle the salt over the dough, add the honey and olive oil if using, and squeeze and fold the dough until the salt and extras are fully incorporated.
- If the dough feels very stiff, gradually add up to 30 g extra water, working it in with pinching motions until evenly hydrated but still manageable.
- Over the next 2 hours, perform 3–4 sets of stretch and folds every 30 minutes, lifting and folding the dough from each side to build strength, then cover between sets.
- If using toasted buckwheat groats, gently fold them into the dough during the second or third set of stretch and folds.
- After the final fold, let the dough ferment at room temperature until puffed, slightly domed, and showing bubbles at the edges, about 2–4 hours depending on temperature.
- Lightly flour your work surface, gently turn out the dough, and shape it into a tight round or oval by folding the edges toward the center and tensioning against the counter.
- Dust the banneton or cloth-lined bowl generously with rice flour, then place the shaped dough seam side up into it.
- Cover the banneton and refrigerate for 8–12 hours for a cold proof until the dough has slowly risen and feels aerated.
- About 45 minutes before baking, place the Dutch oven (with lid on) in the oven and preheat to 240°C (465°F).
- When ready to bake, remove the hot Dutch oven, carefully invert the dough onto a piece of parchment so it is seam side down, and score the top with a lame or sharp knife.
- Transfer the dough with the parchment into the Dutch oven, cover with the lid, and bake for 25 minutes.
- Remove the lid, reduce the temperature to 220°C (430°F), and bake for another 18–20 minutes until the crust is deep brown and the loaf sounds hollow when tapped.
- Transfer the bread to a cooling rack and let it cool completely for at least 1–2 hours before slicing.
Notes

Cynthia Weatherford is a seasoned chef and culinary enthusiast who serves as the Recipe creator of Somonday. With decades of experience in the kitchen and a passion for exploring diverse cuisines, Cynthia brings a blend of creativity and technique to every dish. Known for transforming simple ingredients into show-stopping meals, Cynthia believes that cooking is an art form anyone can master. Dedicated to inspiring home cooks, Cynthia shares approachable recipes, pro tips, and culinary wisdom to make every meal memorable.


