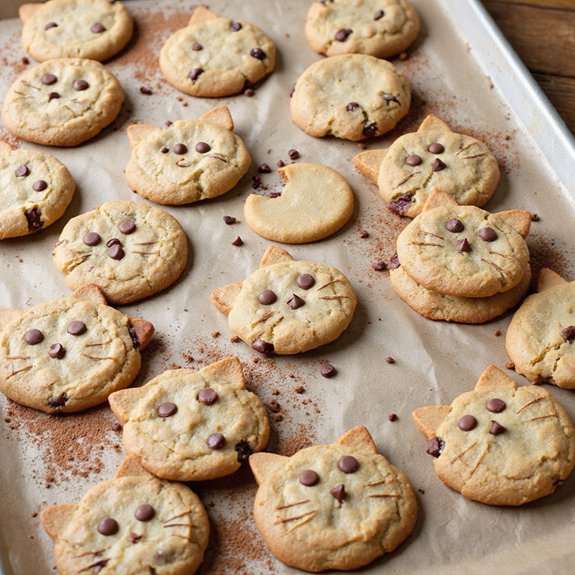
Picture a tray of golden cat-shaped cookies, their edges delicately crisp, studded with glossy mini chips that melt into soft, velvety pockets.
Imagine the warm vanilla-butter aroma curling through your kitchen, the gentle snap at the ear, and a tender, chewy center that feels like a hug in cookie form.
This little whimsy matters to me because baking playful shapes turns an ordinary afternoon into a memory—kids perk up, adults smile, and suddenly the day feels lighter.
They’re perfect for busy weeknights when you need a quick treat, Sunday suppers that deserve a sweet finale, or cozy gatherings where a touch of charm goes a long way.
Once, a rainy playdate teetered on chaos until these cat cookies became our project and our peace—rolling, cutting, and decorating turned the mood around. You’ll love how simple, reliable, and fun they are. Ready? Let’s cook!
Why You’ll Love It
- Uses pantry staples you likely already have on hand
- Delivers adorable cat shapes without special decorating skills
- Chills neatly to hold crisp, detailed edges
- Bakes soft centers with lightly golden edges
- Freezes beautifully for easy make-ahead treats
Ingredients
- 2 1/4 cups all-purpose flour — spoon and level for accuracy (unbleached works well)
- 1/2 teaspoon baking soda — fresh, not clumpy (check date)
- 1/2 teaspoon baking powder — aluminum-free preferred (for clean taste)
- 1/2 teaspoon fine salt — fine sea salt dissolves evenly
- 3/4 cup unsalted butter, softened — room temp gives better creaming
- 3/4 cup granulated sugar — standard white cane sugar
- 1/2 cup light brown sugar, packed — adds moisture and chew
- 1 large egg, room temperature — helps dough emulsify
- 2 teaspoons vanilla extract — pure vanilla for best flavor
- 1 tablespoon milk — whole milk if available for richness
- 1 cup mini chocolate chips — minis keep cat details defined
- 1/4 cup mini chocolate chips, reserved for decorating — press in for eyes/nose
- 2 tablespoons cocoa powder (optional) — for dusting whiskers/ears using a fine sieve
Step-by-Step Method
Cream the Butter and Sugars
Beat softened butter with granulated and brown sugars until light and fluffy, about 2 minutes. Scrape the bowl once to guarantee even mixing. Aim for a pale, creamy texture to aerate the dough. This step helps create tender cookies with a slight lift and soft centers.
Combine Dry Ingredients
Whisk flour, baking soda, baking powder, and salt in a separate bowl. Break up any lumps for an even mixture. Keep this bowl nearby to add in stages. Properly blending the dry ingredients guarantees consistent rise and keeps the cookie texture uniform.
Blend in Egg and Vanilla
Add the egg and vanilla to the creamed butter mixture. Beat until smooth and fully combined, about 30 to 45 seconds. Avoid over-beating. A cohesive, glossy mixture helps the dough come together easily and prevents separation during baking.
Alternate Dry and Milk
Add half the dry mixture to the bowl and mix just until incorporated. Pour in the milk and mix briefly. Add the remaining dry ingredients and mix until a soft dough forms. Stop as soon as no dry streaks remain to avoid tough cookies.
Fold in Mini Chips
Switch to a rubber spatula and fold in 1 cup mini chocolate chips. Distribute evenly without overworking the dough. Mini chips hold details better than regular chips. Reserve extra mini chips for decorating faces after cutting shapes.
Chill the Dough Discs
Divide the dough in half. Flatten each portion into a disc. Wrap tightly and chill for 30 minutes. Chilling firms the dough, limits spreading, and helps cat shapes stay crisp. If the dough softens while working, re-chill briefly.
Preheat and Prep Pans
Heat the oven to 350°F (175°C). Line two baking sheets with silicone mats or parchment paper. Prepare a lightly floured rolling area. Have a cat-shaped cutter ready and a small bowl of flour for dipping the cutter to keep edges clean.
Roll to Even Thickness
Work with one chilled disc at a time. Roll on a lightly floured surface to 1/4-inch thickness. Rotate the dough occasionally to prevent sticking. Keep thickness even for consistent baking. Lightly flour the rolling pin if needed.
Cut Cat Shapes Cleanly
Dip the cookie cutter in flour, then cut close together to maximize dough use. Transfer shapes to prepared sheets, spacing about 2 inches apart. Gather scraps, re-roll gently, and cut again. Avoid overworking to keep cookies tender.
Add Eyes and Nose
Press a few reserved mini chips into each cat for eyes and a nose. Place chips gently to avoid distorting edges. If dough warms, chill the tray for 10 minutes. Chilled shapes bake cleaner and keep sharp ear points.
Bake to Just Set
Bake one sheet at a time for 9 to 11 minutes. Look for set edges and slightly soft centers. Pull earlier for softer cookies or wait for light golden edges for crisper results. Rotate the pan once if your oven bakes unevenly.
Cool and Finish Details
Cool on the sheet for 5 minutes, then move cookies to a rack to cool completely. Optionally dust cocoa powder through a fine sieve to accent ears or whiskers. Store airtight up to 4 days, or freeze baked cookies for up to 2 months.
Ingredient Swaps
- Dairy-free: replace butter with equal amount vegan butter or refined coconut oil; use plant milk (almond, oat, soy) for the 1 tbsp milk.
- Gluten-free: use a 1:1 gluten-free all-purpose baking flour blend; chill well to help shaping.
- Egg-free: substitute 1 flax egg (1 tbsp ground flax + 3 tbsp water, rested 5–10 min) or 3 tbsp unsweetened applesauce.
- Lower sugar: reduce granulated sugar by 2–3 tablespoons; texture stays tender due to brown sugar.
- Budget/availability: use all granulated sugar if no brown sugar (add 1 tsp molasses if you have it); swap mini chips with finely chopped regular chocolate.
- Flavor swaps: add 1/2–1 tsp cinnamon, or replace 1/4 cup flour with cocoa powder for chocolate cat cookies.
You Must Know
- Doneness • If edges look pale and centers glossy at 9 minutes, pull the tray and let carryover finish 5 minutes on the sheet; the bottoms should be light golden and the tops set but soft for chewy cats.
- Troubleshoot • When shapes spread or lose ear detail, chill cut cookies on the tray 10–15 minutes until firm to the touch; cold dough holds crisp outlines and keeps ears/whiskers defined.
- Scale • For 12 cookies (half batch), use 1 1/8 cups flour, 3/8 cup butter (6 tbsp), 6 tbsp sugar, 1/4 cup + 2 tbsp brown sugar, 1/2 egg (25 g beaten), 1 tsp vanilla, 1.5 tsp milk, 1/2 cup mini chips; time cues stay the same, but watch doneness starting at 8 minutes.
- Flavor Boost • To deepen chocolaty notes without making the dough darker, swap 2 tbsp flour for cocoa and add a pinch (1/8 tsp) espresso powder; you’ll get richer aroma and balanced sweetness.
- Make-Ahead • For freshest party timing, portion and cut shapes, freeze flat until solid (2–3 hours), then store airtight up to 2 months; bake from frozen and extend oven time by 1–2 minutes until edges set.
Serving Tips
- Arrange in a circle on a platter; add a small bowl of cold milk.
- Serve with vanilla ice cream sandwiches between two cookies for feline “ice cream cats.”
- Pair with hot cocoa or chai; dust cocoa “whiskers” right before serving.
- Plate on a napkin-lined tiered stand; scatter extra mini chips as confetti.
- Offer a dipping trio: warm caramel, chocolate ganache, and strawberry sauce.
Storage & Make-Ahead
Store cookies airtight at room temperature up to 4 days.
In the fridge, they keep 1 week but may firm slightly.
Make ahead by chilling wrapped dough discs up to 48 hours.
Freeze baked cookies or cut, unbaked shapes for best quality up to 2 months.
Bake from frozen, adding 1–2 minutes.
Reheating
Reheat gently: microwave 1–2 cookies 8–12 seconds.
Oven at 300°F for 5–7 minutes on a sheet.
Stovetop skillet low heat 1–2 minutes per side.
Avoid overbaking; tent to retain moisture.
Hello Kitty Bake-Sale Nostalgia
Those few seconds in the microwave bring back more than warmth—they whisk me to fold-out tables and paper banners at school bake sales, where anything with whiskers sold out first.
I remember the Hello Kitty stickers on coin jars, the rush of quarters, and the sweet steam that fogged my glasses as I lifted lids.
When I bake these cat-shaped chocolate chip cookies now, I press in mini chips for eyes and a tiny bow of cocoa dust—just enough to wink at that pink-and-white icon.
You’d taste it too: buttery edges, soft centers, and a hint of vanilla that feels like a Saturday morning cartoon.
I box them in wax paper, stack the ears upright, and suddenly I’m ten again, grinning behind a table.
Final Thoughts
Ready to bake some purr-fect treats? Give these cat-shaped chocolate chip cookies a try, and feel free to tweak the flavors—add a pinch of cinnamon, swap in cocoa, or play with chip placement for extra-cute faces!
Frequently Asked Questions
Can I Make These Cookies Gluten-Free Without Gritty Texture?
Yes—I can. Use a quality 1:1 gluten-free baking blend with xanthan gum, add 1 tablespoon milk, and chill thoroughly. I whisk it well, roll gently, and bake just until set; the cookies stay tender, not gritty.
How Do I Ship These Cookies Without Breaking the Cat Ears?
Pad the ears: I nestle cookies back-to-back, wrap each in bubbles, then sandwich between parchment and two snug cardboard sheets. I fill gaps with crinkle paper, double-box, label “Fragile,” and ship fast to preserve buttery freshness.
What Altitude Adjustments Are Needed for High-Elevation Baking?
At 3,000–7,000 feet, I reduce sugar 1–2 tablespoons, increase flour 1–3 tablespoons, add 1–2 teaspoons milk, slightly more vanilla, and bake hotter by 15°F. I chill longer; cookies hold shape, edges whisper-crisp, centers tender.
Can Kids Safely Help With Specific Steps of This Recipe?
Yes. I’d invite kids to whisk dry ingredients, measure chips, fold them in, roll chilled dough, and press eyes. I’ll handle mixers, oven, and sharp cutters. We’ll chill trays, wash hands, and taste warm, sweet success together.
How Do I Scale the Recipe for Large Party Batches?
Scale by multiplying all ingredients evenly; I prefer 2x or 3x per batch. Mix in separate bowls, bake one sheet at a time, rotate racks, and chill dough between rounds. Keep chips mini; weigh ingredients for consistency.
Cat Shaped Chocolate Chip Cookies
Equipment
- 2 Mixing bowl
- 1 hand mixer or stand mixer
- 1 Whisk
- 1 Rubber spatula
- 1 Measuring cups set
- 1 Measuring spoons set
- 2 Baking sheet
- 2 silicone baking mat or sheet of parchment paper
- 1 Rolling Pin
- 1 cat-shaped cookie cutter
- 1 Cooling rack
Ingredients
- 2 1/4 cup all-purpose flour
- 1/2 teaspoon baking soda
- 1/2 teaspoon baking powder
- 1/2 teaspoon fine salt
- 3/4 cup unsalted butter softened
- 3/4 cup granulated sugar
- 1/2 cup light brown sugar packed
- 1 large egg room temperature
- 2 teaspoon vanilla extract
- 1 tablespoon milk
- 1 cup mini chocolate chips
- 1/4 cup mini chocolate chips reserved for decorating
- 2 tablespoon cocoa powder optional, for dusting whiskers/ears
Instructions
- Whisk the flour, baking soda, baking powder, and salt together in a bowl and set aside.
- Beat the softened butter, granulated sugar, and brown sugar together until light and fluffy, about 2 minutes.
- Mix in the egg and vanilla until fully combined and smooth.
- Add the dry ingredients in two additions, alternating with the milk, and mix just until a soft dough forms.
- Fold in 1 cup mini chocolate chips with a spatula until evenly distributed.
- Divide the dough in half, flatten into discs, wrap, and chill for 30 minutes.
- Preheat the oven to 350°F (175°C) and line baking sheets with silicone mats or parchment.
- On a lightly floured surface, roll one dough disc to 1/4-inch thickness.
- Cut cat shapes with the cookie cutter, re-rolling scraps as needed to use all dough.
- Place cookies 2 inches apart on prepared sheets and press a few reserved mini chips in for eyes and nose.
- Bake one sheet at a time for 9 to 11 minutes until edges are just set and centers look slightly soft.
- Cool on the sheet for 5 minutes, then transfer cookies to a rack to cool completely.
- Optionally dust a touch of cocoa powder with a fine sieve to accent ears or whiskers once cooled.
- Repeat rolling, cutting, decorating, and baking with the remaining dough.
Notes

Cynthia Weatherford is a seasoned chef and culinary enthusiast who serves as the Recipe creator of Somonday. With decades of experience in the kitchen and a passion for exploring diverse cuisines, Cynthia brings a blend of creativity and technique to every dish. Known for transforming simple ingredients into show-stopping meals, Cynthia believes that cooking is an art form anyone can master. Dedicated to inspiring home cooks, Cynthia shares approachable recipes, pro tips, and culinary wisdom to make every meal memorable.


