Imagine you’re hosting a game day gathering, and you’re searching for the perfect appetizer to impress your guests.
Cheesy bacon potato skins might just be your answer.
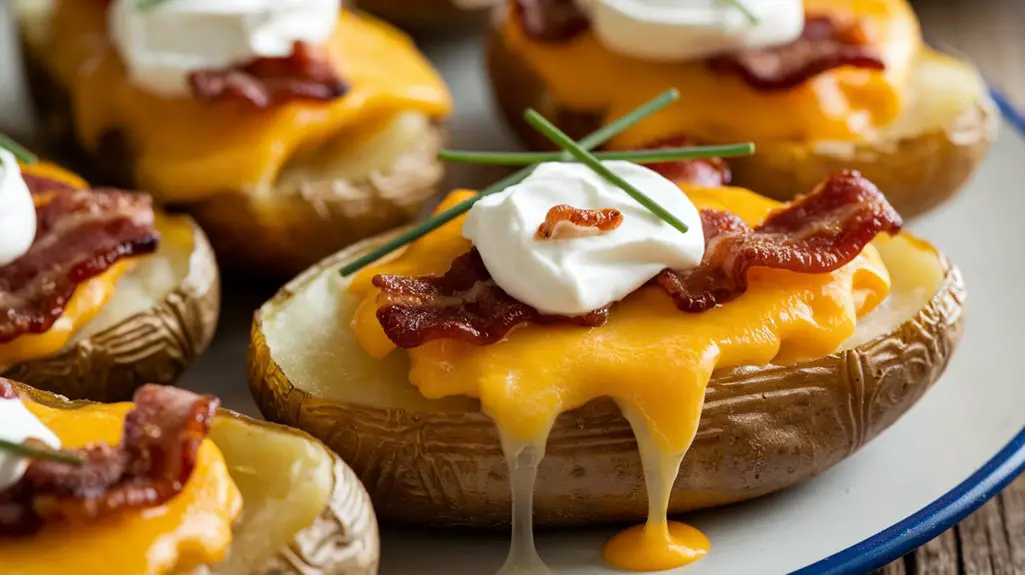
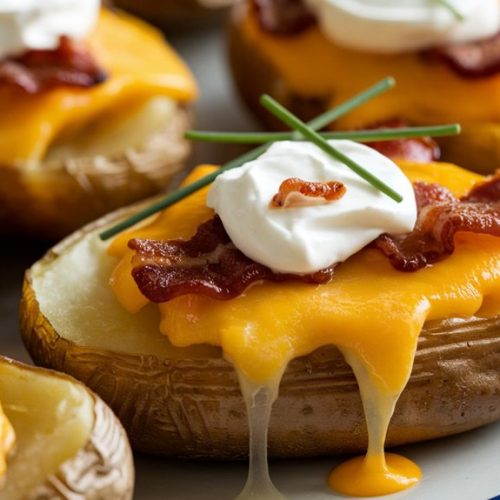
Picture crispy potato shells filled with melted cheddar and savory bacon, topped off with a dollop of sour cream and a sprinkle of green onions.
The satisfying crunch paired with the rich flavors will surely make them a crowd favorite. But there’s more to discover in this recipe.
Kitchen Tools Required
When you’re ready to whip up a batch of Cheesy Bacon Potato Skins, having the right kitchen tools on hand makes the process much smoother and more enjoyable.
Imagine the satisfying crunch of crispy potato skins as you reach for your trusty baking sheet, a staple in any kitchen.
With a sharp knife, you’ll slice through the tender potatoes, each cut precise and effortless.
The mixing bowl becomes your ally as you prepare the bacon bits, the frying pan sizzling with anticipation.
As the cheese grater transforms a block of cheddar into a fluffy mound, you’ll feel like a culinary artist.
Finally, with a spoon in hand, you’ll scoop and fill, creating a savory masterpiece that’s sure to delight.
Recipe
Cheesy Bacon Potato Skins are a classic appetizer that combines the comforting flavors of crispy potato skins, melted cheddar cheese, and savory bacon.
This dish is perfect for gatherings, game day snacks, or even as a starter for a casual dinner.
The combination of crispy bacon and gooey cheese nestled in a baked potato shell is sure to be a crowd-pleaser.
With just a few simple ingredients and steps, you can whip up this delicious treat in no time.
To begin, you’ll need to prepare the potatoes by baking them until tender and then scooping out some of the flesh to create a perfect vessel for the cheese and bacon filling.
The key to achieving the perfect texture is to verify the potato skins are crisped to perfection, while the cheese melts beautifully over the top.
The addition of sour cream and green onions adds an invigorating contrast to the rich flavors of the cheese and bacon, creating a well-balanced dish that’s both satisfying and flavorful.
Ingredients:
- 4 medium Russet potatoes
- 2 tablespoons olive oil
- 1 teaspoon salt
- 1/2 teaspoon black pepper
- 1 cup cheddar cheese, shredded
- 4 slices bacon, cooked and crumbled
- 1/4 cup sour cream
- 2 tablespoons green onions, chopped
Preheat your oven to 400°F (200°C). Begin by scrubbing the potatoes clean and patting them dry.
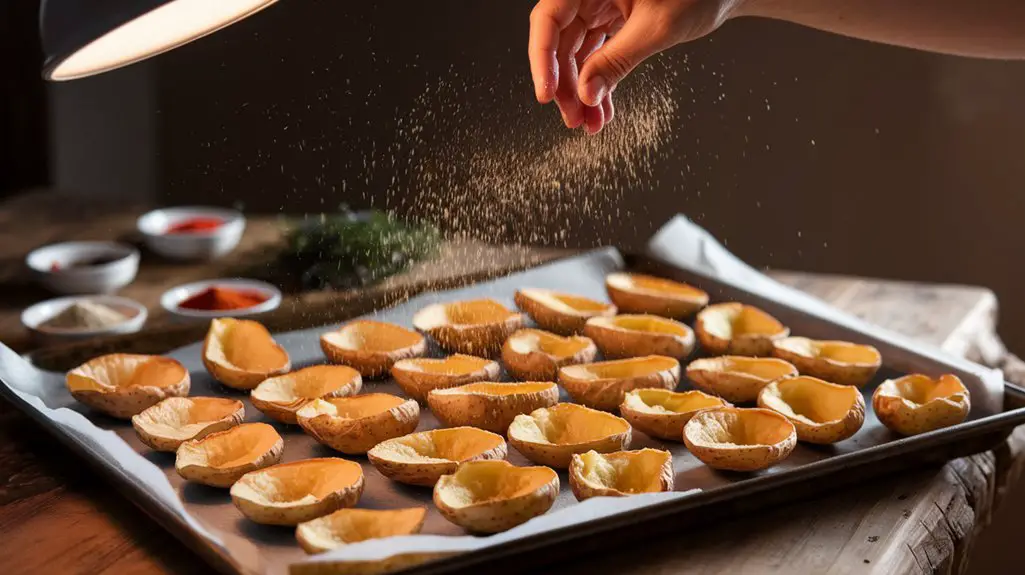
Rub each potato with olive oil, salt, and pepper, then place them on a baking sheet.
Bake the potatoes for about 45 minutes until they become tender.
Once done, let them cool for 5 minutes before cutting them in half lengthwise.
Scoop out the flesh, leaving a 1/4-inch shell, and place the potato skins back on the baking sheet.
Sprinkle shredded cheddar cheese and crumbled bacon evenly into each potato skin.
Return the potato skins to the oven and bake for another 5 minutes until the cheese is melted.
Remove from the oven and top with sour cream and chopped green onions.
For extra crispy potato skins, you can put the scooped shells back in the oven for an additional 5-7 minutes before adding the cheese and bacon.
Make sure to cook the bacon until crispy to enhance the texture and flavor of the dish.
Feel free to experiment with additional toppings like jalapeños or a dash of hot sauce for a spicy kick.
This dish can easily be adapted to suit your taste preferences, making it a versatile and tasty option for any occasion.
Enjoy your homemade Cheesy Bacon Potato Skins!
Cook & Prep Time
Time is of the essence when crafting the perfect Cheesy Bacon Potato Skins.
Envision this: You’ve got guests arriving in just over an hour, and you want to impress with a savory appetizer.
With 15 minutes of prep time, you’ll be scrubbing and seasoning those russet potatoes, feeling the smooth texture under your fingertips as you coat them in olive oil and spices.
Then, let the oven work its magic during the 50 minutes of cook time, filling your kitchen with the irresistible aroma of baking potatoes.
As they bake, the anticipation builds.
Finally, a quick 5-minute rest gives you just enough time to set the table and prepare your toppings.
These 70 minutes are worth every savory bite.
Cooking Steps
As you gather your ingredients for these cheesy bacon potato skins, imagine the warmth of the oven preheating to 400°F, ready to transform simple spuds into a mouthwatering appetizer.
Picture yourself scrubbing the potatoes until they’re spotless, then covering them in a generous layer of olive oil, salt, and pepper—almost like giving them a comforting hug before their time in the heat.
Once baked until tender, let them cool briefly; cutting them open will reveal their steaming insides, inviting you to start crafting your delicious creation.
Step 1. Oven Preheat to 400°F
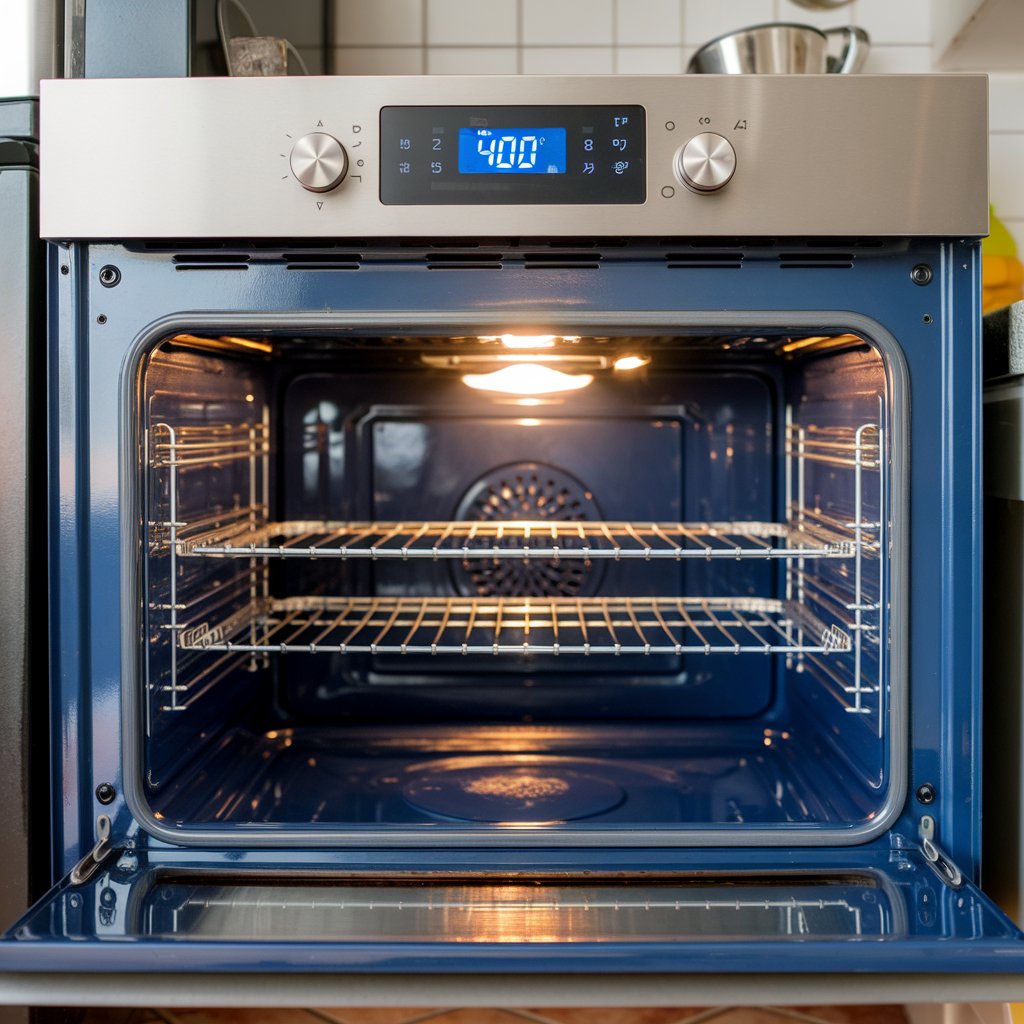
Preheating the oven to 400°F is a simple yet essential step to set the stage for your cheesy bacon potato skins.
Imagine the warmth enveloping your kitchen, a cozy prelude to the deliciousness that awaits.
As you adjust the dial, you’re not just turning on an appliance; you’re beginning a culinary journey.
Think back to gatherings where the comforting aroma of baking potatoes filled the room, sparking conversations and whetting appetites.
That’s the magic you’re about to recreate.
Let the oven hum to life, its anticipation matching yours.
Like an old friend, it reliably promises crispy skins and gooey cheese, with bacon bits adding the perfect crunch.
Your taste buds already know they’re in for a treat.
Now, it’s time to let the magic unfold.
Step 2. Clean and Dry Potatoes

Envision this: you’re standing at the kitchen sink with a sense of anticipation, ready to transform humble Russet potatoes into a savory delight.
The cool water runs over your fingers as you scrub each potato, removing the earthy dirt clinging to their skins.
It takes you back to those childhood moments spent helping in the family kitchen, enthusiastic to learn the secrets of flavor.
Once clean, grab a soft towel and gently pat each potato dry. It’s a small but essential step, ensuring they roast to perfection, with skins that turn satisfyingly crisp.
You feel the smooth texture beneath your hands, knowing this attention to detail sets the stage for a delicious appetizer.
With each motion, you’re one step closer to culinary magic.
Step 3. Season Potatoes Generously
With the potatoes now clean and dry, you’re ready to season them generously, setting the stage for incredible flavor.
Imagine this: the olive oil glistens like liquid gold as you pour it over the potatoes, massaging each one to guarantee a glossy coat.
A sprinkle of salt follows, reminiscent of my grandmother’s kitchen where seasoning was an art, not a science.
The pepper adds a hint of mystery, its aroma sparking memories of family gatherings filled with laughter and stories.
As you work, you can almost hear the crackling of bacon in the pan and smell the cheese waiting for its turn.
This moment is where simple ingredients transform into something extraordinary—a symphony of flavors ready to delight your taste buds.
Step 4. Bake Potatoes Until Tender
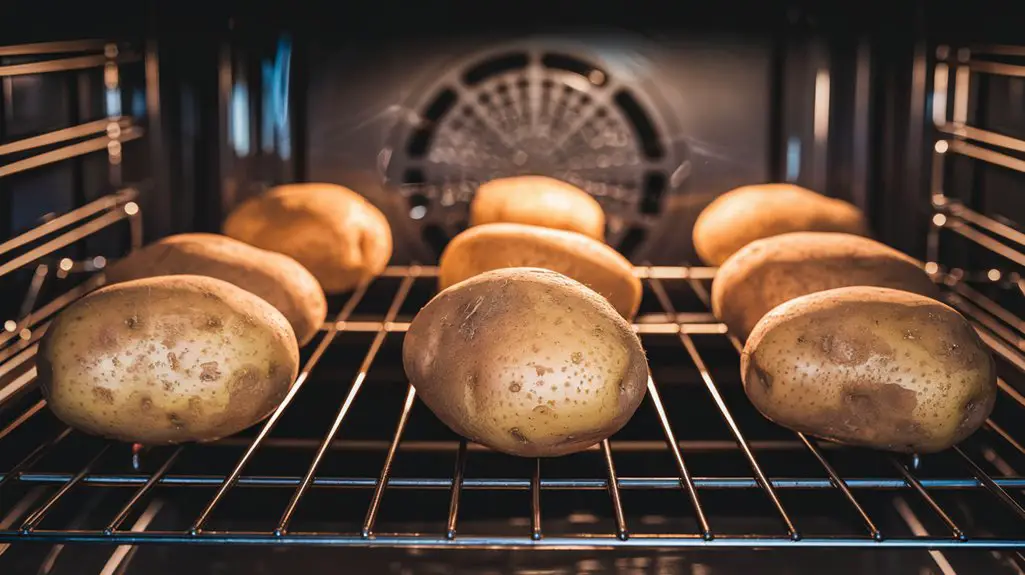
As the oven hums to life at 400°F, you’ll find the anticipation building in your kitchen, promising warmth and comfort.
The scent of olive oil and spices begins to waft through the air as you place your well-seasoned Russet potatoes onto the baking sheet.
This moment always reminds me of family gatherings where the promise of a delicious meal brought everyone together.
You watch the potatoes transform, their skins crisping slightly while the interiors soften to perfect tenderness over 45 minutes.
Each minute ticks by, and you can almost taste the creamy potato flesh that awaits.
It’s a time of reflection and excitement, knowing that these humble potatoes will soon become a savory canvas for cheese, bacon, and all things delightful.
Step 5. Cool and Halve Potatoes
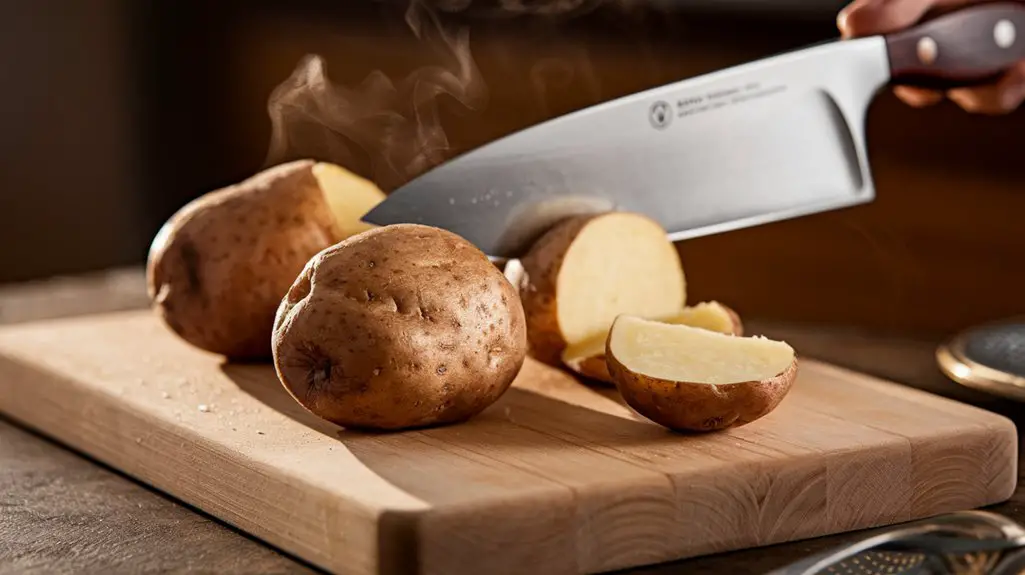
After a brief pause, let the potatoes cool slightly, just enough so they’re easy to handle but still warm to the touch.
You’ll feel the anticipation as you wait, like a child waiting for a cookie to cool.
Once cool, grab a sharp knife and slice each potato lengthwise.
There’s something satisfying about that first cut, revealing the fluffy interior.
- Safety Tip: Use a kitchen towel to hold hot potatoes.
- Visual Cue: Look for steam escaping as you slice.
- Efficiency Trick: Line the halves up for easy scooping.
Remember when Mom taught you how to halve a potato?
Her patience turned a simple task into a cherished memory.
Now, as you cut, keep an eye on the thickness, ensuring a sturdy shell for your toppings.
Final Thoughts
Once you’ve savored the last bite of those cheesy bacon potato skins, you’ll find yourself reflecting on the delightful simplicity and rich flavors packed into each crisp shell.
Remember the joy of pulling them from the oven, the cheese bubbling and bacon sizzling.
Your kitchen filled with warmth, perhaps reminding you of family gatherings or game nights.
Here’s a snapshot of your culinary journey:
| Step | Time Spent |
|---|---|
| Prep | 15 minutes |
| Cook | 50 minutes |
| Rest | 5 minutes |
| Total Time | 70 minutes |
Each bite celebrated the perfect blend of creamy cheese, smoky bacon, and the mild tang of sour cream.
As you clean up, you might already be planning the next occasion to make these delightful bites again, enthusiastic for more shared moments.
Frequently Asked Questions
Can I Use a Different Type of Potato for This Recipe?
You can absolutely try different potatoes, like Yukon Golds. I once swapped them and loved the buttery taste. Just remember, they might cook a bit differently, so keep an eye on them to avoid overcooking. Experimentation’s fun!
How Can I Make This Recipe Vegetarian-Friendly?
You can easily make this recipe vegetarian-friendly by swapping bacon for crispy, seasoned tempeh or mushrooms. I remember doing this at a party once, and everyone loved the rich flavor and satisfying texture. Give it a try!
What Are Some Alternative Cheese Options?
You can swap cheddar with gouda or pepper jack for a unique twist. I once tried smoked gouda, and it added a rich depth. Don’t be afraid to mix cheeses; it’s like a flavor adventure!
How Can I Store Leftover Potato Skins?
You’ve got leftover potato skins, huh? Pop them in an airtight container, then refrigerate. When hunger strikes, reheat them in the oven at 350°F until crispy. Once, I tried microwaving, but they turned soggy—lesson learned!
Can I Prepare Potato Skins Ahead of Time?
Absolutely, you can prepare ahead! I remember prepping mine a day early. Just bake, scoop, and store them in the fridge. When guests arrived, I added toppings and baked them fresh. They were a hit!
Cheesy Bacon Potato Skins
Equipment
- 1 Baking sheet
- 1 Mixing bowl
- 1 Frying pan
- 1 Spoon
- 1 Knife
- 1 Oven
- 1 Grater
Ingredients
- 4 medium Russet potatoes
- 2 tablespoons olive oil
- 1 teaspoon salt
- 1/2 teaspoon black pepper
- 1 cup cheddar cheese shredded
- 4 slices bacon cooked and crumbled
- 1/4 cup sour cream
- 2 tablespoons green onions chopped
Instructions
- Preheat the oven to 400°F (200°C).
- Scrub the potatoes clean and pat them dry.
- Rub the potatoes with olive oil, salt, and pepper.
- Place the potatoes on a baking sheet and bake for 45 minutes until tender.
- Let the potatoes cool for 5 minutes and then cut them in half lengthwise.
- Scoop out the flesh, leaving a 1/4-inch shell.
- Place the potato skins back on the baking sheet.
- Sprinkle cheddar cheese and crumbled bacon evenly into each potato skin.
- Return the potato skins to the oven and bake for another 5 minutes until the cheese is melted.
- Remove from the oven and top with sour cream and chopped green onions.
Notes

Cynthia Weatherford is a seasoned chef and culinary enthusiast who serves as the Recipe creator of Somonday. With decades of experience in the kitchen and a passion for exploring diverse cuisines, Cynthia brings a blend of creativity and technique to every dish. Known for transforming simple ingredients into show-stopping meals, Cynthia believes that cooking is an art form anyone can master. Dedicated to inspiring home cooks, Cynthia shares approachable recipes, pro tips, and culinary wisdom to make every meal memorable.